


DIYP tests out the new SpyderX Elite – Datacolor’s “fastest and most accurate” monitor calibrator
Feb 12, 2019
John Aldred
John Aldred is a photographer with over 25 years of experience in the portrait and commercial worlds. He is based in Scotland and has been an early adopter – and occasional beta tester – of almost every digital imaging technology in that time. As well as his creative visual work, John uses 3D printing, electronics and programming to create his own photography and filmmaking tools and consults for a number of brands across the industry.
Share:

Along with camera profiling, monitor calibration is one of the most vital things a photographer can do to ensure their work looks the way they intend it to look throughout the whole imaging process. There are various devices out there for calibrating monitors, and now a new one has been added into the mix.
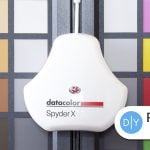
Yesterday, Datacolor announced the new SpyderX Pro and SpyderX Elite, adding to their lineup of monitor calibration tools. They say it’s their fastest and most accurate calibration device to date. Well, I’ve had a SpyderX Elite here for the past couple of weeks, so let me tell you about my experiences with it.
What’s the big deal with monitor calibration?
As mentioned, the whole point of calibrating your monitors is to help ensure accurate and consistent colours throughout your photography workflow.
If your monitor isn’t displaying the correct colours, then you don’t really know how your adjustments are affecting the image, and when you get your prints back from the lab, they’re not going to look the way you thought they would. The colour and contrast can be way off from how you perceived it on your monitor.
Even if you’re only going to be posting your photographs online, when others see your image, they may see strange colour casts because their uncalibrated monitors are off in a different direction. And while calibrating your monitor won’t help other peoples screens, their eyes and brains are used to how “normal” colours look on their screens. So, when you calibrate your screen and edit your colours accurately, when it pops up on their screen, to their eyes and brain, it’ll look right.
For compositing, you also need accurate colours to ensure that you can better match colours between different elements of your composition.
Monitor calibration deals with all of these issues by ensuring that your monitor is showing the colours that your software (like Photoshop) thinks it is. And that’s where devices like the SpyderX Elite come into play.
My brief history with the Spyder
I feel like this needs a short explanation so you can see where I’m coming from, why my expectations weren’t very high for the SpyderX Elite, and why there might be some surprise in my tone later on in this review.
My history with Spyder calibration device hasn’t been that great. My introduction to monitor calibration devices was when the Spyder2 was supposed to be the pinnacle of monitor calibration technology. I bought the Spyder2 Express. A little less expensive than the higher end models, and it only supported a single monitor, but it was supposedly just as accurate.
After installing the software and letting it do its magic, my monitor’s colours changed drastically. I thought “Wow, look at that difference! My screen must have been way off!”. So, now it’s perfect, right? Well, not really, no.
After making an order at a rather respectable UK print lab, the colours were way off from what they were supposed to be. So I borrowed a friend’s i1 Display 2 and a Spyder3 Elite and calibrated with those to compare. My colours changed massively again with each. The Spyder3 Elite also didn’t seem to reflect the colours of the prints in the “calibrated” monitor. But when I used the i1 Display 2, the files coming up on my screen that I’d sent to the lab were near identical to the prints I was holding in my hand.
So, I bought my own i1 Display 2 and stuck with it until last year, when I got the Spyder5 Elite. Surely they’ve got this calibration thing figured out by now, right? That would be another no.
While some users seemed to be having some measure of success with the Spyder5, every time I ran the calibration I’d get very different results to the previous run. I could run it over and over on the same system, and I’d get different colours every time. It didn’t seem to like my Nvidia graphics drivers at all.
When Datacolor reached out to me recently and asked if I’d like to give the new super SpyderX Elite a try, I thought, “sure, why not?”. After all, the press release they sent to me made some pretty bold claims about colour accuracy, speed and ease of use.
I wanted to see if they were true.
First impressions
On opening up the box, the contents were pretty sparse. There’s a card insert telling me where to download the SpyderX software and where I could find support. Then, obviously, there was the SpyderX Elite unit itself, packed in a plastic vacuum formed cavity with a neatly wound and velcro strapped USB cable. Below this was a sticker containing the device’s serial number to install the software.

Datacolor says that the SpyderX has been completely redesigned from the ground up, so I thought I’d see how it looked side-by-side against my Spyder5 Elite.
On the top you can see the form factor is a little different. It still has that familiar overall shape, but it’s been flipped upside down, elongated slightly and given some sexy sleek curves – perhaps alluding to the claimed speed improvements?

But what about the business end? The part that actually looks at your scren in order to determine what colour it’s putting out? Well, that’s changed quite drastically.

The Spyder5 Elite looks to have some sort of grid over its sensor, presumably to help read the pixels more directly while trying to eliminate off-angle bleed from neighbouring pixels – imagine how a grid helps to “guide” the light being put out by a softbox, only in reverse.
The new SpyderX Elite, on the other hand, has a giant single lens right in the centre. It looks very familiar, but unless it starts calling me Dave, I’m not going to get worried.
With that, let’s get onto those three big claims.
Ease of use
For me, ease of use includes the initial setup and configuration of the software that goes along with the device. And that was a bit of a breeze. As the SpyderX section of the Datacolor website was not live at the time I was testing this, I was sent a link to what was then the current version of the software. Installing it was an absolute breeze. Run the setup, click next 5 or 6 times, wait a couple of minutes, then hit Finish. Job done. Simples.
Once it had completed, the software loaded up, and basically told me that I’m running the default windows profile and should calibrate my display, which I then did.
This, too, was very straight forward, with easy on-screen instructions. After choosing to calibrate my display, I’m presented with a handy checklist of things to do in order to get the best results.

The lighting conditions in this room, are typically daylight. Either I’m using Spekular LED lights, daylight balanced LED lights up in the ceiling, or the lights are off completely, with just the glow of the screen to keep me company.
After going through the list and hitting next, we’re asked what type of display we want to calibrate. Gone are the days of it asking whether we’re using a CRT or an LCD panel. Now it just assumes it’s some kind of flat panel display and it wants to know what LED tech it uses.
I first ran this on my ASUS ZenBook Pro UX550VD, which contains a 100% sRGB IPS screen. So, I chose Wide LED.

As this was the first screen I was calibrating, I didn’t want to try and colour match it to another display, and I didn’t want to deal with the “Expert Console” to really start tweaking, so I went with the Step-by-step assistant, as this is the option that most users will choose.

Next, what type of calibration we want to do. Do we want to do a full calibration, a quick recalibration, or just check the calibration we’re already running? We can also choose the gamma, white point and brightness setting.

And then finally we’re asked to place the Spyder on our monitor and click next to begin the process.

All very simple and straightforward. So, when it comes to ease of use, it is very easy with no complicated forced questions or settings that less experienced users might not understand.
Now, on to the next claim…
Blazing speed
My past experience with monitor calibration devices is that they’re typically quite slow, taking anywhere from around 4 to 10 minutes to complete the cycle through all of the colours and brightness levels.
But I told it to go, and it went through its motions.

I figured it would take a while, but once I saw the progress bar racing across the screen, it became immediately obvious that it wasn’t going to take long. In fact, it took less than about a minute and a half.
To be sure I wasn’t imagining things, I ran it again. And, yes, this thing is crazy quick.
I ran it the second time around on my ASUS VivoBook Pro N580GD. now, this laptop contains a TN panel, not a wide gamut IPS one. So I knew it would never get it perfect, but I wanted to see how quickly it ran.
Both of these laptops contain an Nvidia GTX1050 GPU. The ZenBook Pro has a 7th Generation Core i7 4 core 2.8Ghz CPU. The VivoBook Pro has an 8th Generation Core i7+ 6 core 2.2Ghz CPU with Intel Optane.
The calibration process actually ran even faster on the VivoBook Pro than it did on the ZenBook Pro. This time it was less than a minute. Whether this was to do with the extra two cores (I wasn’t keeping an eye on the CPU usage) or the fact that I told it that it was using a Standard LED panel rather than a Wide LED panel, I’m not sure.
Either way, it was ridiculously fast.
So far, the SpyderX Elite had passed both of the first two claims. But they mean absolutely nothing if the last one is false.
Highest Accuracy
Datacolor’s press release mentions, multiple times, that it’s the “most accurate”, calibration tool for monitors. It offers “increased colour accuracy” as well as a “significantly higher level of colour accuracy”. The “Highest accuracy”, in fact.
So, I think it’s safe to say that colour accuracy is an important factor that Datacolor wants to get across with the new SpyderX. The fact that it’s said so often would normally stick out for a company that specialises in colour calibration devices, but given the troublesome history that many users have experienced with Spyder devies in the past, it’s understandable that Datacolor would want to emphasise the point if it truly has been fixed.
After running through the calibration on the ZenBook Pro, I could see very little difference in most of the colour. Where I did notice a massive shift, though, was in the reds. Before, some reds had blown out to complete saturation, whereas after calibration, that detail came back quite nicely. Although these are photos of the screen, you can see some quite obvious differences in saturation and hue in the intense reds and greens, and skin looks a bit more like skin.

Comparing to the HP LP2475w wide gamut IPS monitor on my desktop, which was calibrated with my trusty old X-Rite i1 Display 2, the colours were actually pretty close. That monitors’ getting a little long in the tooth now and isn’t quite as bright as it once was, but when it came to the colour and overall level of contrast, I could see very little difference between the two.
Was this a success? I think it might be. After all, this is the goal of calibration. To bring your display to a known standard, so that when other people who’ve also calibrated their displays to a known standard (with any device, not necessarily the same one you used) the images would look largely identical.
And, well, they seem to.
Calibration with the VivoBook Pro while just as painless, and even faster, showed a drastic difference in before and after. But this isn’t a wide gamut display, it isn’t even IPS. It’s just a TN panel, so it’s never going to be perfect. Just moving your head up or down slightly will change the colour and contrast you perceive on the screen. And cameras can’t quite pick up the colour and contrast perfectly from such panels, either. The calibrated view here looks much warmer than it did to my eye, but you can see that there’s an obvious change, despite the white balance in the camera staying on daylight for both images.

But issues inherent with TN panels aside, the SpyderX Elite did an admirable job. It got the screen much closer to both that of the ZenBook Pro and the HP LP2475w on my desktop when looking at the display head-on.
So it looks like Datacolor might have finally cracked it when it comes to colour accuracy. At least, cracked it well enough for the vast majority of users.
Conclusions
As far as Datacolor’s Spyder devices go, the SpyderX Elite is by far the most accurate one I’ve tried so far. Easily more accurate and consistent than my experiences with the Spyder5 Elite. So, all three claims seem to be true. It’s easy to use, it’s fast, and it’s accurate.
My tests for this review only really cover the most common use case. The hobbyist or pro photographer editing from home that needs their display “good enough” (that is, pretty close to the prints from their lab) with the minimum amount of fuss. They don’t want to spend half a day tweaking to get things just perfect with multiple monitors every week or two. They just want to be able to click a button, let it go do its thing, and then they’re done until the pop up reminds them that it’s been a while since they last calibrated and that they should do it again.
And for that type of user, I don’t think the SpyderX Elite is actually a bad choice.
To say I’m pleasantly surprised with the SpyderX Elite would be something of an understatement, given my history with previous model Spyders.
The SpyderX Pro and SpyderX Elite are available to buy now for $169 and $269 respectively.

John Aldred
John Aldred is a photographer with over 25 years of experience in the portrait and commercial worlds. He is based in Scotland and has been an early adopter – and occasional beta tester – of almost every digital imaging technology in that time. As well as his creative visual work, John uses 3D printing, electronics and programming to create his own photography and filmmaking tools and consults for a number of brands across the industry.


Join the Discussion
DIYP Comment Policy
Be nice, be on-topic, no personal information or flames.
6 responses to “DIYP tests out the new SpyderX Elite – Datacolor’s “fastest and most accurate” monitor calibrator”
I’ve always used a Spyder…..Pro3
what was meant to be wrong with them?
People (=the internet cloudsource oracle) say, that all Spyder 3 for screen calibration are the same, just the software varies. That means that once run with Argyll/DisplayCAL, you could easily buy the cheapest device of a series, import the Datacolor corrections in DisplayCal and happily profile away.
People also say the all Spyder 3 for screen calibration use organic filters (“gels”) for measuring the intensities of the prime colors and that they will degrade either faster (if stored in humid, bright and warm conditions) or slower (if stored in a sealed container with silica dry pack) and the anorganic filters (aka. dichroic filters) are far better.
I don’t know what my Nikon DSLR uses for its Bayer filter, at least I don’t store it in a sealed container with silica dry pack and so far (after around 10 years) nothing noticeable has degraded. I know that since I tested it.
I also don’t know why there is an endless number of problems reported with accuracy or – more precise: reproducibility of measurements with Datacolor devices, even when brand new. Among the choices (X-Rite, Datacolor, spectrophotometers, …) the Spyder 3 I’m still using was the only one I could afford. The monitors I have tested it with seem to work fine, no issues about repeating (verifying) a profile run, no issues with color tint, no issues with prints not coming out as planned.
Probably it is just Datacolor’s software that was crappy, however I have to point out that none (yes, NONE) of my profiling runs complete within couple of minutes as John reports. The quickest result I get with Argyll/DisplayCAL would take at least(!) one hour. More around two hours with medium instead low accuracy selected. So I would recommend everybody having problems with Datacolor devices to give alternative software a try. If things still don’t turn out too well, then forget about it.
BTW, DisplayCAL also recommends reasonably brightness levels and guides you to a good starting point in terms of white balance, contrast settings and RGB channel mix. I’m currently sitting in front of a cheapskate Iiyama ProLite XB2483HSU-B2 which – with nearly 100% sRGB coverage does not qualify as “wide gamut display” at all, but in order to achieve minimal correction by the profile, I had to adjust the settings to B37C50R100G92B92. Yes, Brightness to level 37, it came set to 100 originally. RGB levels were at 100 as well.
This to address the point about ‘I didn’t want to deal with the “Expert Console” to really start tweaking’.
I’m also using an NVIDIA GPU in my machine (Win7x64) with a massive 503.26 MB worth of general purpose driver that seems to cover all hardware, NVIDIA has built. Ever. Does not seem to be a problem – however, I switched off all gaming KI, all tweaks the NVIDIA Control Panel applet offers and all other things that could possibly interfere and let the OS do its job with a profile provided by DisplayCAL.
So it could be that there’s one fraction of users who trust on reasonable defaults provided by the stuff they buy and install, which could cause trouble. And there is another fraction of users who dig into things and try to rule out influences that have nothing to do with the hardware itself.
Just my 2ct.
John, I respect your work to the maximum, but now you’re on the wrong track: you compared a completely new technology to the “two worst tools in the world” (i1D2 and Spyder 3) – of course, the new stuff is faster and more accurate – not surprisingly. :) Check out this: https://forum.luminous-landscape.com/index.php?topic=53825.0 All older Spyders calibrates with ~200-250 Kelvins next to the reference, and even worse, the measuring of the dark tones are disastrous. Otherwise, the older Spyders had the drawback of precision, as they had 7 sensors against the 3 or 4 sensors of the other manufacturers: the mapping of the 7 sensors does not follow the characteristics of the human eye. They could no longer do anything else because the technology was not given: in chemical-based tristimulus colorimeters, the absorption filter is a liquid or gel that passes a certain wavelength and filters out the rest at the time, even plastic filters were associated with them, which also changed their optical properties over the time to complete the chaos) are using more modern, non-chemical based glass dichroic prisms / filters. In my opinion, SpyderX should have been compared with BasICColor Discus (which is the most accurate colorimeter on the market today as I know) or with the X-Rite i1 Display Pro (which is the fastest, but accurate with the 2nd – possibly ColorMunki Display) which is the same hardware but 3-4x slower) to compete with the same level of technology. Try any of them with DisplayCAL and you will see a whole new world (literally, on your monitor)! :)
Sorry for my english: not my native language. :)
Good day
I read your review regarding the spiderX. I am currently starting my career in video editing and color grading.
As a result I am purchasing the necessary equipment. The i1 display and the spiderX elite are outside of my budget so my considerations are munki or the spyderX pro.
As I understand they have the same hardware as the higher level tools, they are just software limited. As I understand I can however use displayCal if I need more advanced features like the video calibration targets but as I understand I can just manualy set the settings to resemble rec709 or what I need. Why do I need the targets? Spyder X doesnt support displayCal yet but I’m sure it will in the future?
So my primary question is should I buy the slow but reliable munki or buy the new but risky spyderX pro and am I completely shooting myself in the foot not buying the elite or i1display pro. As buying one of those would stretch my budget very thin.
Thank you very much
Best regards
Francois
Hi Francois,
first I have to say, I did not use it myself up to now. But I have read some good things about an open source solution, which works with nearly every color calibration device out there on the market.
It’s a command linke software called ArgylCMS (https://www.argyllcms.com/) and there is a GUI for it called DisplayCAL (https://displaycal.net/). With them together you should get all the feature from cheaper devices.
This means every feature of the software with the SpiderX Pro for example.
I have to got through it and test it myself. I hope this helps.
Best Andreas
Hi John,
Thanks for the article. As I have the same HP LP2475w monitor, would you please share the results from the calibration? RGB, brightness, contrast. Thanks a lot.