


How to Shoot Sharp Photos on Your Phone in Low Light
Jan 11, 2026
Darlene Lleno
Darlene Lleno brings a unique perspective to DIY Photography as someone who grew up surrounded by camera gear but chose words over lenses. With five years of writing experience, she specializes in photography content that’s both technically informed and genuinely passionate. Growing up with a photographer twin brother meant camera talk was everyday conversation in her household. While he mastered capturing moments, Darlene discovered she preferred being the subject and the storyteller behind the scenes. As a travel enthusiast and mother of two, she understands the importance of preserving life’s precious moments. When not exploring new destinations or writing for DIY Photography, you’ll find her reading or tending to her garden. Her approach to photography writing is refreshingly authentic, she may not be behind the camera, but she knows exactly what it takes to help others capture the shots that matter most.
Share:

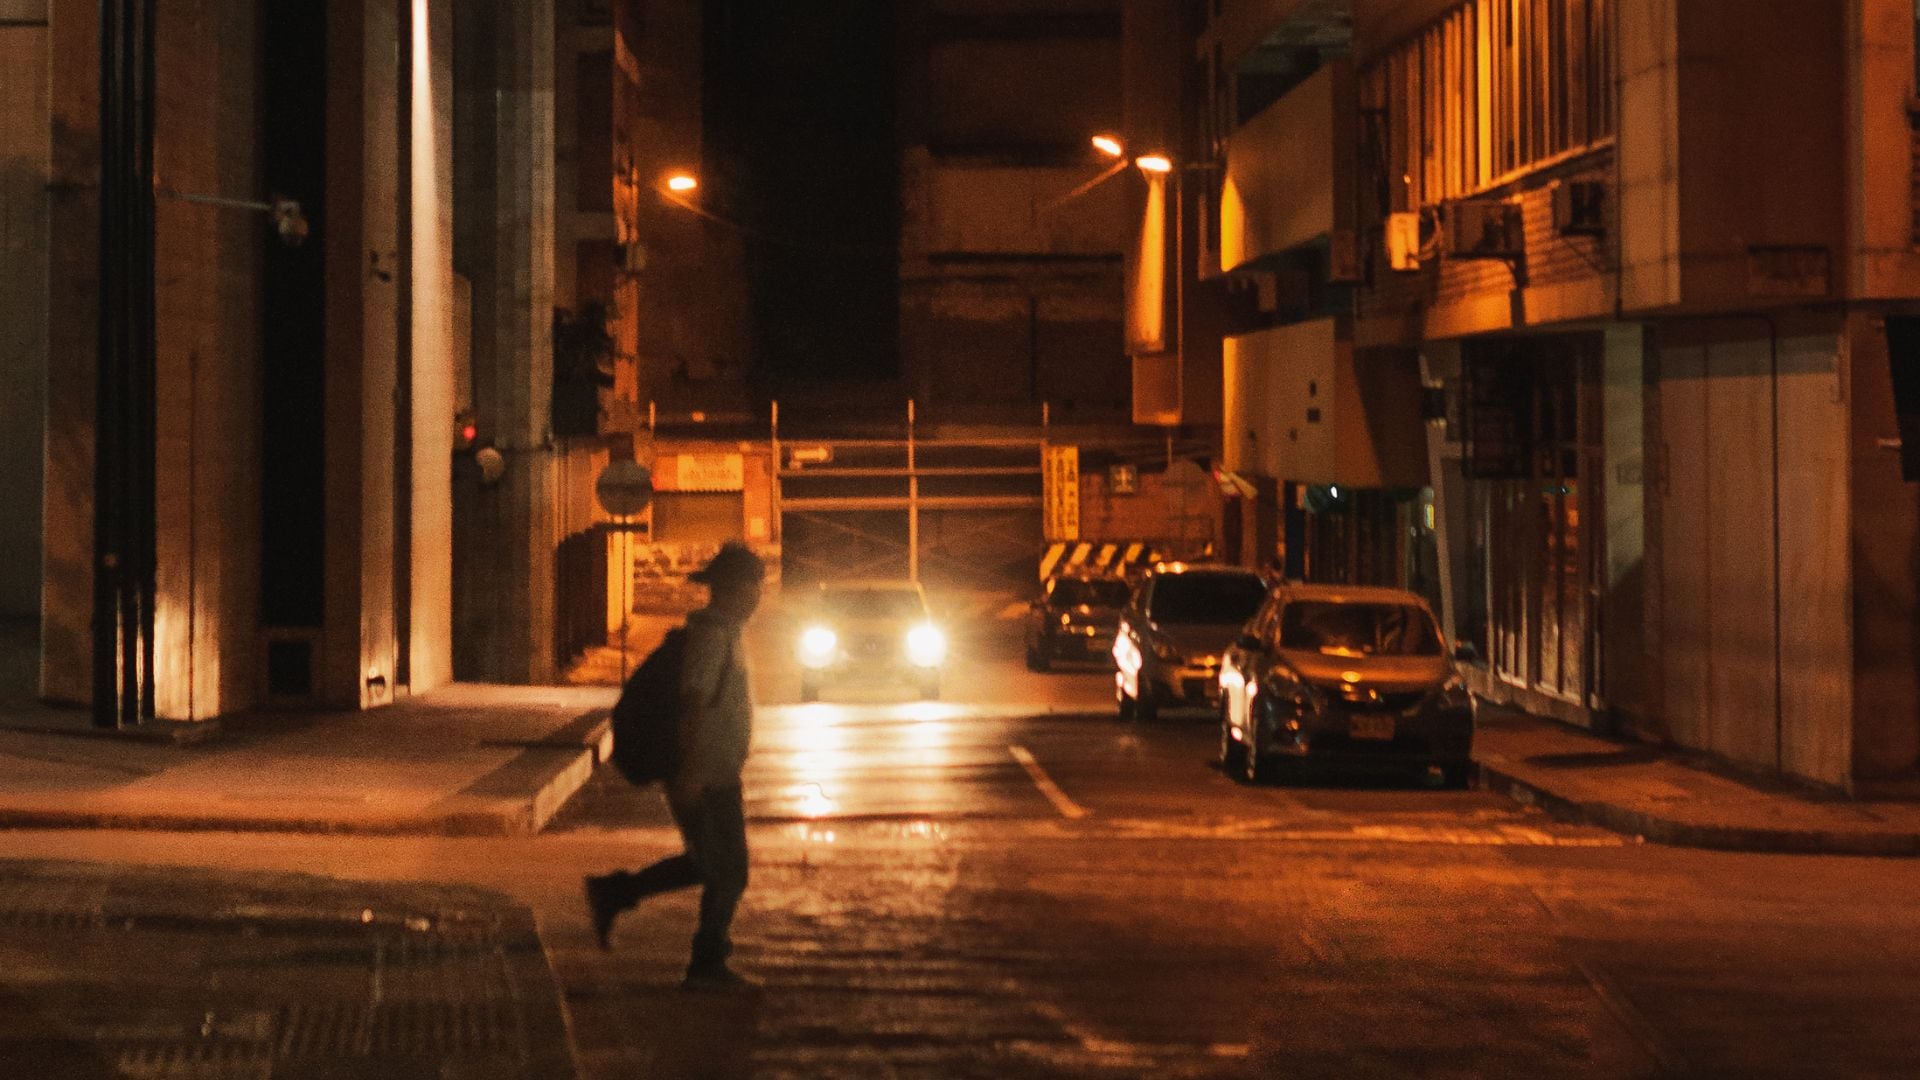
Smartphone low light photography challenges even experienced photographers. Darkness tests your phone’s limits fast. But sharp, clean low light photos are possible when you know the right techniques.
Your phone packs advanced tech specifically built for dark conditions. Night modes, manual controls, and proper stabilization work together. Learn to use them correctly and low light becomes manageable.
Use Night Mode for Clean Images
Almost every flagship phone in 2026 includes AI-driven night mode. This feature transforms dark scenes into bright, sharp images automatically. The technology stacks multiple quick exposures into one clean photo.
Activate Night Mode Correctly
Open your camera app and swipe to More or tap the crescent moon icon. Your phone recognizes low light and suggests night mode. Sometimes you need to activate it manually though.
Many 2026 models let you customize exposure time. Switch from Auto to Max for extreme darkness. Longer exposures capture more detail but require absolute stillness.
The golden rule stays simple. Hold perfectly still while the timer counts down. Your phone’s algorithms compensate for small shakes. Heavy movement ruins everything though.
When Night Mode Works Best
Night mode excels for stationary subjects in low light. Street photography at night, buildings, landscapes. Anything that doesn’t move works perfectly.
Moving subjects create problems in night mode. Multiple exposures blur together creating ghost images. People walking disappear or look transparent. Use manual mode for action instead.
Some scenes look too artificial with night mode processing. Heavy AI brightening flattens contrast and creates unnatural colors. Manual settings give you more control.
Master Manual Mode for Low Light
Manual mode puts you in charge of every setting. Smartphone manual mode prevents AI from making wrong decisions. You balance ISO and shutter speed yourself.
Set ISO Strategically
Start with ISO between 400 and 800 for low light. This range balances brightness with acceptable grain. Go higher only when absolutely necessary.
High ISO above 3200 brightens images but adds visible noise. Grain reduces perceived sharpness dramatically. Keep ISO as low as the scene allows.
Test your phone’s ISO performance before important shoots. Take test shots at every ISO setting. Find where grain becomes unacceptable to your standards.
Remember that some grain beats a blurry image every time. Prioritize shutter speed fast enough for sharpness. Accept grain as the trade-off.
Balance Shutter Speed
Use shutter speeds between 1/60 second and 1/125 second for handheld shots. Faster speeds prevent motion blur from camera shake. Slower speeds let in more light.
Shooting static objects with a tripod allows slower speeds. Try one to two seconds for maximum light gathering. Lower ISO compensates for longer exposure.
People and moving subjects need faster shutter speeds. 1/125 second minimum prevents blur from subject movement. Bump ISO up to maintain proper exposure.
Your phone’s screen shows if shutter speed is too slow. Blurry preview means you need faster speed. Adjust immediately before taking the shot.
Manual Focus in Darkness
Autofocus hunts in low light without finding anything. Manual focus solves this instantly. Tap your screen and slide the focus control yourself.
Look for light sources or high contrast edges to focus on. Streetlights, signs, window frames. These give you something sharp to lock onto.
Zoom in on your screen while setting focus manually. This helps confirm perfect sharpness before shooting. Take your time getting it right.
Lock focus before recomposing if needed. Many camera apps hold focus when you tap and hold. This prevents refocusing after you frame perfectly.
Physical Stabilization Techniques
Even modern image stabilization needs help from you. Your body’s stability directly affects sharpness more than any tech feature.
The Tuck and Brace Stance
Tuck both elbows firmly against your ribs. This creates a stable human tripod structure. Your arms become rigid supports instead of wobbly extensions.
Stand with feet shoulder-width apart for better balance. Weight evenly distributed prevents swaying. Plant yourself solidly before shooting.
Bend knees slightly to absorb body movement naturally. Stiff legs transfer every tiny shift to your hands. Relaxed knees act as shock absorbers.
Pull your phone close to your face for extra contact points. Your forehead provides a third stabilization point. More contact equals less movement.
Control Your Breathing
Breathing moves your entire body more than you realize. Each breath lifts and drops your chest. This motion transfers directly to your hands.
Inhale deeply and exhale slowly before shooting. Take your photo at the bottom of the exhale. Your body reaches maximum stillness between breaths.
Hold your breath only for the moment of capture. Don’t hold too long or you’ll shake from oxygen deprivation. Quick exhale and shoot works best.
Practice this breathing technique repeatedly. It becomes automatic after a while. Professional shooters use this every time.
Find External Support
Look for walls, railings, or solid surfaces anywhere you shoot. Lean your shoulder against walls for instant stability. Rest your phone on railings or stacks of books.
Your body pressed against something solid eliminates movement completely. This beats handheld shooting dramatically. Always scan for support options first.
Car hoods, benches, rocks all work as temporary tripods. Set your phone down and use the self-timer. Zero shake produces maximum sharpness.
Even slight pressure against something stable helps significantly. Your forearm resting on a table edge provides support. Use every advantage available.
Use Remote Triggers
Touching your screen to take photos introduces shake. Your finger pressing the button moves the entire phone. Remote triggers eliminate this problem.
Set your camera timer to three seconds minimum. Step back and hold perfectly still. The timer fires automatically without you touching anything.
Bluetooth remotes let you shoot from any distance. Volume buttons on your earbuds work as shutter releases. Keep your hands completely off the phone.
Voice commands activate the shutter hands-free too. Say cheese or smile to trigger capture. Your phone never moves during the shot.
Essential Low Light Gear
A few affordable accessories transform smartphone low light photography completely. These tools solve problems that technique alone can’t fix.
Magnetic Fill Lights
Compact LED lights attach directly to your phone using magnets. They provide soft illumination without harsh flash effects. Shadows disappear and subjects light up naturally.
Look for adjustable brightness and color temperature controls. Warm light flatters skin tones better than cool light. Dimming prevents overexposure on close subjects.
These lights cost less than quality portable tripods. The investment pays off immediately in better photos. Every smartphone photographer needs at least one.
Battery life matters more than maximum brightness. Choose lights that run for hours on single charges. Nothing worse than dead lights mid-shoot.
Mobile Tripods
Portable phone tripods enable long exposures anywhere. Stability turns impossible shots into easy ones. Sharp night photos require tripods period.
Compact options like the PGYTECH MantisPod fold smaller than water bottles. They fit in pockets easily but provide serious stability. Weight almost nothing but work perfectly.
Look for adjustable legs that adapt to uneven surfaces. Rocks, stairs, and slopes need flexible positioning. Rigid tripods limit where you can shoot.
Ball heads let you angle your phone any direction quickly. Portrait and landscape orientations switch instantly. Smooth adjustment mechanisms matter more than you think.

Lens Cleaning Kits
Dirty lenses ruin low light photos more than anything else. Smudges create massive light flares and hazy images. Fingerprints scatter light reducing contrast and sharpness.
Microfiber cloths remove oils and dirt without scratching. Keep one in your pocket always. Wipe your lens before every important shot.
Screen cleaners and eyeglass cloths work perfectly for phone lenses. Avoid paper towels and shirt fabric. These scratch lens coatings permanently.
Inspect your lens under bright light regularly. You’ll be shocked how dirty it gets. Clean lenses make everything sharper instantly.
Advanced Low Light Techniques
These professional techniques separate great smartphone low light photography from basic shots. Master these and you’ll create images people can’t believe came from phones.
Long Exposure Light Trails
Car headlights and taillights create beautiful streaks with long exposures. Set your phone on a tripod and use manual mode. Choose shutter speeds from four to thirty seconds.
Traffic on highways produces the most dramatic trails. Position yourself above the road for best angles. Bridges and overpasses work perfectly.
Lower ISO to 100 or 200 for clean results. Long exposures gather plenty of light at low sensitivity. Grain-free images look professional.
Experiment with different exposure lengths for varying trail lengths. Four seconds creates short streaks. Thirty seconds produces long flowing lines.
Silhouette Portraits
Backlit subjects against bright backgrounds create stunning silhouettes. Position people in front of sunset skies or bright windows. Manual mode prevents your phone from brightening their faces.
Expose for the background to keep it properly lit. Let your subject go completely dark. Sharp edges and interesting shapes make silhouettes work.
Clean profiles show better than frontal views. Turn subjects sideways for recognizable outlines. Remove distracting elements from backgrounds.
Focus on the edge of your subject for maximum sharpness. Soft silhouettes look muddy and undefined. Crisp edges create impact.
Golden Hour and Blue Hour
Shoot during the hour after sunset for magical blue hour light. The sky glows deep blue while cities light up. This perfect balance creates stunning urban shots.
Blue hour requires slightly higher ISO than daytime. Start around 800 and adjust from there. Shutter speeds around 1/30 second work handheld.
Golden hour before sunset provides warm natural light. Shadows get softer and contrast reduces. Subjects glow with flattering warm tones.
Plan shoots around these times using sun position apps. Arrive early to scout locations and test settings. The best light lasts only minutes.

Indoor Low Light Portraits
Window light creates beautiful natural portraits indoors. Position subjects close to windows for soft directional light. Avoid direct sunlight through windows.
Use manual mode to prevent AI from adding fake brightness. Real window light looks better than computational processing. Keep ISO between 400 and 800.
Reflectors bounce light into shadows reducing contrast. White walls, paper, or foam boards work perfectly. Position them opposite your light source.
Shoot during overcast days for the softest window light. Clouds diffuse sunlight creating even illumination. Harsh shadows disappear completely.
Common Low Light Mistakes
Everyone makes these errors when starting smartphone low light photography. Recognizing them speeds your improvement dramatically.
Relying Only on Auto Mode
Auto mode makes wrong decisions constantly in low light. It cranks ISO unnecessarily high. It chooses shutter speeds too slow for sharpness.
Switch to manual mode for complete control. You’ll get better results immediately. Auto mode works in daylight but fails in darkness.
Learn your phone’s manual controls before important shoots. Practice in safe situations first. Build confidence through experience.
Moving During Capture
The biggest cause of blurry low light photos is movement during exposure. You think you’re holding still but you’re not. Even breathing causes blur.
Use stabilization techniques religiously every shot. Brace against walls, control breathing, use timers. These habits become automatic quickly.
Check every photo immediately after capture. Zoom in to verify sharpness before moving on. Reshoot anything questionable right away.
Ignoring Available Light
Photographers miss existing light sources constantly. Streetlights, store windows, car headlights. These light your subjects naturally for free.
Position subjects near existing light instead of adding your own. Natural light looks better than phone LEDs. Work with what’s already there.
Move around to find better lighting angles. A few steps changes everything. Scout locations before shooting seriously.
Skipping the Tripod
Handheld low light photography has limits period. Some shots require tripods no matter how steady you are. Accept this reality early.
Cheap phone tripods cost ten dollars. That investment opens up entire categories of photos. Long exposures become possible instantly.
Carry a compact tripod everywhere you might shoot. The best camera is the one with you. The best tripod is the one you actually have.
Master Low Light Photography Today
Smartphone low light photography combines technique, gear, and practice. Master stabilization first since it affects everything. Add manual controls next for precise exposure.
Invest in basic gear slowly but strategically. A tripod and cleaning cloth cost almost nothing but transform results. Add lighting later when you understand what you need.
Shoot deliberately in low light rather than spraying and praying. Take fewer photos with proper technique. Quality beats quantity every single time.
Your phone already has the capability for stunning low light photos. These techniques just unlock what’s already there. Practice consistently and you’ll amaze yourself quickly.

Darlene Lleno
Darlene Lleno brings a unique perspective to DIY Photography as someone who grew up surrounded by camera gear but chose words over lenses. With five years of writing experience, she specializes in photography content that’s both technically informed and genuinely passionate. Growing up with a photographer twin brother meant camera talk was everyday conversation in her household. While he mastered capturing moments, Darlene discovered she preferred being the subject and the storyteller behind the scenes. As a travel enthusiast and mother of two, she understands the importance of preserving life’s precious moments. When not exploring new destinations or writing for DIY Photography, you’ll find her reading or tending to her garden. Her approach to photography writing is refreshingly authentic, she may not be behind the camera, but she knows exactly what it takes to help others capture the shots that matter most.


Join the Discussion
DIYP Comment Policy
Be nice, be on-topic, no personal information or flames.