


How I shot a photo of an octopus hogging an action figure – A lighting breakdown
Aug 4, 2016
Carlo Orlandi

We love it when our readers get in touch with us to share their stories. This article was contributed to DIYP by a member of our community. If you would like to contribute an article, please contact us here.
Share:
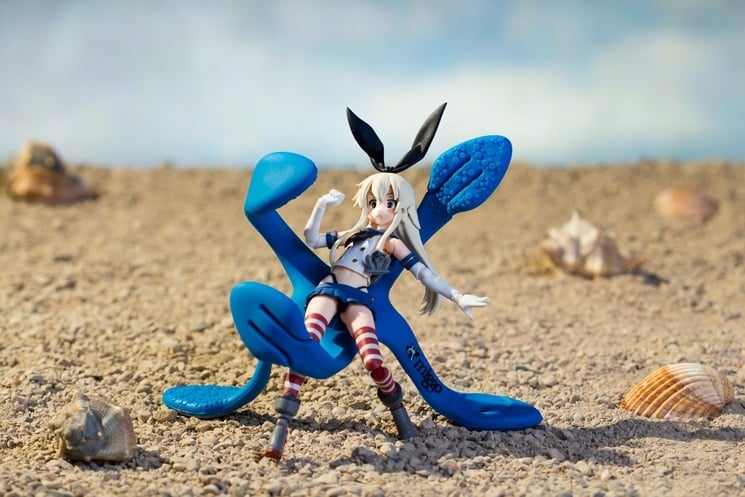
With the heat of August, I thought that nothing will beat making a small beach set photo in the chill studio. In this product shot, I am going to use three lights to simulate outdoor sunlight for a small scale product octopus attack shot.
I am going to use a Miggo Splat , a small stand which kinda looks like a 5 armed octopus. Given this similarity I decided to make a light hearted photo using an action figure I own.
Gear and setup

The photograph was taken with a Canon EOS 550D and a 100mm f / 2.8 Macro lens. I used a Cactus V6 to sync the setup.
- The main flash is a Cactus RF60 – it natively communicate with the Cactus V6 trigger which makes things really convenient. The strobe is gong to mimic the sun, so it is mounted with a 1/4 CTO gel and a honeycomb.
- For fill flash I used a LumoPro LP120 with a 1/2-blue gel, shot through a translucent umbrella in optical slave mode (it will pick up the light from the RF60 and pop)
- The Last strobe is mounted in a Light Blaster and aimed at the background. The Light Blaster has a 1/4-blue gel and a slide with some sky and a a Canon 28mm f/2.8 lens;
- A small paper was used on the left of the shot as a a small white reflector.
Influence of ambient light

Here you can see the influence of the ambient light in the picture. It is almost non-existent. There are some con continuous lights so I can record a view but their impact is very low. Of course, if I could kill the lights all together it would have been better.
Key light

The key light is positioned to the left of the frame, slightly behind the main subject and is quite hard. The grid ensures that the light does not hit the background.
In this case the main light is simulating the sun, so it makes sense for it to very hard shadows. The reason for positioning the strobe on the left side is to help bring out the 3d nature of the model. Lastly, there is a 1/4 CTO gel to add a touch of warmth to the scene – it is a sunny day after all.
Fill Light

With only the key light the shadows are so dark that you lose quite a bit of details of the shadowed areas. This is where a fill light comes in. The light is almost perfectly aligned on axis with the lens and it provides a very soft light. This combination produce very little shadows. (the sun only casts a shadow in one direction, so I did not want to introduce a second shadow).
The fill light has a 1/-Blue gel to simulate the “global light” coming from the sky. This will add a slight blue cast to the shadows.
Lighting the background

The gray background does not give the idea of a sunny scene! Instead of resorting to post-production for the cloudy sky, I used a Light Blaster. The Light Blaster projected a slide with some sky on the backdrop. (actually, it also projected some daisies, but I did not use that part for the photo)

Aside the slide, I also placed a blue gel inside the slide mount to make the projected image have a stronger color.
Adding a small reflector

Finally I added a small white reflector on the left of the frame. In the first photograph it was a bit too close to the scene and casted a small shadow (see bottom left) obstructing the key light.

Moving the reflector a few centimeters to the back the panel shadow disappeared. In many cases a reflective panel can drastically improve an image and open up shadows. Sadly, in this photograph, adding the panel did very little to light the subject and the difference is almost unnoticeable.
Final image ,after photoshop tweaks
I did a small modification to the white balance when I imported the RAW (to make it a bit warmer), and gave it a bit more contrast and saturation.
Then in photoshop, I cleaned both the stand and the action figures from a dust and sand. I also boosted saturation on the sky. As far as the action figure goes, I made her skin pink, increased contrast on the eyes, and removed the joints in the legs.
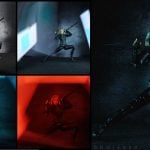
Here is a step by step process animated into a gif

About The Author
Carlo Orlandi is a photographer and a VFX artist based in Rome, Italy. He is also the editor of Playerdue Lighting a free lighting course in Italic. You can see more of Carlo’s work on his Flickr stream, showreel and portfolio.
We love it when our readers get in touch with us to share their stories. This article was contributed to DIYP by a member of our community. If you would like to contribute an article, please contact us here.


Join the Discussion
DIYP Comment Policy
Be nice, be on-topic, no personal information or flames.
One response to “How I shot a photo of an octopus hogging an action figure – A lighting breakdown”
very nice, Carlo, thanks for sharing!