


How to reduce noise and more easily work with “Blend if” layer sliders in Photoshop CC
Jun 13, 2016
John Aldred
John Aldred is a photographer with over 25 years of experience in the portrait and commercial worlds. He is based in Scotland and has been an early adopter – and occasional beta tester – of almost every digital imaging technology in that time. As well as his creative visual work, John uses 3D printing, electronics and programming to create his own photography and filmmaking tools and consults for a number of brands across the industry.
Share:

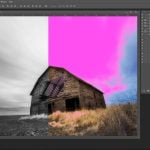
Photoshop’s layer blending options are some of its most powerful tools but also one of its most frustrating, particularly the “Blend if” sliders. Designed to help you blend a layer with those below it based on the luminance of colour channels, actually seeing what’s effect it’s having on a layer often can be difficult.
In this video from the f64 Academy, Blake Rudis shows us a technique for dealing with “Blend if” to be able to easily see what part of the image our layer is covering, and applies it to some noise reduction.
It’s a very handy trick, especially for those who use the “blend if” sliders regularly, allowing you to quickly and easily see the effect of blends on your layers.
For those dinosaurs amongst us, like me, that haven’t yet jumped onto the CC bandwagon and are still using Photoshop CS6, you may find that this technique doesn’t work quite as described in the video.
It can still work, it just requires a slightly different setup.

In order for it to work in CS6, you just need to put your layer inside a group and then clip the colour layer to the group rather than the layer. Make sure the colour layer isn’t also inside the group, or it still won’t work.
Do you use “Blend if” sliders a lot in your work? What techniques do you use to make your life easier when working with them? Let us know in the comments.
[via ISO1200]

John Aldred
John Aldred is a photographer with over 25 years of experience in the portrait and commercial worlds. He is based in Scotland and has been an early adopter – and occasional beta tester – of almost every digital imaging technology in that time. As well as his creative visual work, John uses 3D printing, electronics and programming to create his own photography and filmmaking tools and consults for a number of brands across the industry.


Join the Discussion
DIYP Comment Policy
Be nice, be on-topic, no personal information or flames.