


Projection tricks to make the most out of a small studio
Nov 28, 2016
John Aldred
John Aldred is a photographer with over 25 years of experience in the portrait and commercial worlds. He is based in Scotland and has been an early adopter – and occasional beta tester – of almost every digital imaging technology in that time. As well as his creative visual work, John uses 3D printing, electronics and programming to create his own photography and filmmaking tools and consults for a number of brands across the industry.
Share:

The Light Blaster has become one of my favourite lighting tools over the last few months. I first got to play with one in person at The Photography Show in March. Some of you might remember the cartoon portrait tutorial by Dracorubio posted here shortly afterwards. The image shown in that tutorial was shot at the show, with a Light Blaster projecting onto the backdrop behind me.
Now, Joe Edelman has gotten his hands on one, and put a video together on some of the different ways it can be used. Joe also offers some tips on how to get the most out the Light Blaster, and how to work with it more easily in the studio.
Essentially, the light blaster is a speedlight powered projector with a lens on the other end. It’s a Canon mount, so you can put pretty much any of your Canon lenses on it. You can even use other brand lenses with the use of cheap adapters. Personally, I use a lot of Nikon and M42 lenses with mine, because it’s what I have the most of.
A holder that slips into the Light Blaster allows you to slow in small printed acetate sheets a similar sort of size to speedlight gels. These printed designs are then projected onto whatever the Light Blaster is pointing at. Laser cut metal gobos are also available for use with the Light Blaster, or you can cut your own out of paper or thin card. You can even pop your old 35mm transparency slides in there.

It’s a handy tool in any size studio, but especially so in a small home studio, where you may be limited on space. Being able to dictate the amount of space that the projection covers simply by switching out your lens means you can cover a huge backdrop at a very small distance.
Because you can print whatever you like on a sheet of acetate, or create whatever slides you wish, you’re only limited by your imagination. You can print out whatever design you need to suit the look you’re going for.

You don’t need to print in mono, you can also project colour prints, too. Or, you can always just use a gel to change your dull grey background to any other colour you choose. You can either tape your gel over the end, as shown here, or you can cut them down and sandwich it into the holder along with the gobo itself. The latter is the way I generally prefer to work.

A number of slide packs are available from the Light Blaster website, too, although you can use any 35mm transparencies you’ve shot yourself. The holder that comes with the Light Blaster has a slot for a standard 35mm slide mount. If you don’t have any 35mm slides, you can always get your digital photos or illustrations printed onto slides and mounted very inexpensively.
This then allows you to shoot whatever background you want, right in the studio. Due to the Light Blaster incorporating a standard DSLR lens, you can also throw the background out of focus to simulate depth of field where none may exist. Want to get that “creamy bokeh” look with your 18-55 kit lens? Not a problem with the Light Blaster. Just throw the projection out of focus, and you’re all set.

You could project a landscape shot in the background, for example. Then put it out of focus, and make it look like it’s a couple of miles away. All while shooting at f/8 to keep your subject completely in focus. As long as you match the lighting on your subject to that shown in the scene behind, nobody will ever know it was shot in your living room studio.
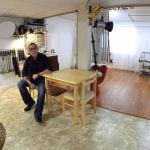
When we were shooting with the Light Blaster at The Photography Show, we were in a very small space. It was maybe 8ft (245cm) wide, shooting only around 6ft (185cm) away from the background. So, we really didn’t have a lot of room at all, and it performed admirably.
The Light Blaster is available for a mere $99 with transparency packs available for $17 each, or $68 for the Pro Gobo Kit. A universal adapter is also available which allows you to mount it to a studio strobe, for when a speedlight just isn’t powerful enough.
Do you have a light blaster? What other tips or tricks can you offer that Joe didn’t mention in the video? What’s your favourite background to project into your shots? Let us know and show off some of your images using the Light Blaster in the comments.

John Aldred
John Aldred is a photographer with over 25 years of experience in the portrait and commercial worlds. He is based in Scotland and has been an early adopter – and occasional beta tester – of almost every digital imaging technology in that time. As well as his creative visual work, John uses 3D printing, electronics and programming to create his own photography and filmmaking tools and consults for a number of brands across the industry.


Join the Discussion
DIYP Comment Policy
Be nice, be on-topic, no personal information or flames.
2 responses to “Projection tricks to make the most out of a small studio”
3D printed light blaster at :
https://grabcad.com/library/strobe-based-image-projector-1
It’s not a freSnel it’s pronounced frenel, dumbass