Dunja Djudjic is a multi-talented artist based in Novi Sad, Serbia. With 15 years of experience as a photographer, she specializes in capturing the beauty of nature, travel, concerts, and fine art. In addition to her photography, Dunja also expresses her creativity through writing, embroidery, and jewelry making.
“Playing with fire” denotes something dangerous and with a possible negative outcome. But in photography, playing with fire can be exactly the opposite. If you do it right, it can lead to fantastic and creative images. Photographer Zach Smidt gave us an excellent example of this. His image named The Ritual is playing with fire at its best.
Zach shared his image with us, along with the details of making – from the preparation to the editing process. And as a special treat, he has shared a few more images from the series.
Zach explained that his fascination with light painting reached its peak two years ago when he stumbled across an article showcasing the incredibly elegant light painting creations of Eric Pare. Inspired by his work, he began his own journey towards light painting. The inspiration led him to create a series of images he shared with us for this article.
You will need
In case you decide to give “playing with fire” a shot (pun not intended), you will need some pretty inexpensive and readily available stuff:
Wireless trigger releases ( Zach uses a pair of Yongnou RF603-C triggers)
A sturdy tripod
A torch: a four foot long, three-quarter inch thick wooden dowel rod with a plain white cotton T-shirt stapled to it
When you are making the torch, there are a few things to remember. First, the using 100% cotton T-shirt is of utmost importance! Any blend of synthetic fiber will melt into molten plastic, which can severely burn the skin. And second, you will need some BBQ starter fluid if you want to get bright and long lasting flame. You need to soak the cotton with it before you light it up.
Making of the image
Zach has shared with us the details of making the pictures. Here you can see the settings and the location he chose. And it’s worth noting that he picked out a place with a large body of water. It provided both great reflections, but also minimized the chances of any unintended damage fire could cause. Here is what the photo shoot itself was like:
In order to create these photos, I try to find a nice landscape setting with a large body of water to create beautiful reflections and to minimize the chances of starting an unintended brush fire. Once I’ve got my location picked out and my composition for the photo chosen, I place my camera on the tripod, attach the triggers, and switch my camera to bulb mode. Bulb mode allows me to precisely start and stop the exposure when I want, which helps to capture only the movements I want to capture. Each exposure is kept as short as possible in order to keep the model in sharp focus and increase the amount of usable frames from each shoot, most exposures only last one to two seconds! With my model wearing a long flowing dress, I crouch down to obscure myself from the view of the camera, light the torch, and then paint my shapes!
SOOC image
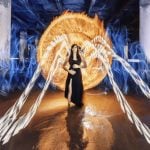
I was encouraged by the massive positive response to my early creations with fire, and I’ve now begun to work a light painting session into almost all of my portrait shoots! This particular shot was created after a long portrait session on Galveston Island in Texas. After a few light painting shots with the model we were working with, my girlfriend and constant muse Juli volunteered to take part and help create something special. Since I generally only shoot with one model, this was a unique opportunity to try a new pose that I couldn’t ordinarily capture! After snapping a few frames we decided on a pose that would resemble some sort of arcane fire portal opening ritual. Several shots and several torches later, it was time to head home and edit!
Editing process
After the successful shoot, it was time for the editing, to get the final result. Zach didn’t leave us without the answer here. He shared his editing process and all the tricks with us, and this is what it was like:
This edit was different from my usual light painting edits due to the fact that I wasn’t obscured behind the model’s dress, instead I was right in between the two girls in all my blurry, frantic light painting glory. After correcting exposure, slightly tweaking the contrast and shadows, I imported the file from Lightroom to Photoshop to begin the real heavy lifting portion of the edit. All the color work was done with the Google Nik collection’s “Cross Processing” module. After the color was to my liking, I used a curves and contrast layer on the reflection to really emphasize the beautiful color and texture of the reflections from the fire. I then used another curves layer on the girls to add contrast and really make them stand out in the image.
Once I had the look I wanted, it was time to remove myself from the image! I decided that attempting to clone myself out from the middle of the fire would be too difficult, as the gradient created by the sunset was hard for me to precisely reproduce. Instead, I headed over to the free stock photo website Unsplash.com, chose a photo of the sky that best matched the mood of my photo, and began the process of blending the sky into my final image. First, I duplicated my background layer and placed the sky underneath. Then, in order to make the sky look less artificial, I switched the blending mode on the sky to “soft light”, which blends in the luminosity of the original sunset, making the blend appear much more natural and smooth. Finally, I add a mask to the top layer and carefully brush in all the areas where I’d like this new sky to appear, and to make myself completely invisible. That’s all of it!
Exposure and color adjustedSky imageFinal image
Zach points out that “with a little patience you can create some stunning light art of your own.” And after reading his guidelines for creating this image, I can only agree. Sure, it takes some time, and you need to be cautious. But seeing the result, it’s definitely worth the effort.
As I mentioned in the beginning, Zach shared a few other shots from the set with us. I can’t decide which one I like best!
I’ve been fascinated by fire ever since I was a kid, so this series was a real treat for me. Also, I love the mystical feeling all these photos have. I hope you enjoyed, and I hope you got inspired for trying something similar yourself. Finally, I’d like to thank Zach for sharing the images a detailed explanation with DIYP.
About the Artist
Zach Smidt is a Houston-based photographer. He is experienced working in a variety of venues, but specializes in portraiture of all sorts, creative work, brand campaigns, and landscape photography. For more of his work, check out his website, follow him on Instagram and Facebook, and subscribe to his YouTube channel.
Dunja Djudjic is a multi-talented artist based in Novi Sad, Serbia. With 15 years of experience as a photographer, she specializes in capturing the beauty of nature, travel, concerts, and fine art. In addition to her photography, Dunja also expresses her creativity through writing, embroidery, and jewelry making.


Join the Discussion
DIYP Comment Policy
Be nice, be on-topic, no personal information or flames.
One response to “How a photographer created fantastic light painting with fire”
Some long exposure fun, during lights&fire show in Poland :)