


How To Photograph Three Indoor Window Light Portrait Styles
Share:

Since it’s the winter that won’t end, I though I’d share a few tips for how to photography three indoor window light portrait styles in the comfort of your own home using any camera.
I’m always amazed by how great window light can look and how easy it is to get completely different looks from such a simple light source – and the best part is that you can stay warm indoors too!
Window Light Portrait Style 1: Silhouette
Taking window light silhouette portraits is easy – put someone in front of a bright light source and snap a photo with pretty much any camera and you’ll get a silhouette.
The hard part is coming up with a concept that makes an interesting silhouette. The focus of a window light silhouette should primarily be the figure of the subject. Since you will be exposing for the background, you also need to be careful to make sure that you have an interesting background.

DSLR Window Light Silhouette Settings
Matrix metering and good old Program Auto (P) will usually produce a silhouette when you are photographing a subject against a bright background. If you want a little more control of your image, use Aperture Priority (A).
Also make sure that you camera’s flash is turned off!
Mobile Phone Window Light Silhouette Settings
Same as for a DSLR – matrix metering, Program Auto (P), and make sure the flash is turned off.

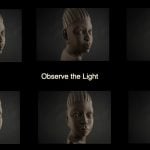
Window Light Portrait Style 2: Semi-Silhouette
Dark and moody with lots of interesting shadows, but not quite a full silhouette. Semi-silhouette window light photos are best used to create a sense of drama and really work great with soft, directional window light.

DSLR Window Light Semi-Silhouette Settings
The easiest thing to do is use the same settings as for a silhouette image – matrix metering, either Program Auto (P) or Aperture Priority (A) and flash off, but then use exposure correction to brighten up the exposure to a level you like. Most cameras have exposure correction up to +2 which is usually enough to turn a silhouette into a semi-silhouette.
One thing to keep in mind is that you need more light than for a silhouette – so an ISO of 400 to 800 is often required (depending on your lens).
Mobile Phone Window Light Semi-Silhouette Settings
Again, the same as for a DSLR – matrix metering and Program Auto (P), then use exposure correction to brighten up the exposure.
I use an app called Camera FV-5 which allows for easy access to the exposure correction settings – or you can dig into your mobile phone’s camera settings and set the exposure correction there (its just a bit of a pain to navigate to every time you want to snap a photo).

Window Light Portrait Style 3: Backlit
For backlit window light portraits, we are intentionally overexposing the heck out of the background and setting the exposure for the front of our subject.
The soft directional window light wraps around the subject and produces very soft and sometimes ethereal looking photos. Backlit window light looks great for fashion and glamor sessions – anything that you want to look soft and smooth.
Using a reflector such as a piece of white foam core or bristol board can really help fill in the shadows on the front of your subject and produce a much higher quality image.

Backlit window light portraits are the trickiest of the three to get a good exposure.
You can try using exposure compensation, but unless you have a camera that has an exposure compensation range of +4 or +5, chances are you are not going to be able to get the scene bright enough.
A better option is to use spot metering and auto-exposure lock. With spot metering, find an area of your scene that is relatively dark and point your camera right at it (the spot metering sensor is right in the middle of the frame). Then, once you have an exposure that you like, hold down auto-exposure lock, re-compose your image and take your photo. If you want to make things a little easier – try this method in Live View.
The best option is to use Manual Mode (M) and the preview screen on the back of your camera to set aperture and shutter speed values that give you the exact exposure you want.
Indoor backlit portraits usually need a pretty high ISO setting to be able to capture enough light to overexpose the background to the exposure level needed – so try ISO 1600 or 3200 if you need more light.
Mobile Phone Window Light Backlit Settings
The best way to capture backlit window light portraits with a mobile phone is to use the spot metering / auto-exposure lock method. In order to do this you will need an app like Camera FV-5 that gives you access to metering modes and auto-exposure lock in one place.
Use the same procedure as with a DSLR – except it is a lot easier to do on a mobile phone with the live preview on the screen.
Because backlit window light portraits are usually low light situations, you might not get a very good quality image with a mobile phone. If that’s the case, a DSLR or mirrorless camera will have much better low light image quality.

Window Light Portraits Without Windows!
Now that you know how to capture the three styles of window light portraits indoors – you can use these same techniques to capture similar scenes outdoors.
Here are a couple examples of window light portraits captured outdoors without a window.


Further Tips for Window Light Photography and Editing
If you’d like a more in-depth explanation of these tips, including post processing techniques using VSCO Cam, Snapseed and Lightroom, I just released a class on Skillshare that covers everything in detail.
We arranged for 50 free enrollments only for DIYP readers – just click here (first come first serve, expires in one week from today).
Or, if you miss the free enrollment, you can also get a 14 day free trial that includes access to this class and other photography classes on Skillshare – just click here.
(This is a novice level class, so if you’re already a natural window light ninja, you’re probably already ahead of the curve.)

JP Danko
JP Danko is a commercial photographer based in Toronto, Canada. JP can change a lens mid-rappel, swap a memory card while treading water, or use a camel as a light stand.
Related Posts
 How To Take A Classic Three Light Studio Portrait With Hardware Store LED Light Bulbs
 Light, shadow, highlight: A guide to window light portraits
 Create 4 Different Background Styles Using Only 1 White Seamless Paper
 These cooking videos shot in the styles of famous directors are just beautiful and hilarious.
Join the Discussion
DIYP Comment Policy
Be nice, be on-topic, no personal information or flames.
2 responses to “How To Photograph Three Indoor Window Light Portrait Styles”
thanks
if I’m photographing a room and it has big windows and I’m using lights to photograph the subject how do I get the color of the sky in windows to show blue skyi