


How to use light, shadows and highlights for dramatic portrait lighting – Part 2
Feb 15, 2020
Barry Mountford

We love it when our readers get in touch with us to share their stories. This article was contributed to DIYP by a member of our community. If you would like to contribute an article, please contact us here.
Share:
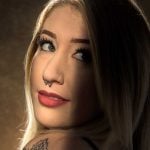
Hey guys! In episode 2 from my Light, Shadow, and Hi-light series, I will take you behind the scenes of the image below. I will break down the lighting setup one by one and I will go through the camera gear used so you can easily recreate this look in your own style. Think of it as a great starting point.
If you haven’t seen it yet, check out Episode 1 first. In this episode, we decided to change up the background to a grey hand-painted canvas and Ashleigh swapped out her outfit to blue denim to keeping the muted tones running through the image.

This time, I started with my main light which was a Godox AD200 (Pixapro Pika200) in a 90cm octobox with a grid fitted positioned at a 45 degree from camera and subject which is a great position to create that nice Rembrandt look. You can see the triangle pattern under the eye on the shadow side of our models face in the photo below. The grid is essential for me when working in such a small studio space, as it helps control the spill of light and allows me to focus my light on the model.

My meter reading for the main light is F8 with a shutter speed of 1/200 second. The ISO is set to 100 and because my model and the light position won’t be moved I won’t need to change these setting throughout this set. Next, I set the hair light/kicker light, which is placed high up behind our model. I am using a standard reflector fitted with a 60-degree grid on a speedlight.

With all the lights remotely controlled from my camera trigger, it is quick and easy to adjust the power output of that light with it being placed high up. When it comes to the hair light it comes down to your taste on the strength of the light. Do you choose a strong hair light or go for a more subtle one? There’s no right or wrong answer here, folks. It’s all in the eye of the creator. I tried both and they both look great but I settled on a more subtle hair light which still gives a nice separation from the background.


Now, I want to control the shadow value, how light or dark I want it, think of this light as your lightroom shadow slider. Now working in my small space, it’s difficult to have more than one light set up at a time. With more room, you could easily set up another octobox behind the camera and use that as a fill light. Or, you could go with a smaller light source depending on how much contrast you want in the image.
I don’t have that luxury of space my studio, so I have made a ceiling lighting rig that allows me to mount my lights, up high. So, for the fill light, I am using a Godox AD600 (Pixapro Citi600) fitted with a standard reflector mounted to the ceiling rig. This is firing against my white painted wall, which is bouncing the light back into our model and lifting the shadows.


I like this set up a lot as it gives you full control of all the aspects of the lighting and allows you to easily switch things up. This really is one of the easier lighting setups, which creates great results and one I recommend you try out!


My choice of camera was the Nikon Z6 and I was using the kit lens 24-70mm f4 which is a fantastic lens and I can not stress enough don’t underestimate your kit lens especially when your shooting in studio conditions, as good lighting yields great results with any lens, I have all my prime portraits lenses but this has become a favourite of late.
Don’t worry if you don’t have the same lights as I am using, you can recreate this look with whatever lights you choose to use but if you would like to check out all the gear used, links will be below. Thanks, guys and I hope you have fun trying this out! until next time.
The gear I used:
- Nikon Z6 & 24-70mm f/4
- Nikkor Z 35mm f/1.8 S
- 5 in 1 reflector
- Godox V850II Speedlite
- Godox AD600
- Godox AD200
- Bowens Flash Bracket
- 90cm Octabox
About the Author
Barry Mountford is a portrait photographer based in Gateshead, England. For more of his work, check out his website, follow him on Twitter and Instagram and subscribe to his YouTube channel. To get in touch, you can look him up on Facebook. This article was also published here and shared with permission.
We love it when our readers get in touch with us to share their stories. This article was contributed to DIYP by a member of our community. If you would like to contribute an article, please contact us here.
Related Posts
 How to use light, shadows and highlights for dramatic portrait lighting – Part 1
 Follow these three tips to create dramatic portrait lighting with a single light
 How To: Dramatic Portrait Lighting Using Nothing But Lamps
 Learn three dramatic portrait lighting setups with just a single speedlight and a 5-in-1 reflector
Join the Discussion
DIYP Comment Policy
Be nice, be on-topic, no personal information or flames.
3 responses to “How to use light, shadows and highlights for dramatic portrait lighting – Part 2”
Great content! Super high-quality! Keep it up! :)
Thanks for sharing!
Wow. Very nice. I use key light most times