


How to make a DIY light support system on a budget
Mar 27, 2024
Mike Piontek

Dunja Djudjic is a multi-talented artist based in Novi Sad, Serbia. With 15 years of experience as a photographer, she specializes in capturing the beauty of nature, travel, concerts, and fine art. In addition to her photography, Dunja also expresses her creativity through writing, embroidery, and jewelry making.
Share:

I came up with this DIY light stand system a few years ago when I needed more light stands. Like most DIY types, I didn’t want to pay a lot for them. Fortunately, I happened to have a lot of 3/4″ PVC and 1/2″ metal conduit lying around. So, I decided to start experimenting. My goal was to come as close as I could to the functions of a retail light stand.
The basic DIY light stand fits the bill except for the fact that the legs don’t collapse. However, since this was a DIY project, I wasn’t limited to manufacturer’s accessories. This meant I could dream up as many different add-ons as I wanted. The simple stand soon grew into a complete light support system.
CAUTION: This is not a quickie one-hour project. There’s a lot to it. I advise you to read through the entire article and then decide if it’s for you or not. You do not need to create everything at once for it to be useful. One DIY light stand will work all by itself. From there, the system can grow as you need or want it to.
Tools
You will need, at a minimum, the following:
- PVC cutters (unless you’re really good with a hacksaw) – here
- A vise to hold pieces for drilling (here)
- A hacksaw to cut the conduit (here)
- A file to deburr the conduit (here)
- A power drill and tap for 1/4 20 thread (here)
- Sandpaper (220 grit and possibly 80) (here)
- PVC primer and cement (here)
Ideally, having the following will make life a whole lot easier:
- Drill Press with vise (here)
- Bench grinder (here)
If you’re already into DIY projects, you likely already have most of these things in your workshop. If not, this part of the tutorial can double as your list of items to purchase.
Before you build (you really need to read this)
There are a few very important steps you must follow in building any part of this DIY light stand system. It is made to support lights; which means weight. Proper building techniques are a must. You MUST properly secure PVC joints. That means sanding, priming, and gluing. The small pieces that connect the joints must be long enough to completely fill the joints.
The second thing that must be done correctly, and I cannot stress this enough, is to properly drill and tap the holes for the 1/4 20 screws.
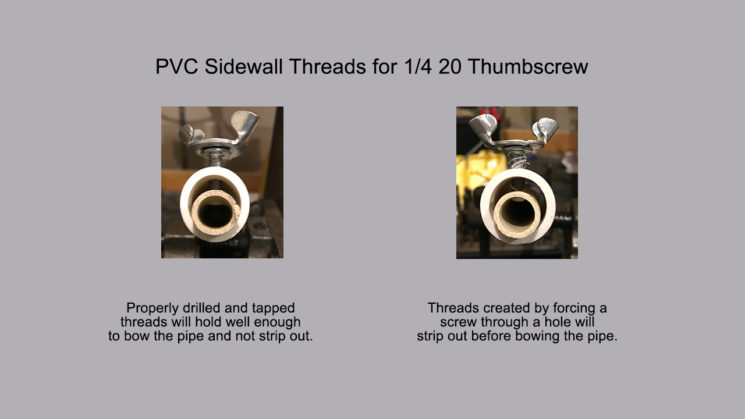
You willl need the correct size drill and tap for 1/4 20 thread. Do not try to just drill a hole into the PVC and force a screw through it. It will not hold! As you can see from the picture, a properly threaded hole is quite strong, even in a single thickness of PVC. All the threaded holes in this project will go through a double thickness of pipe and will stand up to a good deal of torque without stripping out.
To ensure a clean and safe finish, use a file to deburr and smooth the edges of the EMT after cutting it with a saw. If you happen to have a bench grinder, that works even better.
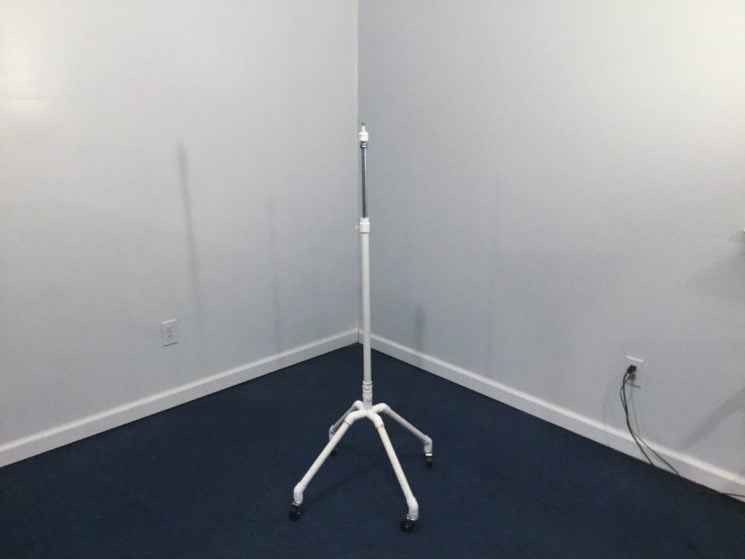
The basic DIY light stand
The stand consists of 4 parts; base, support column, riser, and riser head. Unlike most other DIY projects, this one is not single-purpose. This means that the best part about the stand, and the whole system for that matter, is that all the parts are interchangeable and configurable in just about any way you can imagine.
The total cost of each DIY light stand is about $12.00 to build without casters. Note that the casters will add about another ten bucks, but it still beats a retail stand and dolly that would be over $50.00.
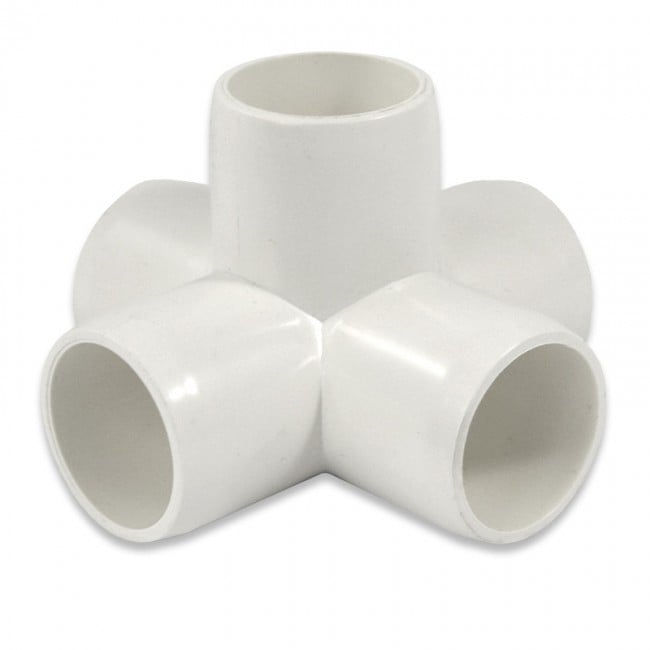
Only one part is not readily available at your local home improvement or hardware store: the center of the base which is a 5-way 3/4″ PVC cross. They are available online from numerous sources for about $2.00 each.
Painting
I’ve found the best paint to use is KRYLON Fusion for Plastic. It doesn’t need a primer coat and is pretty tough if you give the PVC a very light sanding with fine-grit paper first. I’ve found it best not to paint the riser conduit pipes if you plan to use metal thumb screws, as they will destroy any paint. The paint will hold up if you use nylon screws instead of metal. I use them, and they hold well just tightening them with my fingers.
Assembling the DIY light stand
The base
The stand uses 3/4″ Schedule 40 white PVC pipe, 1/2″ EMT (steel conduit), and associated connectors and adaptors. Parts lists for each component are contained in the images. Assembly is straightforward as per the images.
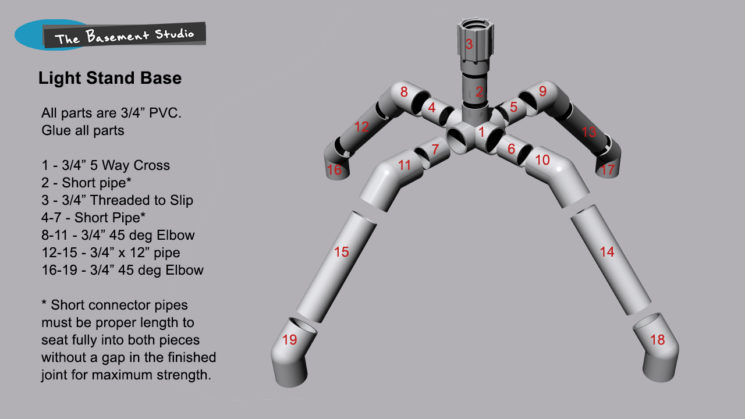
Make sure all the fittings are lightly sanded, and primed, and that you glue them properly. After all, the part has to support all the weight. I throw a sandbag across the top of the base and use it to support a 3lb monolight with umbrellas and softboxes without problems. For stability, 12″ leg pipes are recommended. This way the stand is no more prone to tipping than a retail light stand at the same footprint.
The center support

The center support consists of the PVC column and the riser. Once again, the important part here is to properly drill and tap the hole for the thumb screw. Regardless of the size you make the column, the riser needs to be 6″ longer to prevent it from falling through. If it does you can always get it out by unscrewing the column from the base.
NOTE: I’ve found that some of the 3/4″ to 1/2″ slip adaptors have a ridge inside that will prevent the riser from going through. If this is the case, you can put some 60 or 80-grit sandpaper around a dowel and take it down until the riser goes through smoothly.
The light stand standard head
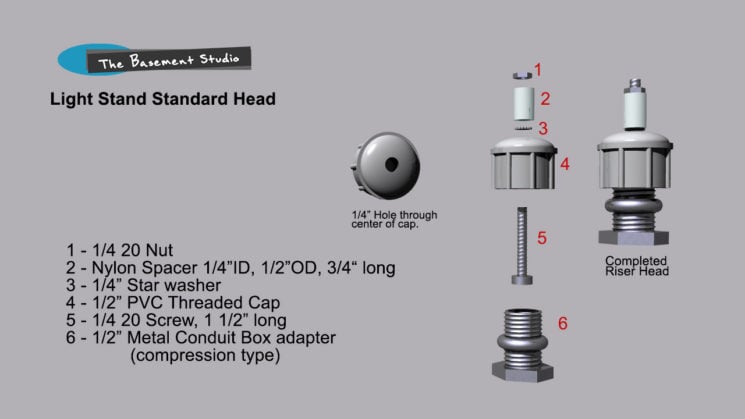
The standard riser head comes as close as I could get to the head on a retail light stand. You need to stick to the sizes shown. The depth of most mounts on lights is about an inch and a half. If you use too long a screw, the light will not properly seat itself to the head. Remember that a small star washer is also important, as it helps keep the spacer from turning.
To assemble the stand, simply screw the support column into the base, set in the riser, and attach the riser head. Keep in mind that attaching the support column to the base requires you only to tighten it to the point where you hear a popping noise. If you go too far, you’ll need a pair of channel locks to remove it. It’ll just depend on how strong your hands are.
The compression fitting on the riser head can be hand-tightened and will not come off. If you don’t trust it, you can always use pliers.
Attachments
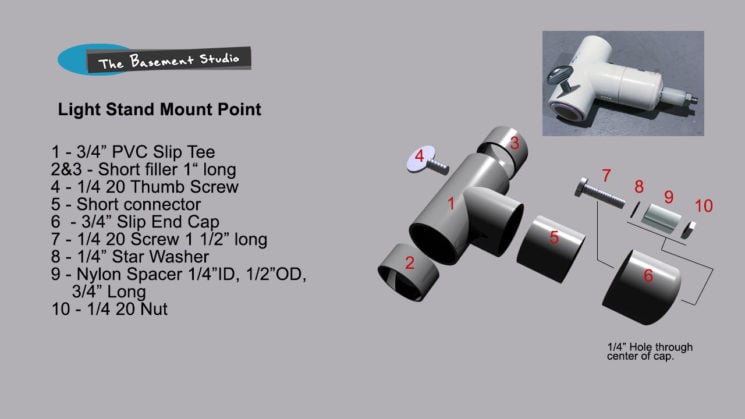
Mount Points
If there’s one thing that makes this system versatile, it is the Mount Point. It is essentially a riser head that can attach anywhere on a riser or crossbar.
The assembly of the mount point is pretty straightforward, as shown in the image. You can put the thumb screw on the back or side of the Tee. I tap both sides, one on each end. This way, the thumb screw can move if it happens to get in the way.
Backdrop Stand
To use as a backdrop stand, you’ll need a couple of 1/2″ threaded, 90-degree conduit elbows. I put the same compression fitting used in the riser head onto one side and use the screw on the other side to secure the crossbar. The crossbar is just a length of EMT cut to the size you need.
I’ve given you all the basics and haven’t even scratched the surface of what is possible. From this point, I’m sure someone will be able to come up with many inventive ways to use and expand this system.
FAQ
How to make a light stand at home?
You can skip the fancy store-bought stands and build a DIY light stand system with PVC pipes and metal conduit. Use PVC cutters, sandpaper, glue, and a drill to build the basic stand. Customize it further to your needs: add wheels and other features to this expandable system later on.
What can I use for a light pole?
You can use PVC pipes and metal conduits to build a light pole. The project requires drilling, tapping, and gluing the pieces together. You can customize the design with additional features like wheels and crossbars. Other than photography, you can use it for any other purpose you can think of.
We love it when our readers get in touch with us to share their stories. This article was contributed to DIYP by a member of our community. If you would like to contribute an article, please contact us here.


Join the Discussion
DIYP Comment Policy
Be nice, be on-topic, no personal information or flames.
4 responses to “How to make a DIY light support system on a budget”
The return of Tinker Tubes?
This is the type of article I come to DIY Photography to read. (Hint, Hint)
Years ago, when I started reading here, there were more of this type of article. It would be great if they did “look back” reposts or had some other highlight of the true DIY articles.
This is the kind of article I come here to read.