


High Speed Primer – The Woosh
Dec 19, 2011
Udi Tirosh
Udi Tirosh is an entrepreneur, photography inventor, journalist, educator, and writer based in Israel. With over 25 years of experience in the photo-video industry, Udi has built and sold several photography-related brands. Udi has a double degree in mass media communications and computer science.
Share:

On the previous post we build all the circuitry needed for complete control over high speed setups and today we will put it to the test. We will recreate one of the images previously done on DIYP (and has been in the title for this series).
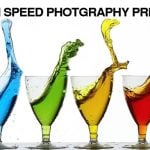
My local Flickr group is a lively and active group (the Hull Pool) and lots of collaboration goes on. The most collaborative image is “Whoosh,” which is the outcome of (to quote Moose) “another evening of technical mucking about with friends” Moose Malloy and mkratty – who were also part of the crossbow games :-) we explained along with the sound trigger.
The setup and image we are about to describe was actually featured on DIYP way back, and I thought it would be interesting to show how we made a similar image using our HSP setup.
Setup And Lighting
We used a photocell trigger with an interrupted laser beam and the adjustable delay unit, constructed by myself, and a ramp and skateboard (with interchangeable decks for ease of changing the glasses) precision-engineered by Mark (mkratty). Paul (Moose_Malloy) suggested the idea and supervised the lighting :-) It’s great when a plan comes together!
Lighting: Paul’s careful reading of “Light Science and Magic” and prior experimentation, led to both the lighting of just the background (so the glasses were through-lit), and to the addition of two vertical black panels to left and right, which used the lensing effect of the liquid to delineate the edges of the glasses to great effect. Genius :-)
Strobe placement: three flash units, all at 1/32 power, aimed at a white background (a bed sheet), fired by radio triggers connected to the photocell trigger. One central under the table, and one each at camera left and right slightly above the subject and snooted.
Photogate Adaptation: By taping over the emitter in the photo gate, and tilting it slightly, I could aim a laser from a DIY spirit level at the collector from a greater distance, and the photogate worked perfectly. The easiest way to aim the laser was to fix it and put the collector on a tripod with a ball-head – easy to adjust and get in the right spot.
Setup
Four glasses are attached to a skateboard on an inclined plane. That is, a plank resting on a box. Just as the “truck” hits a stop-bar at the end, it breaks a laser beam and triggers the flash.


The only lighting here is the spill from the white sheet, reflected around the light garage walls – though they were cranked up to 1/2 power for this setup-shot. Shadows “re-balanced” (!) in post processing…. A Vivitar 283 and a Canon 430ex on stands which can be seen left and right, and a Canon 540ez below the truck, all facing the white sheet. For the real shots, the flashes were dialed down to 1/32 power. The left-hand flash is snooted to prevent light spilling onto the front of the glasses.
The Shoot
We were very pleased to have the new “gate ready” lamp – a green LED – on the control box, which gave a visual indication that the laser was on target pointing exactly at the phototransistor in the optical gate. The picture taking sequence consisted of setting everything ready and camera shutter set to 2 seconds, and the repeated calls…” Lights out! Green Light on! Shutter! Action! “
Once again, adjusting the delay between the beam-break and the flash captures different stages in the “splash”


The other shape of glass produced remarkably similar splash pattern:

Once again, the pattern produced was practically identical between shots when the same length of track and flash delay were used. The “title shot” above was the last of the evening, when a little hand pressure was used to speed up the truck. All good fun!
What Did We Have Here?
We hope you enjoyed this series, if you want to go back and reread some of the posts here is the map for you:
About The Author
 Brian Davies is a photographer and a Retired educationalist based in Hull, UK. You can follow his flickr stream here.

Udi Tirosh
Udi Tirosh is an entrepreneur, photography inventor, journalist, educator, and writer based in Israel. With over 25 years of experience in the photo-video industry, Udi has built and sold several photography-related brands. Udi has a double degree in mass media communications and computer science.


Join the Discussion
DIYP Comment Policy
Be nice, be on-topic, no personal information or flames.