


Here is how Photoshop’s sky replacement handles a night photo
Oct 28, 2020
Ole Henrik Skjelstad
Ole Henrik Skjelstad is a Norwegian math teacher and landscape photographer. He fell in love with photography in 2013 when he got a camera as a birthday present.
Share:

A few days ago I tested Photoshop’s new Sky Replacement feature on a tricky waterfall image. Since Photoshop handled that challenge so well I, started wondering if the same “sky replacement” feature will work the same with a night photo. Well, actually, it was shot in the early morning in Jotunheimen, Norway. The sky, however, was shot in the evening that same day.
I was hanging with Dag Ole Nordhaug, testing the Samyang 18mm. We had some amazing scenery around us, but sadly very little going on in the skies. There were no clouds above, just low hanging clouds and fog rolling from the mountains. I had actually planned to trash the morning image, but when Photoshop released their latest update I changed my mind. It is very difficult to add a new sky to an image when fog and clouds bleed into the sky. How will the “new” Photoshop handle this challenge, I thought to myself. Let’s find out.
The images
Here is the image I started with. I edited the base exposure in Lightroom while keeping in mind that I will swap the sky later on with a night sky.

I shot the night sky image in the evening of that same day:

So those are the two images I am going to blend. Here is an overview of the process.
Sky Replacement
The first thing I did after launching the Sky Replacement tool was to add a group that I named ‘Night.’ That was pretty straight forward. I just clicked on the Folder icon. I may have placed the folder a tad awry, but it is straightforward to rearrange folders and images. Just drag and drop.

Then, I clicked the plus icon to upload an image to the folder. It is also possible to right-click on the folder itself, which launches a pop-up menu where one of the options is ‘Import Skies.’ The first image I added was a RAW file. It took a while for Photoshop to process the RAW file, and it was converted into a PNG file.
Tip: A much better solution would have been to upload a JPG with an edited sky. It would definitely be less time consuming, and the sky would need no further adjustments. With the raw file, I had also to edit the sky.
Confused algorithm
The algorithm got a bit confused with the fact that I did not upload a cropped image containing only the sky, so the first output looked like this:

I just dragged the sky where I wanted it. The sky replacement panel activates the move tool by default.

Almost to perfection
Photoshop blended in the night sky almost to perfection. The blending line along the low hanging clouds is amazing, and some of the stars dimly shine through where the clouds are less dense. Some arbitrary stars placed upon the brightest parts of the mountain is the only issue.

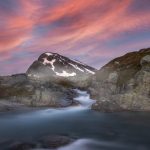
I used the Spot Healing Brush to remove any unwanted stars. This is the finished image, which I have edited to my liking:

And just as a reminder, this is where I started:
Conclusion
I am quite impressed with the way Photoshop blends in a night sky. Photoshop carried out a swift and precise job that would have been very time-consuming to do manually. . I would rather have to clone out a few stars than have to hand-blend images that contain low hanging clouds or fog. Well done, Adobe!

Ole Henrik Skjelstad
Ole Henrik Skjelstad is a Norwegian math teacher and landscape photographer. He fell in love with photography in 2013 when he got a camera as a birthday present.


Join the Discussion
DIYP Comment Policy
Be nice, be on-topic, no personal information or flames.
3 responses to “Here is how Photoshop’s sky replacement handles a night photo”
I’m so in love with the result, as you know. ;)
Thanks so very much, Dunja :) Yes, I know ;)
You may consider to put an unicorn and a flying elephant too. This way nothing would miss.