


We have tested photoshop’s new sky replacement feature – here’s the verdict
Oct 25, 2020
Ole Henrik Skjelstad
Ole Henrik Skjelstad is a Norwegian math teacher and landscape photographer. He fell in love with photography in 2013 when he got a camera as a birthday present.
Share:

The major Photoshop upgrade of October came with several new features. For landscape, cityscape, and architectural photographers, the most interesting update is the Sky Replacement feature. Luminar has had this feature for about a year already, and finally, Adobe has caught up.
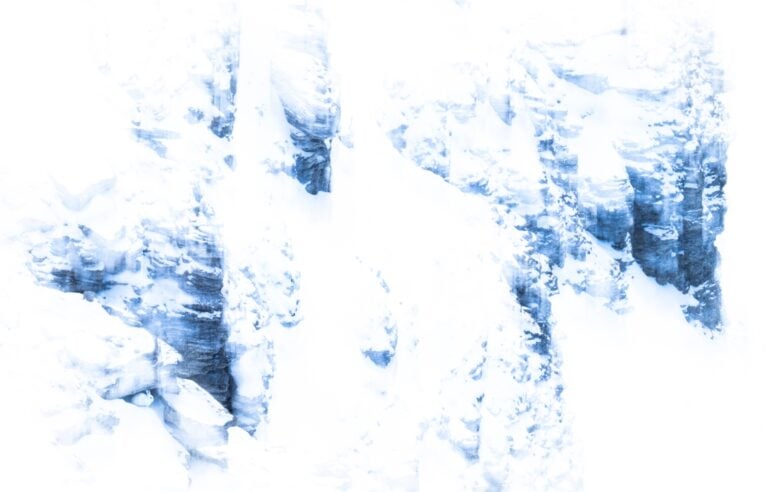
I have a rather tricky waterfall image shot on a gray day with a more or less blown out sky, and I am keen to test out the new feature on this image. How will Photoshop handle all the branches protruding into the sky? Will the algorithm recognize what is the sky part of the image? Blending a sky into this image by hand using masking techniques would most likely have been very time-consuming.
The image is captured in Rondane National Park, Norway, at the end of September 2020. It is a panorama from several verticals.

This is a close-up of the sky, and as you can see, there are quite a few branches set against the sky.

New sky
It is time to replace the original sky. You will find the Sky Replacement option under Edit–>Sky Replacement.

A pop-up window appears, which offers various settings or options for the sky replacement.

The very first thing I did is to pick a sky. Photoshop offers various alternatives, but I can also upload my own skies. In this instance, I used one of the pre-installed skies and opted for a cold blue sky.

Fine-tuning
The next step is to fine-tune everything. I opened up the Sky and Foreground adjustments and played around with the various sliders to see what happens. You can darken the foreground or brighten the sky, or perhaps adjust the sky temperature. If you want, you can make the sky colder or warmer. Since the waterfall image is a panorama, I had to scale up the new sky a tad to cover the old sky.
I also played around with the Fade Edge and Shift Edge sliders to see how that affected the branches protruding into the sky. It is also possible to flip the replacement sky. This option comes in very handy if you would like to use a sunset sky, and it doesn’t match the light direction in the original image.
The Foreground sliders will adjust the area closest to the sky. The brightness slider for the sky and the luminosity slider for the foreground are also important adjustments to avoid edge halos where the sky meets, for example, a mountain.

It is now time to zoom into the image and examine the result.
Preview turned off:
 Preview turned on:

Photoshop has done a marvelous job replacing that old sky. I was happy with the results and clicked OK.
Sky replacement group
Photoshop neatly gathers all the adjustments in a group.

You can now adjust the entire group’s opacity and even add a group mask if you want to. If necessary, you could use a white group mask to paint-out unwanted effects with a black brush. It is possible to adjust each of the layers in the group to my liking. This is what happened when I double-clicked the Sky Temperature icon.

It is a Color Balance adjustment layer that you can fine-tune even more. The down arrow means that the layer is clipped to the layer below, so it only affects that layer.
Here is the Sky mask (alt/opt-click on the mask):

Remember that white reveals and black conceals. It is now easy to see how the mask selects the sky. You can further fine-tune the sky mask if you want to. The trick is to set the brush to the Overlay blending mode and use white and black to paint on the mask to enhance either the darks or the whites.
Just for the fun of it, I also tried a warm sky. Which do you prefer? Warm or cold sky?

Conclusion
It only took me a few minutes to understand the Sky Replacement feature basics, so it is very intuitive and easy to use. I gave Photoshop a challenging image, and the software did a great job adding a new sky to the image. I can only imagine how easy it will be to replace a sky where mountains or buildings constitute the blending line. All in all, I am very happy with the result, and I will not hesitate to take advantage of this new functionality when necessary. What about you?

Ole Henrik Skjelstad
Ole Henrik Skjelstad is a Norwegian math teacher and landscape photographer. He fell in love with photography in 2013 when he got a camera as a birthday present.


Join the Discussion
DIYP Comment Policy
Be nice, be on-topic, no personal information or flames.
31 responses to “We have tested photoshop’s new sky replacement feature – here’s the verdict”
Seems to me its the “lazy photographers way”. Its a fun gimmic. But nothing else i would say.
My thoughts? Less is more with this type of thing. Great that it’s an option, but don’t overdo it. My most likely scenario for this would be if a scene had a great sky that I just couldn’t expose properly, so I exposed it separately and merged the two in. Anything else isn’t my shot.
Thats having it both ways – oh well the sun had gone in so when it came out, oh well it was dark so …..etc also the Luminar version lets you put balloons, mountains, planets, giraffes and unicorns in as well – who doesn’t what that? Now all my prints come with a free game ‘Spot The Unicorn’
You do seem to be trying to convince yourself a little too much – arguing the case with anyone who expresses their PERSONAL opinion, they aren’t suggesting anyone else must agree. Surely your 20 years of experience will have taught you there’s always a range of opinions on any photography related topic and no one has all the answers.
Has anyone experienced the left fourth of the image not getting adjusted? I get a sharp vertical break where no changes to roughly the left quarter are impacted.
I haven’t encountered that issue while testing. The only thing I can think of is that perhaps the sky needs to be scaled if the base image is shot with a high res camera.
Thanks for the response. That isn’t the problem in my case. I saw the same thing come up in a YouTube tutorial, and the presenter didn’t dive into an explanation. He was stumped, too.
I’ll notify a friend of mine who works closely with Adobe. Thanks for bringing this up.
Do you mind sharing the link to the tutorial?
Hi Dean. I’m from the Photoshop team and would appreciate if you’d share the file or screenshot of the issue with me.
You can reach out directly at my first name at adobe dot com.
Thank you,
Meredith
Hi havig now looked at this in depth – fantastic – you need to ensure the scales of the imported file are the same as the one you are using – or very near to – you can stretch it etc but that will degrade its quality somewhat
Thanks for the input! That is what I found out too when I late last evening tried to create an vertical edge situation with the help of a high res pano and one of PS’ default skies. The Scale slider effectively evened out any edges.
I know every photographer has their own view on this. Personally, I think replacing an entire sky is going a bit too far with digital manipulation of a photo. I think it’s fine to adjust parameters to get the best out of a photo like color, contract, exposure. Even the removal of a distracting reflection, or perhaps a minor object is okay (i.e. signpost in an otherwise pastoral picture. But I think a whole scale sky swap out is something a photographer would have to disclose.
too far with digital manipulation of a photo? If I were you I wouldn’t go on the internet shopping sites, buy a magazine, go outside, catch a glimpse of the side of a bus, look at any of your DVD or CD covers, read a book or generally look at anything created digitally then – you know just to be safe.As a Pro I have been doing this for twenty years and no one batted an eyelid – not one
Disclose to whom?
I suppose that is the real issue. If you are selling the work to a newspaper or magazine, perhaps. But as artwork printed and framed, or on Social Media to show your work, I don’t see the point.
Do you warn people that you removed a trash can from a landscape? Or do you leave the trash can?
I swapped out the skies on the photos I took of my house prior to its sale. Do you think I need to tell the buyers that the skies only look like that once in a while?
All of this sort of fakery stuff has killed my interest in landscape photography. I enjoyed it for many years after meeting and learning from Galen Rowell. I wonder how he would react to something like this feature.
He would love it – all that Darkroom nonsense sandwiching negs – gone at the touch of a button but I assume you had the same heart failure when you discovered Auto Focus!!
If you are referring to contrast control masks for printing in like Cibachrome, you are right, good riddens. Galen went to all digital printing by 2001, I took a class with him that year, trashed my enlargers. But he NEVER tried to pass off a composition landscape photo as the real thing. I am sure he would be fine with HDR, as that simply adjusts for limitations in the photographic process, but he would not resort to full on fakery.
Agreed. I especially get ticked off with the people who insist on putting in the Milky Way, particularly from a vantage point where it would (a) not be visible under any possible circumstances (my brother was an amateur astronomer, so I tend to pick up on that quickly) or (b) not be visible because of light pollution (such as a cityscape or a building that is in the heart of a metropolitan downtown).
How does what other people shoot kill your interest in shooting it yourself? Why does it matter what other people choose to do with their images?
My take: i am not opposed to composite work. Art is art. Whether you want to convey a scene as you experienced or as you imagine the potential of the scene could be, i say, fair game. However, if it’s a composite, it should be disclosed in my opinion (unless it’s obvious composite art) I believe in having integrity also being able to create what you want without being dishonest and having people call you out on a lie. But, we don’t live in a perfect world, so, game on! Lol
People are assuming this fantastic new tool only applies to amateur landscape photographers – thats a narrow view – if you’ll pardon the pun!!! As a pro I have been making comps for twenty years and no-one batted an eyelid. You name I’ve done it. 1 Example Advertising – I did a Costa Coffee shoot for Coca Cola last week. We replaced the sky, three reflections, put in tarmac, removed a bush, put in two cars, a pedestrian and a dog – the week before we did a Ford commercial – the car wasn’t even there – did we replace the sky – yes using techniques we have been using for two decades – I ve not had the chance to look at this new tool – but if it does it with a press of a button – I’m in. And everytime you open a magazine – so are you
I present to the jury Exhibit A Picture 2
https://www.countrylife.co.uk/nature/nine-dazzlingly-beautiful-images-from-landscape-photographer-of-the-year-2020-219582
I rest my case for the defence M’Lud, Guilty as charged – but you have to agree – lovely pictures
Conclusion: with Photoshop’s new sky replacement feature, Luminar 4 with all their bugs, has nothing that makes unique. In other words, the new Ps Sky Replacement is the fatality to Luminar 4 (^^)
Also, for those complaining that sky replacement is not “photography” or too much, so are the effects people use in wedding photography, portraits, etc. even Milky Way shots. It’s all part of your creative vision (and editing skills). Unless you shoot solely in Jpeg and never touched a slider other than sharpness, noise, chromatic aberrations and lens distortion, then you really can’t complain much about sky replacement being too much.
Not at all true. Adjusting brightness, contrast etc to make the camera “see” more like the eye sees is reasonable, akin to dodging and burning or the zone system in traditional photographic work flows. Spotting, removing chromatic abberation etc are just correcting for flaws in the process. Adding fake skies, fake people, or fake animals, or subtracting same is just plain fake. Call it what it is, “Digital art”, but don’t call it photography.
I agree. Editing just adds creative vision. Unless these are submitted to competitions etc.. where a good editor gets undue advantage, photo additions IMHO should not be unwelcome! I know many photographers who enhance the overall picture through some editing and manipulation! Nothing wrong with that!
Couldn’t agree more with you. Its a cinch to use the feature and apply to photos. Though I don’t do this level of photo manipulation, my single trial yielded excellent result. Applied the sky and then used Tilt-shift blur to add the right level of bokeh.
https://flic.kr/p/2jYDRNL
Oh come on, every time an article comes out about some kind of filter or auto option the wingnuts come out of the woodwork.
People are comparing apples and oranges and demanding that they are the same, well ya, they are fruit.
1. Photography realism: taking photos and portraying them as “as shot’. Now there is so much gray area in this that it just comes down to how puritan the view demands. The camera/processing are tools used to present what the photographer saw and recorded from what was in front of the lens.
2, Photography art: YOU MAKE WHATEVER THE F**K YOU WANT THE FINISHED IMAGE BE!!
As an artist with paint and brush, a photographer uses lens and light. Shine in my brothers and sisters, lets make the world a better place.
Leave it to us photographers to turn this into a philosophical issue. ;)
The only question here should be the quality of the tool. How well does it work?
What I’m seeing in these recent updates in Photoshop is a clear attempt by Adobe to remain competitive with consumer/enthusiast software. Sky replacement was the big thing that Luminar had going for it, and it seems as if Adobe has met or exceeded its competition. Adobe lagged behind the competition on these “automated” features for quite a while, and it’s good to see them taking some of the difficulty out of what now should be simple tasks. This capability should be a welcome addition for those photographers who might value the option.
I was shooting around Temple Square on this gorgeous spring day, pure azure sky, and I heard this wedding photographer tell the couple that since they were in the shade, the sky was going to be blown out, but she would replace it with some nice clouds. First, there was nothing wrong with the sky. Second, wedding photos are as much historical record as they are art, so why create an “alternate” reality? Finally, this shooter obviously didn’t know how to use fill flash, which would have allowed her to have both the newlyweds and the sky properly exposed together.
Sorry, that’s not a function I will ever use. For me, being an ethical photographer is far more important. I teach photography, and I insist that my students fix a bad image in the camera, not on a computer. That means using tools like polarizing filters, understanding light, and paying attention to every small detail at the moment the photograph is made.
I don’t believe in wasting time behind a screen trying to create an image that was never actually seen. Replacing a sky in a bad photograph—or replacing any element, for that matter—should not be part of ethical photography. If the image isn’t there when you press the shutter, then the real problem isn’t the software… it’s the photographer.
Ignacio A