


Realistic Composites does a great job at teaching you how to realistically compose
May 24, 2016
Stefan Kohler
Stefan Kohler is a full-time retoucher. He’s from Germany and likes bacon. In the last years, he built up a broad community around his retouching classes at the Infinite tool’s website.
Share:

Realistic Composites (basics) – €85.00 by Adrian Sommeling is a workshop that teaches you how to create lively, funny composits from start to finish. And when I say start, I mean from pre-planning a shoot so your photos are “composing ready”, until putting the last coloring touch on the final piece.
As someone who is just starting out with compositing (not to be confused with composting) I totally loved it, here is why:
Structure & what to expect:
Here is the first thing you’ll notice: Adrian is a really nice and relaxed teacher. He’s not rushing through a script and really takes his time to reiterate the important steps when it’s necessary. After each couple of major steps Aad (yea, I call him Aad) stops for a moment to summarize what has been done so far and points out what’s worth remembering. This can be a real help, as the amount of knowledge bits and bobs and random tips shared can easily be overwhelming.
If that sounds a little lengthy to you, don’t worry. Each chapter has its own video (complete with a short intro where Adrian goes over some basics), so you don’t have to watch the whole thing as one. Chapter 7 is the most interesting for you? Just jump right in and go back later, if you need additional information about chapters 1 to 6.
All in all there are 11 chapters you can choose from ( a total of about 4.5 hours):

Adrian recommends using Photoshop CS5 or higher, but CS4 works also (not as comfortable, but still…). At the end he also uses Nik Color Efex, which you can download for free.
Even though Adrian is a professional, advanced beginners shouldn’t have a problem following him through his tutorial. You should already know how to work with layers and masks, though. And that’s the great thing about this course: You learn how to create professional composings with simple techniques. That also keeps it interesting for advanced photoshop users as well and might lead to one or two epiphanies and even some changes in their workflows (it sure as hell gave us a couple of things to think about…).
Oh and of course all the necessary files are also included, so you can “work together” with Adrian :)

If you are not sure, here is a quick chapter breakdown
1. As you would expect from an introduction, Adrian explains what he’s about to show to you in the DVD, what devices he uses and which Photoshop functions you should be comfortable to work with. He also goes into great detail about how his style affects his way of working and preparing for a final piece. Thing like finding the right lighting setup to minimize post processing; trying to tell at least a little a story with each image; and several other tips. Yea, we are not gonna spill everything here.
2. Chapter two is all about how to get a “composite ready” image right in camera as much as possible. Adrian shows how important it is to have matching focal lengths, focus, posture and height in your separate images if you want to bring them together and create a realistic result. With the help of some neat illustrations, he also explains how to “read” an image for example, how to figure the perspective of a background. He then uses his pre-shot background (the one he uses in the tutorial’s image) as a live example and analyzes it to learn how to simulate the lighting conditions in his studio. Regardless of the compositing part, learning how to break a scene like this was awesome.
3. This theory gets applied in chapter three, when Adrian takes you into his studio. He shows and explains how and why he sets up his lights and let’s you sit in while he shoots his model for the planned composite image.
4. After the shooting, the raw images get pulled into the RAW processor and you learn how to pre-process an image for a composite á la Adrian e.g. bring back details to highlights and shadows, reduce noise and get rid of chromatic aberrations.

5. In chapter 5, it gets really interesting: Adrian doesn’t use just one model shot for the ocmposite, but rather he combines multiples shots to get the exact posture and expression he had in mind. Changing the head? No problem… With simple tools likes masks and the clone stamp, he quickly assembles the perfect set of “model parts” and shows you how easy that can be along the way.
6. The finished “model” then gets cut out of her native background with the help of ye good ol’ quick selection tool complete with some great tips on how to get the most out of it and save some time. After some additional minor tweaks with the liquify tool to give the model a “flying” posture, she finds her new home on the pre-shot background mentioned earlier. And here’s the point you see the benefits of getting the lighting, perspective etc. right in camera, because it just looks good right off the bat.
7. Before moving on with the work, Adrian really goes into detail about light and shadow. The easy-to-understand schematics Adrian uses to illustrate how these two work together totally won me over. The show how different light sources affect the shadow(s) of a single object and what the human brain perceives as “real” and “correct”. He also shows how not only light gets reflected, but also color and how to calculate the direction and size of a realistic shadow. Turns out that this is a critical part, because without proper shadows, images just look weird and cut-and-pasted.
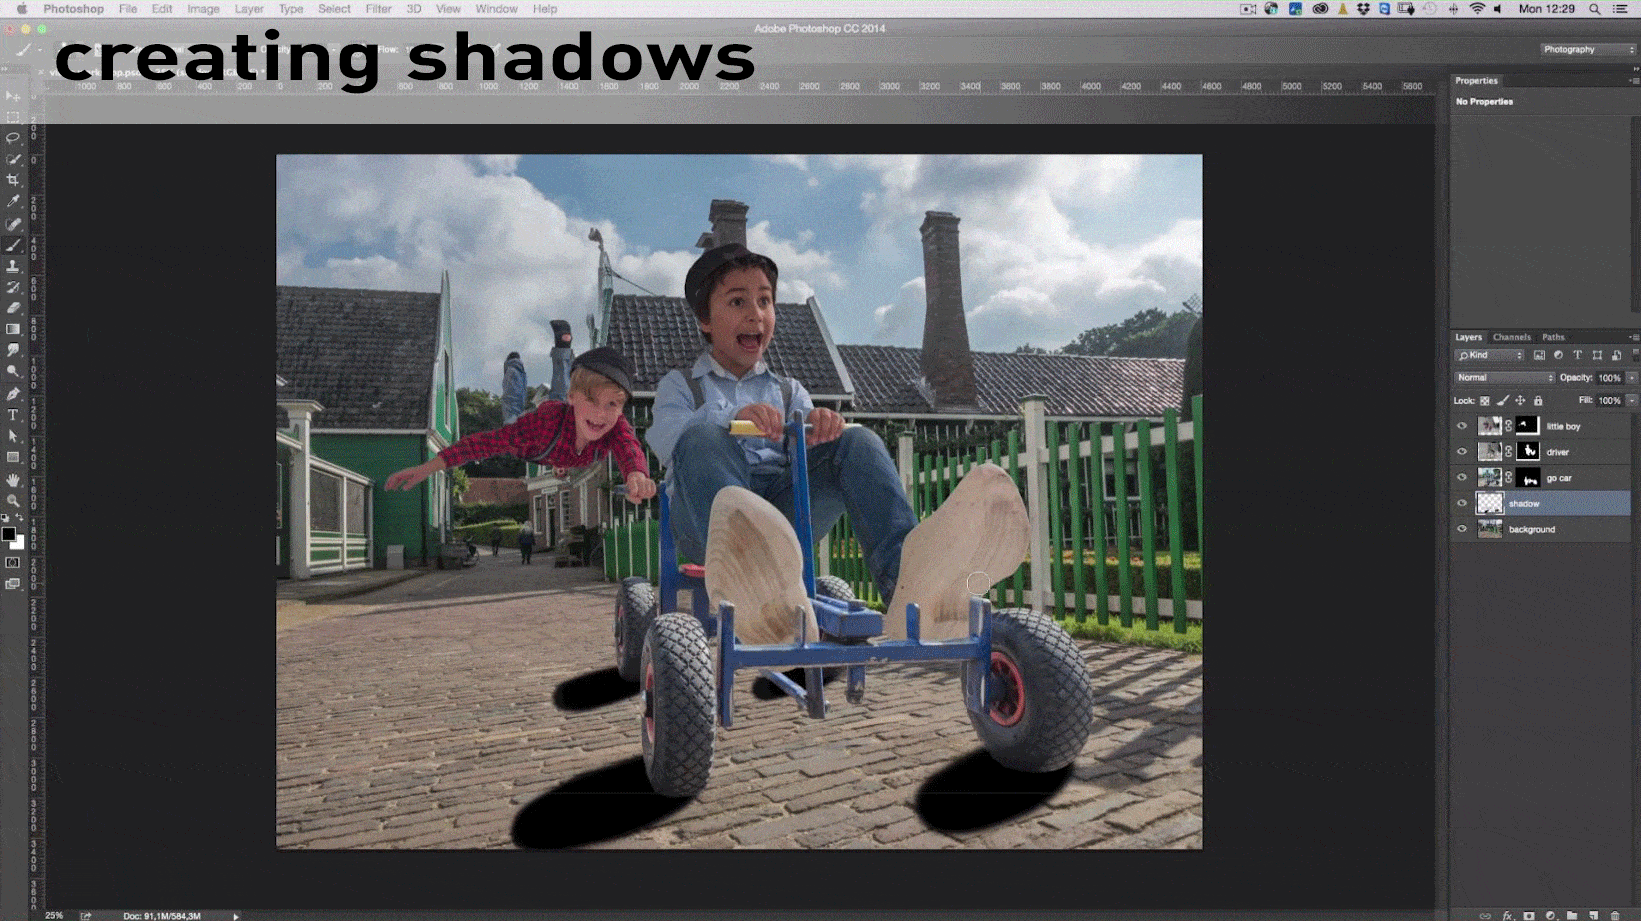
To drive this point home, Adrian jumps into action and starts painting all the shadows of the final image himself with a big emphasis on creating proper contact shadows for when for example an object is supposed to touch the floor. This sounds tedious, but once you understand, that they don’t have to be 100% perfect and how to apply correct luminosity and focus gradients to a shadow, it’s just a matter of practice.
8. After creating stunning artificial shadows it’s time for some good old Dodge&Burn. Again, Adrian starts with explaining why D&B is essential to creating a convincing final image by overall creating more depth/matching different “depth levels” of model and background and thus bringing them together.
9. After Dodging and Burning the image it’s time for some minor color corrections by reducing the strong reds and blues and giving the model a more fitting skin tone.
10. Thus far, the image looks pretty good, but not perfect. For the finishing touches, Adrian first replaces the sky with a couple of different images he blends together. He then adds some dynamic by bringing in the flying shoes, chicken, some particles and the trusty motion blur filter and removes distractions like the chimney and some stray people in the background.
Finally he gives the image its final look by using Nik Color Efex Pro, adding some nice soft blooming light and sharpening with the high pass filter.
11. The obligatory wrap up
My Personal experience
If you take a look at Adrian’s techniques, there’s nothing really new or groundbreaking, at least for me. But of course, knowing the basics is part of my job as a compositor. More interesting though was the fact that even tough I knew most of this stuff, it was still pretty interesting. At no point did we think “Ok, we know how this goes, let’s just skip it” and that’s because of the interesting ways Adrian applies these techniques and the results he gets out of them. In simple words, even if you know a technique, Aadrian always has just “one more way” to apply it that adds to your toolbox.
For me, the real kickers are his non-Photoshop chapters, where he teaches what to consider when taking photos for a composite and how to plan your shooting accordingly. That’s a really important topic, which has been neglected in too many tutorials for too long so I was super happy that Adrian included it here.
Same can be said about his chapter about shadows and how they can make or break an image (yes, just shadows and yes, there are before/after examples to illustrate this).
But a great tutorial not only shows you how to do something, but also explains why you should do it, and Mr. Sommeling definitely does this. And he does this without offering “one size fits all” solutions. His emphasis on the individual necessities of different projects really resonated with me and while that’s not the easiest way to do things, it surely is the right way. After all there is no single recipe to create a strong image.
Additional bonus points are given for:
- Never being too “professional” and showing that you can have a fun work environment (aka chicken flying around your studio) and still produce pro-level results
- Not relying on super expensive gear (although they use professional equipment, everything can be done with cheaper lights/modifiers as well)
- Showing all the Photoshop keyboard shortcuts (for Mac and PC)
All in all it’s a well done tutorial, that teaches you everything you need to know to create awesome composings.
Discounts!
Adrian was awesome to provide a coupon code for the workshop. Enter DIY2015 on checkout, it will give you a €25 discount (valid until June 1st)
Realistic Composites (basics) | Adrian Sommeling €85.00 (€60.00 with DIY2015 coupon code)
Filed Under:
Tagged With:

Stefan Kohler
Stefan Kohler is a full-time retoucher. He’s from Germany and likes bacon. In the last years, he built up a broad community around his retouching classes at the Infinite tool’s website.
Related Posts
 Here are five tips for realistic photo composites in only 90 seconds
 Mom Tries Teaching Daughter a Lesson, and 4Chan Gives a Demonstration
 This 62 year old “Grandma” became a YouTube star after teaching herself how to green screen
 Lightroom vs. Photoshop, which one does a better job with sharpening?
Join the Discussion
DIYP Comment Policy
Be nice, be on-topic, no personal information or flames.