


Creating Mood And Atmosphere with Gelled lighting
Nov 11, 2015
Glenn Norwood
Glenn Primarily works as a social and fashion photographer specializing in editorial, advertising and portrait photography, based in Belfast, Northern Ireland.
Share:

I love creating mood and a dramatic atmosphere with my lighting. I predominately shoot fashion portraits and as well as the position of my lighting, I find adding gels can give a great creative edge to my images. This use of colored gels can produce a multitude of different effects from deep bold color to a more subtle, delicate palette. Check out some further tutorials by my colleague Jake Hicks who creates amazing complex hues from his unique gelled lighting setups.
I was conducting a couple of photographic seminars lately in which I demonstrated some of the gelled effects I usually use. The first shoot was at an old abandoned Gaol located in Armagh, Northern Ireland. This was a fantastically creepy location so I knew the gelled lighting effect I was using would provide an equally eerie image.
My approach, as always, is to keep things as simple as possible! The main light modifier was a Phottix Easy-up umbrella softbox with an egg crate grid attached to minimize the spill of light. The light source was a Godox Witstro Portable Flash which is very lightweight yet powerful. A cyan gel was wrapped round the flash bulb and the light was positioned via a Manfrotto Combi boom stand directly above the models head. I love this type of lighting placed directly overhead. Firstly it is very dramatic and instantly creates very dark shadows under the eyes etc and secondly when we color the light with a gel it creates the eerie mood I hoped to achieve.

The set.a.light lighting diagrams below show the positioning of the softbox. If we want to lift the shadows slightly we can add a fill light to camera left to add detail in the darker areas. This was done with the subsequent images were I placed a large umbrella again with a cyan gel attached to keep the creepy blue tone.

Below is a couple of behind the scenes shots of the set-up. As you can see the gridded softbox is placed high and directly above the model. In the second image you can see the large umbrella acting as a fill light to lift the shadows.

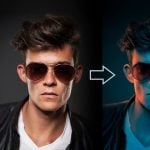
Some of the finished images are shown below.


To add an extra dimension, I added an another light with a pink gel, and fird it directly into the back wall which acted as a subtle fill. This give a pinkish lift to some of the highlights.

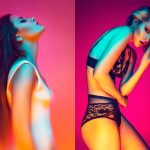
Just to do something crazy with the next step-up, I placed a large sheet of heavy duty polythene to act as kind of diffusion panel for the model to stand behind. Again the softbox with cyan gel was placed high and overhead, whilst two further lights , both with pink gels, were placed at right angles towards and behind the model.

Quick behind the scenes shot will hopefully demonstrate the setup.

This was quite a crazy look, but really just to emphasis how the light would reflect and interact with the Polythene sheeting. Finished image below.

The next seminar was in a more typical studio environment. But I basically used the same techniques as previous.

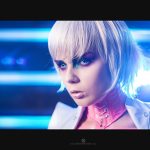
So, again we can see the overhead light with a cyan gel with the large umbrella placed camera left with a cyan gel also. The main difference in this case was to simply light the seamless white paper roll behind with two Bowens strobe heads to give a bright crisp background to contrast against the cool muted blue tones on the models skin.

Just to experiment further, I kept the cool blue light on the model, but simply placed two red gels on the two Bowens heads illuminating the background.
So hopefully this demonstrates that from a simple initial lighting set-up we can create a whole array of dramatic unusual images!

Glenn Norwood
Glenn Primarily works as a social and fashion photographer specializing in editorial, advertising and portrait photography, based in Belfast, Northern Ireland.

Join the Discussion
DIYP Comment Policy
Be nice, be on-topic, no personal information or flames.
4 responses to “Creating Mood And Atmosphere with Gelled lighting”
Love this post, I might be doing my first shoot with gels coming up soon and this was great to see. So simple, just takes trying it.
Awesome!
This is awesome. Much better than Photoshop
Thank you for this. Do you attach the gels to the outside of the modifier (outside of the diffusion, if any) or inside nearer the strobe (perhaps where the first diffuser may be)? I’d be most grateful for your thoughts. Cheers!