


Create Wonderful Astrophotography Images With A DIY Star Tracker
Dec 16, 2009
Udi Tirosh
Udi Tirosh is an entrepreneur, photography inventor, journalist, educator, and writer based in Israel. With over 25 years of experience in the photo-video industry, Udi has built and sold several photography-related brands. Udi has a double degree in mass media communications and computer science.
Share:
 The following guest post and videos about astrophotography tips and building a DIY star tracker was submitted by Jason Anderson from Canon Blogger.
How many times have you looked at the nighttime sky, seen some amazing expanse of stars and just thought, “Hey, now that’d be a cool shot!”? From stars and nebula to comets and asteroids, then planets and galaxies, outer space is still a source of awe and wonder for so many of us it’s no doubt that when we capture images from this overly undiscovered frontier, it is surely to grab the viewers attention.
Well, if you want to retain that viewer attention (and who doesn’t…?) it can help to have images that pop! Astrophotography is a tough area to make images pop because we are dealing with something that we don’t have a lot of – light! Remember, photography by definition means “to write with light”. Yet stars in a more or less black sky can make this challenging. So, what can we do?

There are a couple things you can do to improve your astrophotography results. First off, it helps to know some of the basics, so here are a few rules to go by when out shooting astrophotography.
1. Use a tripod
This should be pretty straightforward – we’re going to be dealing with long exposures here, and you’ve got to have a stable base for your camera. Handheld attempts will not yield good results.
2. Turn on the in-camera noise reduction
Most dSLR’s these days have a custom function that will reduce the amount of noise present in your pictures. Since (as we just noted), we’re going to have long exposures, we’re also going to encounter noise. So, let’s get a head start on minimizing that by turning it on in camera. The menu settings vary from one camera to another, but typically will be under the category of Image settings. For instance, on the Canon 40D (which I use), the long exposure noise reduction is under CF II – Image, and is the first sub-setting.
3. Drop your ISO to its lowest setting
We’ll be fighting noise anyway, so why add it intentionally?
4. Make sure you are working with fully charged batteries and have some spares!
Depending on what you are going for, you could be outside for a long time and those long exposures (not to mention the in-camera noise reduction) will suck the life out of your batteries fast!
5. Try to shoot in a remote area where there is not much stray light
You also want to shoot in clear weather – clouds are your enemy because they can obstruct the view of the stars, so if there’s a chance of clouds, understand the implications of that and be prepared to possibly make a return trip. If you are near a major city, go out to the suburbs. In Colorado, that means I go into the mountains. It helps here because not only is there less light noise, but it also makes for super clear skies!
There’s a lot more that I could go into as far as checklists go, but rather than just give bullet points, let’s also take a look at some of the premises behind astrophotography. To start, it’s important to understand some of the concepts associated with working under these conditions too.
Stars move!
That’s right, just like the sun can appear to move across the sky as the day progresses, so do stars as the night progresses. Why is this important? Well, during the day, the subject of our photography is likely other objects that are also on the surface of Earth. So, as we rotate around in our 24-hour cycle, the objects we are shooting move with us.
Stars, on the other hand, are not on the ground with us, so the subject of our photography is now moving. This is important to understand because that means we are going to encounter blur if we have to decrease our shutter speed. It might surprise you to know that if your shutter speed is over 5 seconds – the stars have likely moved from the position that you first shot them at. Don’t believe it. Try it! A ten second exposure will show sharpness on the leading edge of your stars, and blur on the trailing edge. This is what leads to motion blur from the stars – known commonly as star trails!
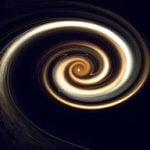
To blur or not – that is the question!
So, in knowing that stars move, this means you have to make a decision. Do you want to work with the blur that can occur and create some amazing artistic compositions, or do you want to minimize it? Sometimes some super long exposures with a stationary tripod/camera setup can make for some amazing star trails. If you’ve got the juice to go long enough (long exposures can drain batteries quickly), you can get entire circles of star trails.
Alternatively, if you want to avoid the blur, you are going to have to take measures to counter-act this – usually with something called a star tracker. You can get these for a pretty penny (I’ve seen some units that are pretty advanced going for upwards of $5000), or you can make your own if you are DIY inclined. Instructions are easy to find on the internet and with a little trial and error, you can get a pretty good system together of your own making for under $50.
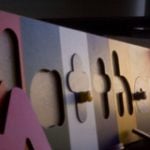
The following series of videos that will show you how.
And this is what the device looks like when it is done:


Shoot the moon – or the stars
While the moon and stars both occupy the same night sky, the methods for shooting them are very different. The reason is because the moon outputs a lot more light than stars do – a lot more! If you think about it, this makes sense, after all not only is it closer to us geographically, but it also takes up more of our visual field. This means you don’t need long exposures to capture enough light.
This also means that you don’t need to track the moon – you can capture it quickly enough where it won’t move perceptibly during your exposure. In fact, in the case of shooting the moon, if you’ve got fast enough glass (think apertures of f2.8 or in that area), you could bump the ISO a little and possibly get a decent handheld shot! I was quite surprised on my first lunar shot – the aperture was set to f8 and my shutter was at 1/100th of a second. So, I dropped the aperture down lower, knowing I could thus increase the shutter speed. When it still wasn’t quite enough to hand hold, I bumped the ISO to 400 and that allowed me to capture a handheld shot of the moon! You’ll never be able to hand-hold a stellar photography shot, but lunar you conceivably could.
Astrophotography is kind of a general (in my mind anyway) catch-all to include any shots of things in the sky. I would make a distinction here between star photographer and lunar photography because the approaches are so different. So, which do you want to shoot – the star or the moon? Either way, the world (or universe in this case) is your oyster.

Udi Tirosh
Udi Tirosh is an entrepreneur, photography inventor, journalist, educator, and writer based in Israel. With over 25 years of experience in the photo-video industry, Udi has built and sold several photography-related brands. Udi has a double degree in mass media communications and computer science.

Join the Discussion
DIYP Comment Policy
Be nice, be on-topic, no personal information or flames.
2 responses to “Create Wonderful Astrophotography Images With A DIY Star Tracker”
I think the star tracker is good if you are trying to see some of the faintest galaxies or nebulas away from us…..
But I always shoot moon hand held.. no issues…. Longer exposures you might get an over exposed Moon instead… just shoot like how u shoot on normal day time photos.. you will get sharp nice Moon photos..
Dont you need to be able to align the hinges toward the north star? I thought that was the whole idea of the barn door tracker? To ensure your camera is moving relative to the “center” of the sky ie the north star (or one or two degrees to the side of it) Also the push up screw has to havea certain lift pr turn ratio (thread turns pr mm or inch) which is relevant for Metric vs Imperial. Better to only use Imperial as there are no plans online for metric and it matters with respect to how fast you turn it. here are a couple links that explain it
http://www.astropix.com/BGDA/SAMPLE2/SAMPLE2.HTM
http://www.philharrington.net/scotch.htm