How To Create The Adidas Lighting Effect In Camera
Feb 22, 2015
Share:
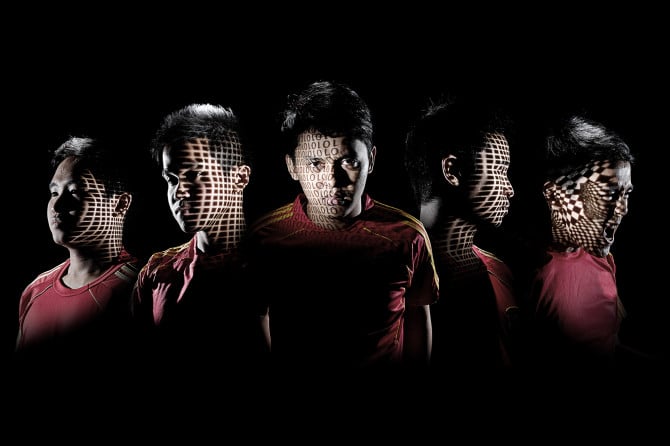
I was walking around the mall the other day and I saw the das made for Adidas, they totally blew my mind and I really wanted to try and figure out how they were made. In this tutorial I am going to take you through the process it takes to create a similar effect.
The original photo

This is undoubtedly an impressive photograph. Both the lighting and the posing serve to create a well crafted message (without even showing any shoes). Reverse engineering the photo, I came to several insights. Of course, those are my insights and I don’t really know if this is in fact how the photo was taken, but they served me in creating the look.
- I assumed there is some sort of projection involved for the patterns
- hard shadows provided both the lighting location (see nose shadow) and the fact that it was probably a small light source (sharp shadows)
- Hair suggested some kicker light coming from above
- Cheek light suggested a kicker from behind
Of course, I was not sure yet, but it seemed like a good plan.
What you will need:
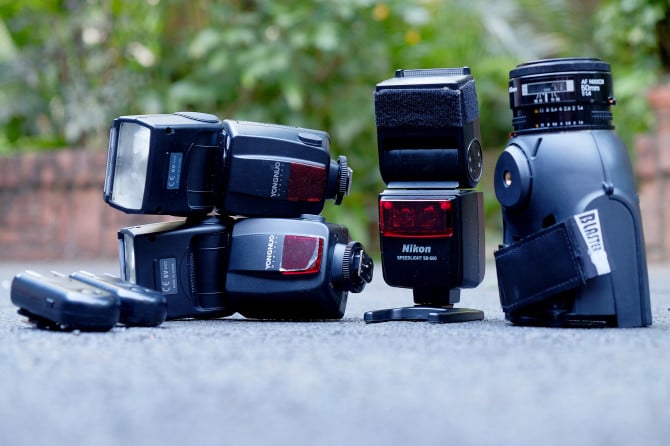
- 3 Speedlights and triggers
- a Light Blaster and creative transparencies (I used the Creative Backdrop kit)
- A large aperture lens for the Light Blaster
Models
I couldn’t actually get any pro male models with my budget (which was none) so grabbed whomever was around and willing to help: a friend, the graphic artist of the studio and myself to be the models for this shoot. I borrowed some football jersey from my bro-in-law for our outfit.
The setup
1. For the background use a grey or black backdrop. As always with every setup, it is easiest to start off with only one light, and then add one light at a time. I started off with the Light Blaster mounted with an SB600 as the main light. The light Blaster is what I used to create the face patterns (with the slides you see below). I thought it would be the hardest light to nail so I wanted to get it out of the way.

I tried playing with 3 different patterns. I needed to adjust the focus of the lens to get a sharp projection of the pattern.
2. After getting the right exposure for the Light Blaster, add some accent or kicker light on your subject. I placed a bare YN-460 II right-back of the subject and set it about 1 stop higher than my main light. The Yongnuo flash has a built in slave mode, so I only had to put a receiver on the SB600.
3. The last light was a hair light, I got another YN-460 speedlight and gridded it with a DIY honeycomb. I then boomed it above the subject.
I changed the projection pattern inside the Light Blaster and the position of the light for every shot to get slightly different effect.
Here are the photos straight out of camera:
4. Nest comes post processing. Place all the photos in individual layers, and move them into place. I went for the same triangle-ish composition from the original ad. I set some of the layers with transparency just for placement, once everything falls into position, I’ll take that out.
5. Change the mode into lighten or lower your opacity to see each image stack onto each other.
6. Using the layer mask brush the parts of the image that you want hidden.
7. Click the “Hue/Saturation” and lower the saturation to on your taste.
8. For the last step, I wanted to make a gritty look, I opted for doing a high-pass filter. Here is how you do it: Click Filter > Others > High Pass filter, I selected about 14 pixels of radius and changed the blending mode to Overlay. (or course this depends on the resolution you shot at). Then adjust the opacity if needed, the more transparency, the more subtle the effect. I made mine around 60%
And here is the final image:
Laya Gerlock
Laya Gerlock is a Portrait and Product photographer based in the Philippines. His passion is teaching and sharing his knowledge in Photograpy and has been doing this for 6 years.







Join the Discussion
DIYP Comment Policy
Be nice, be on-topic, no personal information or flames.
6 responses to “How To Create The Adidas Lighting Effect In Camera”
What about using a video-projector instead of the light blaster? Possibilities would be endless!
The “Ones” and “Zeros” are upsite down. For artistic reasen? Or what?!
Okay, sorry, I have seen it. You have to turn the models upsite down. Then it`s okay.
Hey, great article but the typos took a lot away from enjoying what is being presented here.
don’t be list this, where are they?
Dare I say… use a slide projector?