


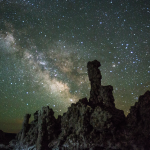
A Complete Checklist For Shooting Night-Time Time-Lapse Sequences
Jul 13, 2014
Udi Tirosh
Udi Tirosh is an entrepreneur, photography inventor, journalist, educator, and writer based in Israel. With over 25 years of experience in the photo-video industry, Udi has built and sold several photography-related brands. Udi has a double degree in mass media communications and computer science.
Share:

Aside from the regular artistic consideration, shooting time lapses requires quite a bit of technical know how. This check list from Stefan Kohler take lots of the stress of you, as you can just cross the items as you go on…
If you are learning the ropes, or simply want something to ease your workflow, you should download this (here) print it and put it in your pocket. We break it down for you after the jump.
Preparation:
- Charge the battery
- Use a large memory card and make sure it is empty (several small memory cards do not replace a large one)
- If you are using an external timer, check battery on that too
- Have something to read, or a laptop with a good movie pack (or someone for the full-blabber)
- Always have extra clothing, water and food
- A seat in the form of a folding chair (preferably with cup holders)
- Remember where you lay down the lens cover
General Checklist:
- Camera mode: M
- AF off (the lens)
- IS off (the lens)
- Set focus and use the best manual lens with an aperture ring. (Lenses with aperture rings are more accurate in when they open and close, otherwise you may experience flicker. If you are using a lens with no aperture ring, give it a small twist s so it stays open)
- Turn off automatic ISO
- Select ISO (= <800)
- Adjust the exposure time (If you want to avoid star-smear use the rule of 600)
- Zoom in and verify focus
- Set Tone Priority Off (to avoid Tone Priority generated flicker)
- Noise Redution: Off (This drives the exposure time unnecessarily high – by a factor of 2)
- Set white balance manually (about 4000K is great)
- Select (RAW) mode
- Disable flash
- Display off (to conserve the battery)
- Close the view finder eye piece (a piece of Gaffa tape works wonders and is quickly removed. Is the eye piece is open, light from behind the camera can generate spots in the images)
- Rain Protection (a large garbage bag with cut off corner, attached to the lens hood works very well)
Additional settings in strong light (sunrise or sunset):
- Use AV mode
- Select aperture
- Set metering to “whole picture” (otherwise generated every cloud from the sun an undesirable change in the exposure time)
Now the fun begins. Review all control settings again. Better to have too much than too little, becasue once you start the sequence, you can not stop and re-adjust.
Now here comes the most important (and challenging at least for ADHD folks like me):
Don’t stop the camera, except the short duration to replace battery or memory card!
Once the camera starts running, there is not much to do, so you may look around and discover that you want to move the camera just a little bit to improve composition. Then after an hour or so, you wanna move it again because you forgot about that rock in the front.
Then you move it one last time to improve the composition just a little bit more.
What you will end up with is wonderful composition, but very short clips that will practically be unusable because they are so short. So Don’t move the camera.
Even if you have a few minutes of clouds, and the skies look murky and dull, on the actual sequence there is a good chance you’ll get some nice drama. So Don’t Stop!
Unfortunately, there are a few things which may impact the shoot (and they are all connected)
- The longer the exposure time, the higher the risk to heat up the sensor or get hot pixels
- The higher the ISO value, the higher the noise
- The wider the aperture, the greater the risk of getting a blurred image
So each time you shoot you make a small comprimise, at least on some of the elements. Here is my list of constraints:
- ISO as far down as possible
- as short as possible expose
- as long as necessary expose
- Aperture as small as possible
- Aperture as wide as necessary
The timer:
If you go with AV mode. the shutter can stay open for as long as 30s. On the interval make you you take the time the image takes to process into consideration.
Checklist against flickering
Here are the most common causes of flicker in timelapse, make sure to hit them on setup.
- Aperture
- Exposure
- Post
- white balance
Aperture:
Most lenses are set wide open and only close down when the actual shooting takes place. This mechanism is not 100% reliable and accurate, and there are two ways to avoid it: use a lens with a manual aperture ring. OR use the DOF preview button to close the lens down and give it a small twist on the bayonet, so the aperture does not change.
Exposure:
When using AV more or measuring with scene setting, the camera may compensate for changing conditions. If those changes are frequent or not consistent, you will have some flicker.. If yotu want to be 100% safe, go with manual settings.
Post Production:
If you shot Jpeg (which you should not have…) the camera make some small decisions for you on the conversion path from RAW to JPEG, those may have small variations that create flicker.
White balance:
Automatic white balance can also be the cause fro flicker as it may be impacted from elements in the scene (like clouds). If you shot RAW, you have 100% control over white balance as well.
These are just so the classic mistakes, I will list on occasion extend times …
Some data about post production
A film is usually played in 25 (or 24) frames per second (FPS). This is why time lapse shooting is so time consuming. if you shoot a photo every 30 seconds, after a complete hour of shooting, you will only have about 5 seconds of video. So take some time with every shot and let the camera run as long as you can. It is also a good idea to give sequence camera a bit of ‘air’ before and after the “good” scene. So even when you think the sequance is crap, don’t stop mid way and let the camera roll at least for 2-2.5 hours…
The post process
In general, one can imagine the simplified workflow to be something like this:
- Edit RAWs
- sequence the pictures one after another
- render as a movie
But is is a subject for another post….

Udi Tirosh
Udi Tirosh is an entrepreneur, photography inventor, journalist, educator, and writer based in Israel. With over 25 years of experience in the photo-video industry, Udi has built and sold several photography-related brands. Udi has a double degree in mass media communications and computer science.


Join the Discussion
DIYP Comment Policy
Be nice, be on-topic, no personal information or flames.
7 responses to “A Complete Checklist For Shooting Night-Time Time-Lapse Sequences”
If your playback is 25 fps and you take a shot every 30s, after an hour of shooting you will get a nearly 5s long film…
of course, fixed that!
Interesting checklists, useful to remember all the important steps
I would add.
– Check Weather.
It’s fine to prepare for rain but it’s better to know your odds. Also wind can ruin a good evening out and is often forgotten, additionally if your spot is coastal, consider checking the tides, they’re more complex than you might think and have massive impact on what a scene can look like.
– Check ‘space weather’, or more notably the moon.
Nothing sucks worse than determining an evening with all the right conditions only to turn up at the location that is likely remote and distant, only to have a full moon burst over the horizon, over-exposing your sky, blotting out all but the brightest stars and ruining any hope of capturing the milkyway.
(A moon does a nice job of lighting the foreground though and has some nice effects in itself tbh.)
This is easily checked on a program Stellarium, which is free, you can use it to pre-plan camera angles for the constellations you’re after, check sunrise/set directions/times and similarly moon rise/set.
Looking forward to the Post Processing bit, my workflow in that area is the worst, I’m sure.
If you use Shutter priority and a manual lens, you will not get flicker in changing light, it’s the iris in the electronic lenses that causes the flicker.
No one seems to ever write about condensation. Get yourself a good lens heater if you are in areas with a lot of humidity and the temp drops below your camera’s heat! I’ve spent hours on a timelapse only to find that 90% of the shots were useless because of a fogged lens.
Looks like a great resource. One thing though – small typo on “Preparation” section title