


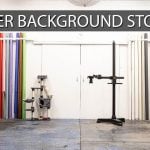
How to build a cheap collapsible DIY light box
Apr 11, 2017
John Park

We love it when our readers get in touch with us to share their stories. This article was contributed to DIYP by a member of our community. If you would like to contribute an article, please contact us here.
Share:

Clear, well-lit photos of your projects are among the best ways to share your work with others. Few techniques highlight your project as well as an all white light box with soft, even, shadow-free lighting. Not only is the white background distraction free, it will also serve to bounce your light source onto your object from nearly all angles.
This is an effective, inexpensive, and easy way to build a light box for project and product photography. Plus, you can quickly break it down for flat storage, and set it back up in seconds!

Materials
- 1 ea. 30″ x 20 ” x 1/2″ thick foam core board (for the floor piece)
- 1 ea. 30″ x 20″ x 1/4″ thick foam core board (for the back wall)
- 2 ea. 24″ x 18″ x 1/4″ thick tri-fold foam core board (for the side walls)
- 18 ea. small magnets, such as these
- 24 ea. 5/8″ wooden cubes such as these
- Hot glue gun
- Blue tape or spring clamps to hold work while glueing

Assembly
You’ll use the wooden blocks and magnets to secure the foam core boards to each other, while still allowing them to be taken apart.
Start by gluing two cubes each on the two back corners of the floor piece, and one cube in the middle of the back edge.


You’ll then glue a magnet onto each cube, as seen in the pictures and diagrams.

Three of the magnets face upwards to connect with the back wall, while two of them face toward the front edge to connect with the side walls.

Next, place the back wall up against the cubes, then glue three cubes to the back wall that contact three of the floor cubes as shown. Add the three matching magnets so that they connect to the floor magnets, then glue them into place.

Glue four more cube onto the back wall. Two on each side, each 9″ and 18″ up from the bottom, respectively. These measurements are approximate. Then, glue magnets facing toward the front edge as seen here. These will be used to connect the side walls.


Once the glue has cooled sufficiently, you can try out the super fun click-into-place action of the magnets!

Now you can prep the side walls. Glue into place three cube/magnet sets per side to align and connect with the corresponding sets on the back wall and floor.

For some extra stability, glue on two cubes at the bottom edge corners of the middle fold panel of each side wall, as well as one cube at the bottom corner of the fold that is at the front wall of the light box.


Use It
Your light box is complete! You can adjust the side walls and front opening by folding the side wall panels. Then, place a large, diffuse light source at the top of the box. I’m using an LED softbox light, but you can get a similar effect by draping a white piece of shower curtain liner fabric over the top of the box to diffuse a couple of bright lights.


Collapse It
When you’re finished, you can pull off the walls from the floor with a gentle tug on the magnets, and pack everything up nice and flat to store for your next shoot!

About the Author
John Edgar Park is a maker who builds creative technology projects for Adafruit Industries. He’s the former host of the PBS series “Make: Television”, and a twenty year veteran of CG animation at Disney Animation Studios, Disneytoon Studios, Sony Imageworks, and others. You can follow John’s work on his website, Instagram and Twitter. This article was also published here and shared with permission.
We love it when our readers get in touch with us to share their stories. This article was contributed to DIYP by a member of our community. If you would like to contribute an article, please contact us here.


Join the Discussion
DIYP Comment Policy
Be nice, be on-topic, no personal information or flames.
5 responses to “How to build a cheap collapsible DIY light box”
This looks fantastic – thanks for sharing!
Magnets- very very smart!
Indeed, I was pretty amazed by John’s solution. It’s very smart and practical. :)
Finally! a DIY project on DIYphotography.net… it’s been a while. Nice work with the very comprehensive instructions too. A great project.
HI! I know this post is almost 3 years old, but oh my gosh it was exactly what I was looking for !
I tried looking at one or two other approaches to a light box, but all those suggestions were for small items. Not large ones like what I needed to photograph. As well as break down and store easily.
So I found the post here, bought all the supplies and put it together this afternoon. After which I took a few photos and oh my !!!
I’m so excited with how well this works! And how great my items now look.
Thank you soooooo much for sharing this project approach.