


Wide Angle Lens Distortion: How to Minimize Barrel Distortion in Architecture Photos
Nov 13, 2025
Darlene Lleno
Darlene Lleno brings a unique perspective to DIY Photography as someone who grew up surrounded by camera gear but chose words over lenses. With five years of writing experience, she specializes in photography content that’s both technically informed and genuinely passionate. Growing up with a photographer twin brother meant camera talk was everyday conversation in her household. While he mastered capturing moments, Darlene discovered she preferred being the subject and the storyteller behind the scenes. As a travel enthusiast and mother of two, she understands the importance of preserving life’s precious moments. When not exploring new destinations or writing for DIY Photography, you’ll find her reading or tending to her garden. Her approach to photography writing is refreshingly authentic, she may not be behind the camera, but she knows exactly what it takes to help others capture the shots that matter most.
Share:
Wide angle lens distortion can wreck architectural photos by bending straight lines into curves. This optical issue happens when wide lenses struggle to project three-dimensional scenes onto flat sensors. Barrel distortion makes buildings bulge outward while pincushion distortion squeezes them inward at edges.
Fixing these problems requires knowing why wide angle lens distortion occurs and how to control it. You can minimize distortion through smart lens choices, shooting techniques, and post-processing corrections. The goal is keeping vertical and horizontal lines straight for professional architectural photography work.
Why Wide Lenses Create Distortion Problems
Wide angle lenses bend light more aggressively to capture expansive fields of view. The extreme angles required to squeeze 90 to 120 degrees onto a sensor create distortions. Physics makes it nearly impossible to project a wide view onto a flat plane perfectly.
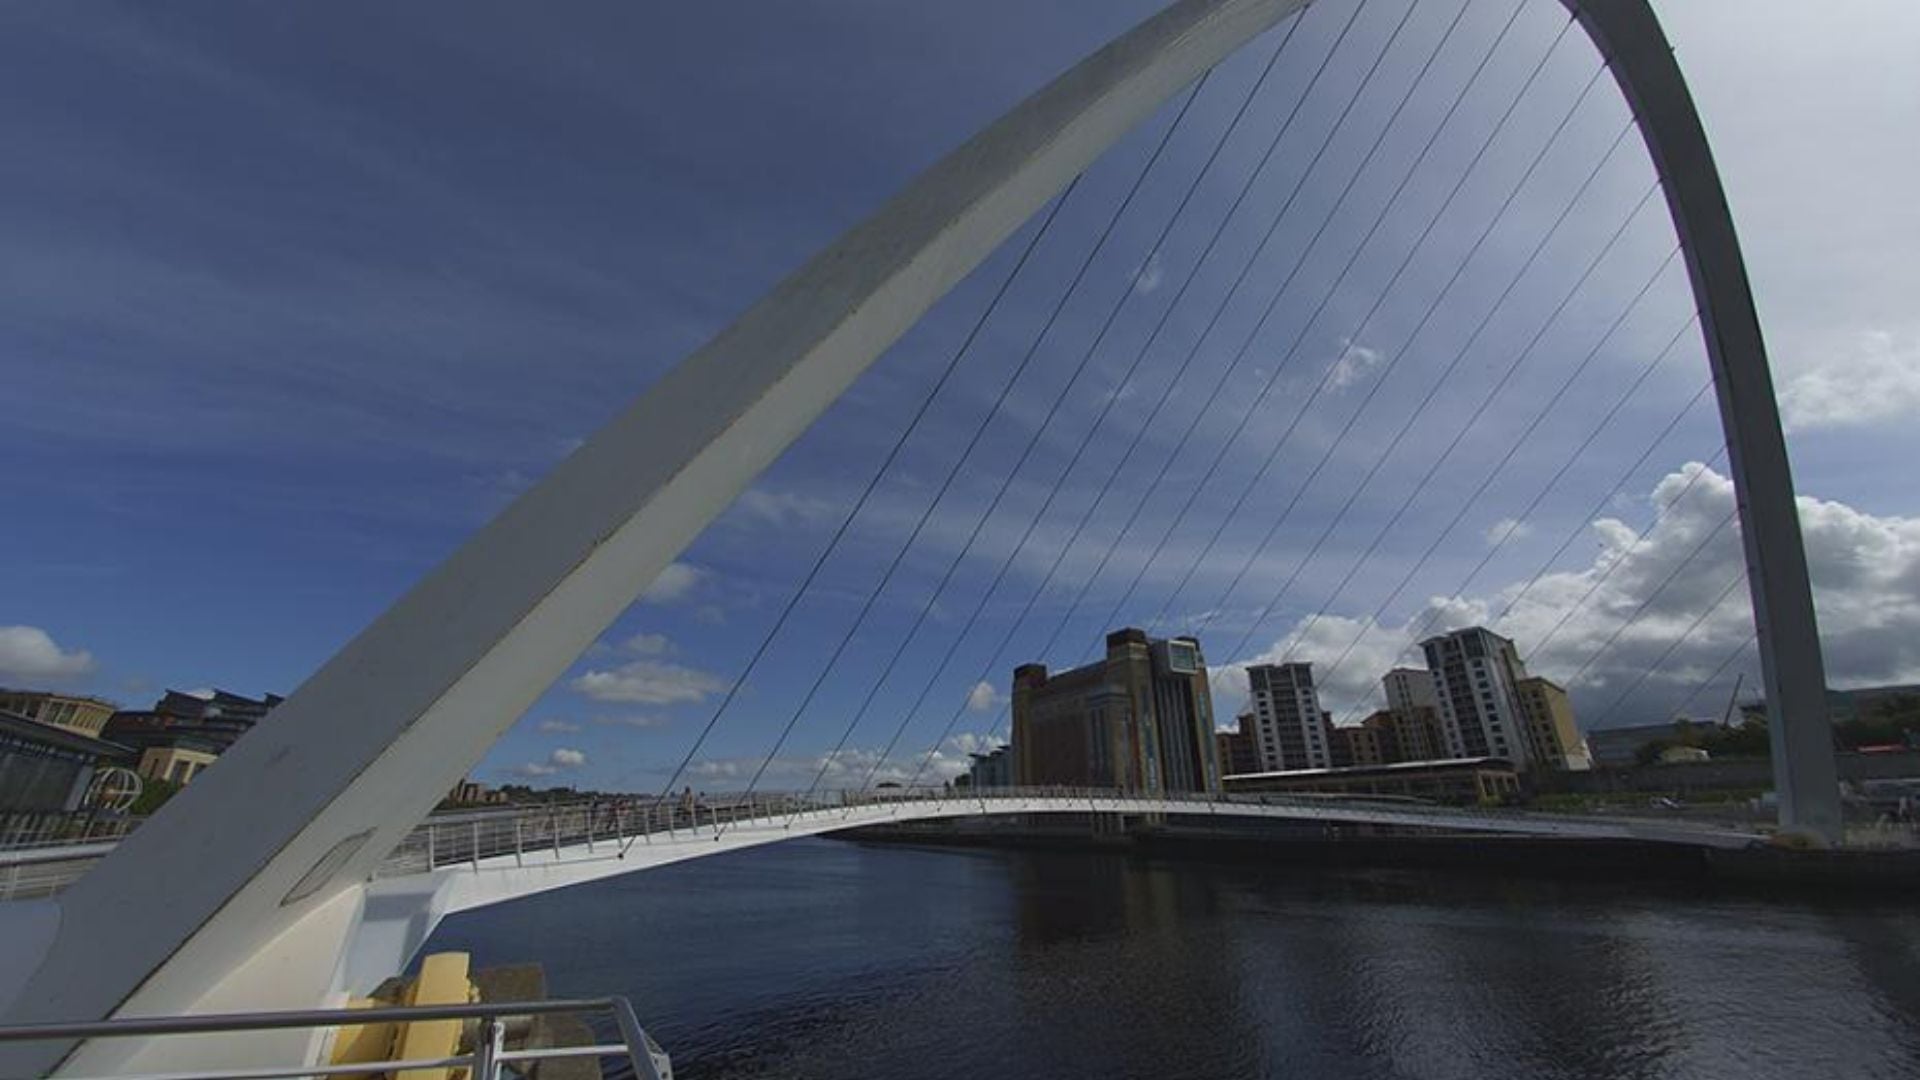
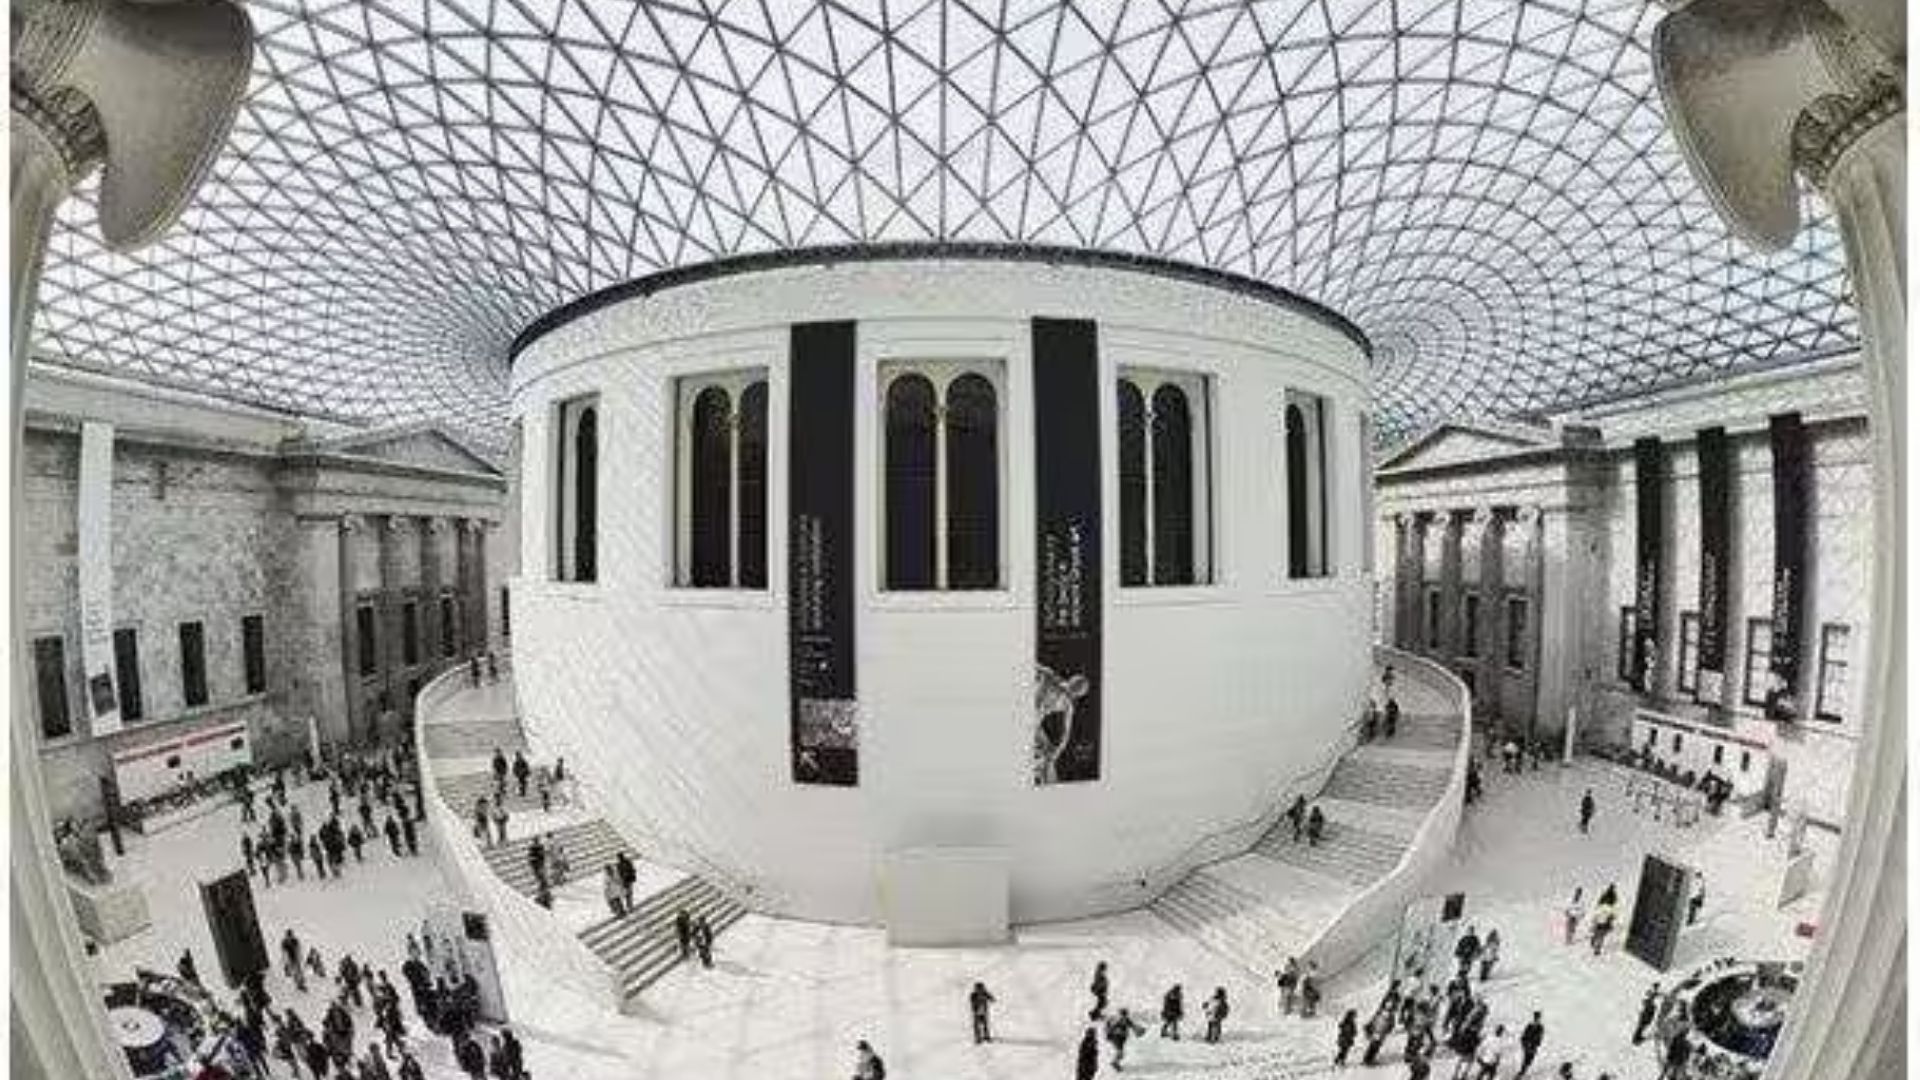
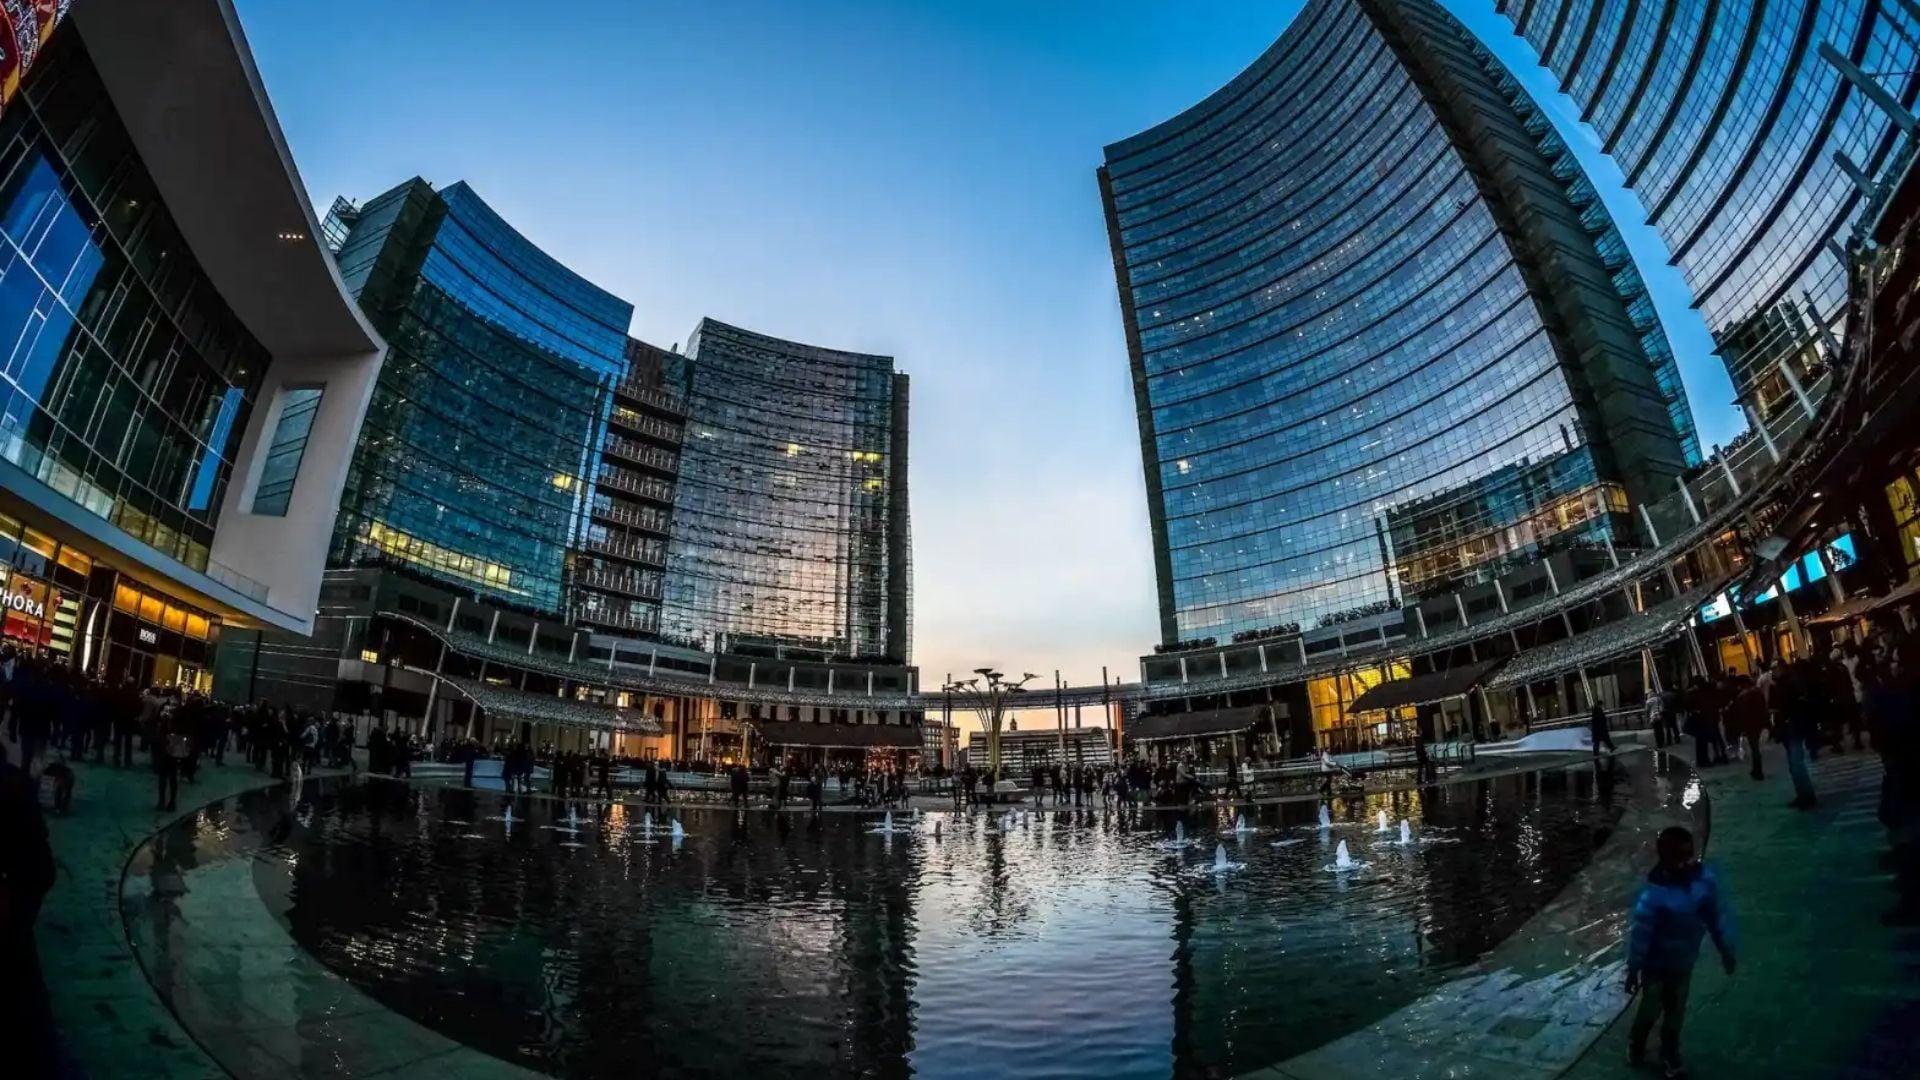
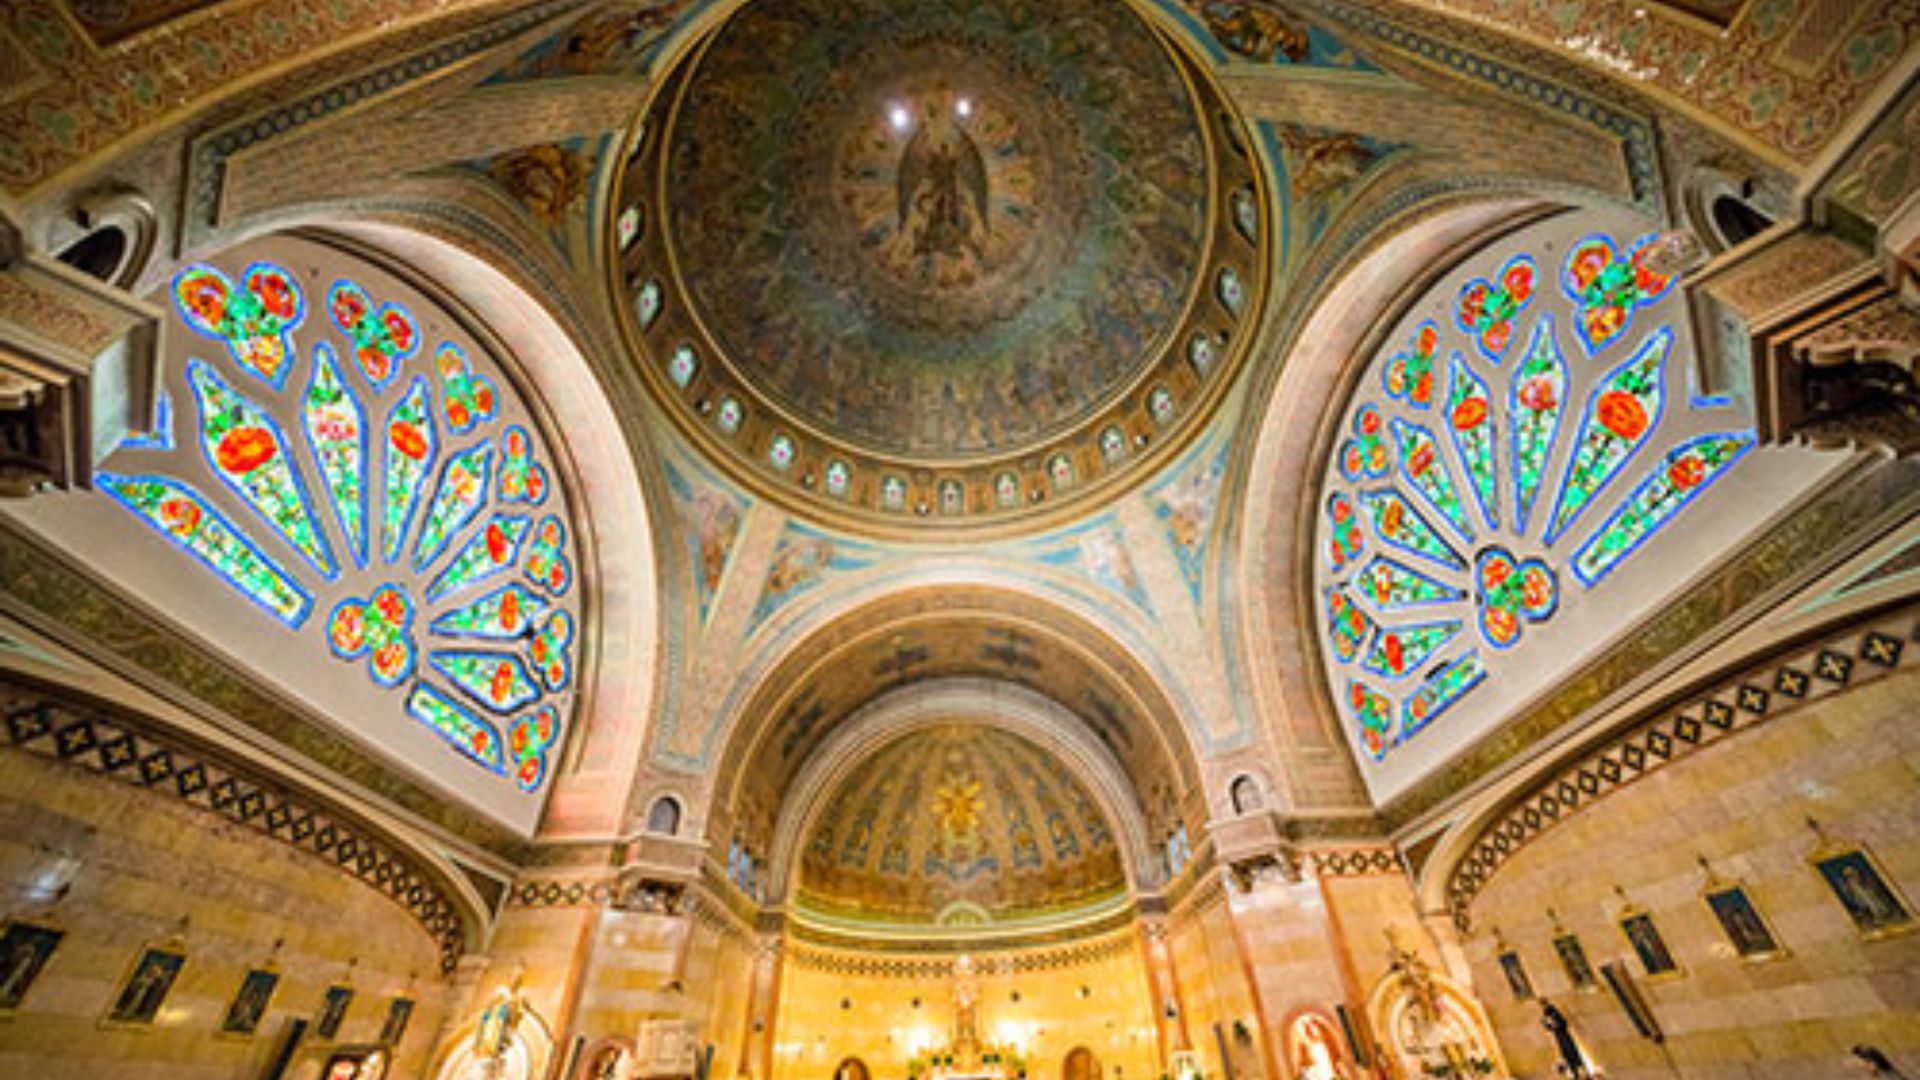
Barrel distortion appears most obviously in ultra-wide lenses from 14mm to 24mm focal lengths. Straight lines near frame edges curve outward like the sides of a barrel. Buildings look like they’re bulging toward you unnaturally in the final image you see.
The distortion happens because light rays entering at extreme angles hit the sensor at different distances. Central rays travel straight through while edge rays take longer curved paths through glass. This uneven light path length causes the characteristic barrel bulge you notice everywhere.
Rectilinear lenses attempt to keep straight lines straight but can’t eliminate distortion completely ever. The wider the angle, the more correction manufacturers must build into the optical design. Some distortion always remains in ultra-wide lenses despite complex optical formulas manufacturers use.

How Lens Design Affects Distortion Levels
Complex optical designs with more glass elements control distortion better than simple formulas do. Aspherical lens elements help correct distortion by bending light more precisely than spherical glass. But adding elements increases weight, cost, and potential for other optical issues like flare.
Zoom lenses typically show more distortion than prime lenses at equivalent focal lengths always. The compromises required to cover a zoom range make perfect correction harder to achieve. Prime lenses optimized for one focal length can better control geometric distortions you see.
Cheaper wide angle lenses often exhibit more noticeable distortion than premium options you can buy. Manufacturers save money by using simpler optical designs with fewer corrective elements inside. You truly get what you pay for in terms of distortion control and quality.
Retrofocus designs required for SLR cameras introduce more distortion than rangefinder lens designs do. The extra clearance needed for the mirror mechanism adds optical complexity that increases problems. Mirrorless cameras allow simpler, better-corrected wide angle lens designs without mirror clearance requirements.
Perspective Distortion vs Optical Distortion
Perspective distortion differs completely from barrel distortion but photographers often confuse the two issues. Perspective distortion happens when you tilt your camera up or down at tall subjects. Buildings appear to lean backward when you point the camera upward from ground level.
This perspective effect is pure geometry, not an optical flaw in your lens at all. Tilting any camera creates converging vertical lines regardless of lens quality you’re using. The closer you stand to tall buildings, the more extreme this perspective effect becomes.
Barrel distortion is purely optical and happens even with the camera perfectly level always. The lens itself bends straight lines into curves at frame edges regardless of angle. You can have both perspective distortion and barrel distortion in the same shot easily.
Correcting perspective distortion requires shift lenses or post-processing perspective corrections applied in software. Barrel distortion needs optical profile corrections specific to your exact lens model used. Different problems need completely different solutions in your workflow to fix them properly.
Recognizing Each Type of Distortion
Check vertical lines in your architectural photos to identify perspective distortion quickly and easily. If vertical lines converge toward the top, you’ve got perspective distortion from tilting upward. Horizontal lines stay straight but verticals lean inward dramatically toward the center top.
Look at horizontal lines near frame edges to spot barrel distortion in your images. Straight horizontal elements like rooflines curve outward forming that obvious barrel shape you notice. The center of your frame stays relatively straight while edges show clear bending.
Grid overlays help you see both distortion types more clearly during shooting or editing work. Turn on the grid display in your camera or editing software for visual reference. Straight architectural elements should align with grid lines when distortion is properly controlled throughout.
Choosing Lenses That Minimize Wide Angle Lens Distortion
Lens quality matters enormously when shooting architecture with wide angle focal lengths you need regularly. Premium wide angle lenses from major manufacturers control distortion better than budget alternatives available. The extra cost buys you better optical designs with more corrective elements built in.
Tilt-shift lenses provide the best distortion control for serious architectural photography work you do. These specialized lenses keep the sensor plane parallel to building faces eliminating perspective problems. They also typically feature excellent barrel distortion correction from premium optical designs manufacturers use.
Prime lenses at 24mm or 28mm offer good compromise between width and distortion control. These focal lengths provide useful wide views without extreme distortion from ultra-wide glass designs. Many photographers find 24mm the sweet spot for architectural work balancing coverage and quality.
Some modern lenses rely heavily on digital profile corrections to straighten lines in post. Manufacturers design lighter, cheaper lenses knowing software will fix remaining distortion automatically during processing. This works well but requires shooting RAW and applying profiles during editing every time.
Research specific lens models for distortion performance before buying for architectural work you do. Read reviews and check sample images at full resolution from actual users shooting buildings. Independent testing sites provide objective distortion measurements you can compare across different options available.
Prime vs Zoom for Distortion Control
Wide angle zoom lenses sacrifice some distortion control for focal length flexibility they offer. A 16-35mm zoom shows more barrel distortion at 16mm than a dedicated 16mm prime. But the convenience of zooming often outweighs the slightly worse distortion for many photographers.
Prime lenses optimized for single focal lengths achieve better distortion correction overall typically you’ll see. A 20mm prime can devote its entire optical design to perfecting that one length. The result is flatter field curvature and straighter lines throughout the frame you capture.
Professional zoom lenses narrow this gap with complex designs that correct well across focal ranges. The best wide zooms from major manufacturers control distortion nearly as well as primes. But they cost significantly more and weigh considerably more than compact prime alternatives available.
Your shooting style determines whether prime or zoom makes more sense for your work needs. Architecture photographers working methodically often prefer primes for maximum quality they can achieve. Documentary and real estate shooters might need zoom flexibility despite slightly more distortion present.
Shooting Techniques to Reduce Wide Angle Lens Distortion
Keep your camera sensor parallel to building faces whenever possible for best results you get. This eliminates perspective distortion even if barrel distortion remains from the lens you’re using. Use a tripod with a level to ensure your camera stays perfectly upright and square.
Step back farther from buildings rather than tilting up to fit them in your frame. More distance reduces perspective distortion dramatically even with the same wide focal length used. You might need to crop later but you’ll avoid converging verticals that look unprofessional.
Shoot from elevated positions like across the street or from another building when you can. Getting higher lets you keep the camera level while still capturing full building height. This technique works great in dense urban environments with accessible elevated vantage points around.
Center important architectural elements rather than placing them at frame edges where distortion is worst. Barrel distortion increases dramatically toward corners while the center stays relatively straight always here. Compose with critical straight lines away from problem areas when you can manage it.
Use the lens’s sweet spot focal length if shooting with a zoom for less distortion. Many zoom lenses show least distortion somewhere in the middle of their focal range. Test your specific lens at different focal lengths to find where barrel distortion minimizes best.
Camera Settings That Help
Shoot in RAW format to maximize your correction options during post-processing work you do later. RAW files preserve all sensor data allowing aggressive corrections without quality loss at all. JPEG files bake in processing that limits how much you can correct distortion problems afterward.
Enable lens profile corrections in-camera if your camera body supports automatic correction features available. Many modern cameras detect which lens is attached and apply corrections to JPEGs automatically. This won’t help RAW files which need correction during processing in editing software separately.
Use live view with grid overlays to check alignment before shooting each frame you capture. The grid helps you see when vertical lines lean or horizontal lines curve right away. This real-time feedback prevents problems rather than discovering them later during tedious editing sessions.
Bracket your shots slightly if you’re unsure about the best camera position for minimal distortion. Take multiple frames from slightly different distances and heights for insurance coverage you need. You can choose the frame with best natural geometry during culling and editing later.
Software Corrections for Wide Angle Lens Distortion
Modern photo editing software includes lens profile corrections for thousands of lens models you use. These profiles automatically straighten barrel distortion based on known characteristics of specific lenses available. Enable profile corrections as part of your standard import preset for architectural images shot.
Manual distortion correction sliders let you fine-tune corrections beyond automatic profile applications given. Drag the distortion slider toward the negative side to reduce barrel distortion you see. Check straight architectural elements against grid overlays while adjusting for best visual results you achieve.
Specialized optical correction software handles distortion better than general editors in many cases today. These programs include extensive lens data with precise correction information for optical issues present. Architectural photographers often use dedicated correction software for superior distortion control it offers.
Advanced wide angle correction tools provide powerful fixes for complex distortion in ultra-wide shots. Draw constraint lines along elements that should be straight and software calculates needed corrections. This works great for extreme wide angle shots where simple profile corrections aren’t enough.
Perspective corrections fix converging verticals after you’ve corrected barrel distortion first in your workflow. Apply lens profile corrections before using perspective tools for best combined results you get. Fixing both issues together often requires some compromise between perfect lines and natural appearance.
Creating Custom Lens Profiles
Shoot calibration targets if your lens lacks a built-in profile in editing software you use. Profile creation programs generate custom profiles from test shots you provide to the software. This ensures perfect correction matched to your specific lens copy’s characteristics exactly right.
Save custom profiles to apply automatically during import for your architectural work workflow setup. This eliminates repetitive manual corrections on every single architectural image you process during sessions. One-time profile creation saves hours over the lifetime of using any specific lens regularly.
Update lens profiles periodically as lens optical characteristics can shift slightly over time and use. Mechanical tolerances change with use and environmental factors affecting glass elements inside your lens. Recalibrating every year or two keeps corrections accurate for professional level results you maintain.

Specialized Lenses for Architecture Photography
Tilt-shift lenses remain the gold standard for architectural photography requiring straight lines you need throughout. The shift function moves the optical axis while keeping the sensor plane parallel to subjects. This eliminates perspective distortion completely while maintaining excellent barrel distortion control built right in.
Major camera manufacturers make tilt-shift options in various focal lengths for architectural work currently. The 24mm focal length is most popular for general architectural work offering useful width. These lenses cost significantly more than regular wide angles but deliver unmatched distortion control.
The learning curve for tilt-shift lenses is steeper than regular wide angles require initially though. You need to understand movements and their effects to use these specialized tools effectively well. But the results justify the effort for serious architectural photographers demanding perfect geometry.
Medium format cameras with technical movements provide even more control for high-end work done. These systems allow extreme perspective control beyond what 35mm format tilt-shift lenses can offer. Professional architectural photographers shooting for publications often use technical cameras for ultimate quality needs.
Alternative Specialized Options
Fisheye to rectilinear conversion software can salvage ultra-wide shots with extreme distortion you have. Specialized programs convert fisheye images to rectilinear projection with straight lines rendered properly everywhere. This only works if you shoot with a fisheye intentionally planning to convert it afterward.
Stitched panoramas from longer focal lengths avoid wide angle lens distortion completely by shooting narrower. Shoot multiple overlapping frames with a 50mm lens and stitch them into wide views. The longer focal length has minimal distortion and stitching creates the wide perspective needed.
Post-Processing Workflow for Architectural Images
Import architectural images and apply lens profile corrections as your first editing step you do. This establishes the geometric foundation before making exposure or color adjustments later on shots. Correcting distortion first prevents weird interactions with other adjustments you make subsequently during full processing.
Check both horizontal and vertical lines throughout the frame after applying automatic corrections given. Profiles fix most distortion but might need manual refinement for perfect results you achieve. Use grid overlays and zoom in to corners where distortion is most visible typically.
Apply perspective corrections to fix any converging verticals from camera tilt during shooting you did. The vertical and horizontal adjustment tools in editing software handle perspective corrections quite effectively. More advanced tools provide precise control for complex corrections you need done properly.
Crop final images to remove any weird stretching at extreme corners from corrections you applied. Heavy distortion correction can create odd shapes at frame edges that look unnatural when displayed. Strategic cropping to a slightly tighter composition often improves the final result significantly overall.
Batch Processing Similar Images
Create presets with your correction settings for batch application to similar shots you took. Images shot at the same location with identical lens settings need identical corrections every time. Syncing settings across batches saves enormous time on large architectural photography projects you complete.
Check a few images from each batch individually after applying synced corrections automatically done. Slight variations in camera position might need minor adjustment tweaks per image you shot. But starting from synced settings gets you 90% there with minimal individual work needed.
Advanced Correction Techniques
Perspective warp tools provide extreme control over geometric corrections beyond basic adjustments you use. This allows you to straighten planes independently rather than applying global corrections only everywhere. Complex buildings with multiple planes benefit from this selective approach to correcting geometry properly.
Liquify tools can fix small areas of stubborn distortion that profile corrections miss entirely somehow. Paint over slightly curved lines to manually straighten them with precision control it offers. Use this sparingly as it’s easy to create unnatural looking results if you overdo it.
Combine multiple exposures shot from slightly different positions for ultimate distortion control you achieve. Shoot one frame optimized for minimal perspective distortion and another for barrel distortion control. Blend them in post to get the best of both geometric corrections applied together.
Use content-aware fill to rebuild cropped areas after aggressive perspective corrections applied really heavily. Heavy corrections often require crops that remove important image areas from edges you need. Content-aware fill can intelligently recreate missing portions based on surrounding context it sees.

Common Mistakes When Correcting Distortion
Over-correcting barrel distortion can create pincushion distortion making buildings look pinched inward badly instead. Stop when lines look straight rather than pushing corrections to extremes you don’t need. Natural looking results matter more than perfectly straight lines by measurement alone you achieve.
Forgetting to correct chromatic aberration before fixing distortion creates colored fringing along edges you see. Color fringing becomes more visible after distortion correction stretches edge areas of frames outward. Always apply chromatic aberration removal before geometric corrections in your workflow order every time.
Applying perspective corrections before lens profile corrections creates compounded problems that are harder to fix. The order of operations matters significantly for clean results you achieve in processing work. Barrel distortion first, then perspective corrections second always for best outcomes you get consistently.
Ignoring field curvature when correcting distortion can leave parts of your image soft and blurry. Wide angle lenses often have curved focal planes that don’t match the flat sensor perfectly. Focus stacking might be necessary for critical sharpness throughout heavily corrected architectural images you create.
Hardware Solutions for Perfect Geometry
View cameras and technical cameras provide mechanical movements eliminating distortion at capture time completely. These large format systems let you keep the film plane parallel while shifting coverage. No post-processing corrections needed but the systems are expensive and slow to use properly.
Tripod leveling bases with bubble levels help you maintain perfect camera alignment during shooting sessions. Precise leveling minimizes perspective distortion requiring less correction in post-processing work you do. Small leveling platforms under ball heads cost little but improve results significantly.
L-brackets help you switch between horizontal and vertical orientation while keeping the camera perfectly level. These simple accessories attach to your camera and mount to your tripod plate securely. They prevent the tilting that happens when rotating ball heads for vertical shots you take.
Remote shutter releases prevent camera shake during long exposures on tripods you’re using for buildings. Even slight vibration can create soft images that look bad after heavy distortion corrections. Cable releases or wireless triggers keep everything sharp and steady during architectural shooting work.
Minimize Wide Angle Lens Distortion for Professional Results
Wide angle lens distortion control starts with choosing appropriate lenses for architectural photography work regularly. Premium optics with good distortion correction save you time and deliver better straight-from-camera results. But even budget lenses can produce acceptable results with proper shooting technique and post corrections.
Combine quality gear, careful shooting methods, and skilled post-processing for professional architectural images you create. Keep your camera level, use lens profile corrections, and fix perspective issues in the right order. Master these core techniques and your architectural photos will show crisp straight lines throughout every frame.

Darlene Lleno
Darlene Lleno brings a unique perspective to DIY Photography as someone who grew up surrounded by camera gear but chose words over lenses. With five years of writing experience, she specializes in photography content that’s both technically informed and genuinely passionate. Growing up with a photographer twin brother meant camera talk was everyday conversation in her household. While he mastered capturing moments, Darlene discovered she preferred being the subject and the storyteller behind the scenes. As a travel enthusiast and mother of two, she understands the importance of preserving life’s precious moments. When not exploring new destinations or writing for DIY Photography, you’ll find her reading or tending to her garden. Her approach to photography writing is refreshingly authentic, she may not be behind the camera, but she knows exactly what it takes to help others capture the shots that matter most.
Related Posts
 This algorithm is a new way to fix distortion in your wide-angle selfies
 People call out Khloé Kardashian over “Photoshop fail”; turns out it’s wide-angle distortion
 Laowa 10mm f/2 Zero-D MFT offers wide-angle shooting with no distortion for $400
 Light pollution is ruining your photos, follow these three tips to minimize it
Join the Discussion
DIYP Comment Policy
Be nice, be on-topic, no personal information or flames.