


A visual approach to the Inverse Square Law and how it affects photographers
Jul 4, 2017
John Aldred
John Aldred is a photographer with over 25 years of experience in the portrait and commercial worlds. He is based in Scotland and has been an early adopter – and occasional beta tester – of almost every digital imaging technology in that time. As well as his creative visual work, John uses 3D printing, electronics and programming to create his own photography and filmmaking tools and consults for a number of brands across the industry.
Share:

The inverse square law (ISL) is one of those principles of photography that drives people crazy. It’s a fairly simply concept that’s broken down into a rather confusing sentence. It states that the intensity of an effect such as illumination or gravitational force changes in inverse proportion to the square of the distance from the source. That, to most people means absolutely nothing.
So, in this video, photographer Joe Edelman is here to explain it in straightforward terms. In his usual way, Joe has lots of diagrams and practical examples to illustrate what it’s all about. The ISL can be a difficult one to wrap your head around at first. Once you understand it, though, it all makes complete sense. You’ll wonder how you ever got on without knowing it.
The problem with the ISL is that it’s physics. It’s maths. And who wants to deal with that? People don’t want to have to think about it every time they go to shoot a photo. But once you figure it out, it’s quite easy to deal with. And you don’t need to carry a calculator around with you. It’s certainly not something you should be afraid of.
It begins with light falloff. Just how quickly (or slowly) the light gets darker the further away it gets from its source. The source being the flash. joe lines up his eggs six inches apart to illustrate. You can see there’s a big difference in exposure between the one 6 inches away from the flash and one 12 inches away. Only six inches apart from each other. There’s very little difference between the ones at 42 and 48 inches, though, which are also six inches from each other.

The next step of this demonstration illustrates why people get confused by the ISL. People, naturally, just assume that when you double the distance you get half the light, but this isn’t so. When you double the distance you actually only get a quarter of the light hitting your subject. That’s two whole stops. So, while Joe needed an aperture of f/22 to adequately expose for the egg at 6 inches, f/11 (not f/16) exposes the egg at 12 inches.
A simpler, and easier example, shows a portrait subject 3ft in front of a medium grey background. The light is also 3ft in front of the subject. Shooting at f/16, the subject is well exposed, with a fairly dark grey background.

Notice what happens, though, when the light is moved a further 3ft from the subject. Doubling the distance from 3ft to 6ft means that the aperture must be opened up from f/16 to f/8 to get a good exposure again. Remember, when you double the distance, you lose two stops.

But do you notice how the background is lighter? This is because the distance between the light and the background has not doubled. So, it’s not lost two stops. The subject doubled in distance, going from 3ft to 6ft. The background only went from 6ft to 9ft. So, it’s only lost about a stop. When you adjust your aperture to compensate for the subject, the background appears about a stop brighter.
When you double the distance again, taking the light to subject distance from 6ft to 12ft, you lose another two stops. That’s four stops below our original exposure. Now, at f/4, the background is even brighter relative to our subject.

When you see all three side by side, you really notice the difference. And remember, the flash is set to the same power level for all three shots. The only thing that’s changed is the distance to the subject (and the background).

This is just one way the ISL impacts your photography. And this is a fairly straightforward example. Where it starts to get tricky, and where understanding it is the most vital, is when you start to photograph multiple subjects together. When you photograph couples or groups, the last thing you want is for one subject to be well lit, while the others are underexposed.

Joe illustrates throughout the video that the important thing to remember is the visuals. How having the light closer or further from your subject affects how it presents. You don’t need to remember the exact distances or apertures. As Joe says, that’s why we have light meters.
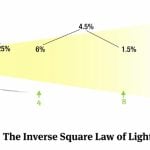
This chart shows a visual representation of how and why the ISL works. And, again, remember, the numbers aren’t important. Just how the distance affects the light.

Joe covers several more examples in his video which illustrate common mistakes new photographers make with flash. He also explains how to solve them, too. So, if you’ve been getting overexposed elements in your portraits, or group shots where some people are brighter than others, pay attention.
And, for those that do want the maths, well…

You’ll probably want to watch the video a couple of times to understand it. And you’ll almost certainly need to go and try it out for yourself and experiment. But once you get it figured out, you’ll be so glad you did.

John Aldred
John Aldred is a photographer with over 25 years of experience in the portrait and commercial worlds. He is based in Scotland and has been an early adopter – and occasional beta tester – of almost every digital imaging technology in that time. As well as his creative visual work, John uses 3D printing, electronics and programming to create his own photography and filmmaking tools and consults for a number of brands across the industry.
Related Posts
 The Inverse Square Law of Light, Explained in the Simplest Way Possible
 These Two Photos Will Make You Instantly Understand How The Inverse Square Law Works
 Lighting Design the Easy Way – Secrets of the Inverse-Square Law of Light
 One way or another, this video will help you understand the Inverse Square Law
Join the Discussion
DIYP Comment Policy
Be nice, be on-topic, no personal information or flames.
9 responses to “A visual approach to the Inverse Square Law and how it affects photographers”
I remember when I was first studying photography in high school, and a tutor at a workshop on portrait photography explained this to me, and I wondered if it could also be used in the darkroom.
I managed to use the formula so that, after I had made a successful test strip, if I changed the height of the enlarger head, the aperture or the exposure time, and one of the other variables stayed constant, I could pretty accurately calculate the other variable.
There is something that is kinda weird. He say the closer the light tge harder the shadows and vice versa. This is kinda not true cause the closer the light the bigger it is to the subjet the more it wraps around hence softer shadows
If you look at the picture of the eggs on a scale he displays around 2:04 in the video, you can see that the shadows are harder the nearer to the source, despite the “relative size” change in light source.
It does not matter how hard they are but the Shadow on the back eggs will be relatively harder. Cuz the light is much further
I think you are using “hard” to mean “dark” when in actuality its more about the immediacy of contrast between the lit and the shadowed area. If you look at the image about light spread, you actually see that the further away, the “bigger” the light source (not brighter!) is to the subject. This is science, not conjecture.
I have no idea what u are talking a bout. I use the right words and when i mean hard shadows is a define shadow see the first egg its lit from the back. Whereas the last one has a big shadow in the back. Dont look at it at this exposure but u need to expose for it correctly. This is why he said is misleading
When the light is moved farther away, it becomes a relatively smaller source and therefore a HARDER light, not softer. But there is an optical delusion that is gets softer because the highlights get dimmer but the shadows remain the some so the RATIO decreases and the appearance is a softer light … but it IS NOT!
That is correct, Salim! When the light is moved farther away, it becomes a relatively smaller source and therefore a HARDER light, not softer. But there is an :optical delusion” that is gets softer because the highlights get dimmer but the shadows remain the same so the RATIO decreases and the appearance is a softer light … but it IS NOT!
Here’s what I got out of it: 1) double distance means double the stops (of light) lost. 2) the farther I am from a light, the faster it gets dark. 3) use a meter to do the math