


Using Two Lights To Get A Perfect On White Look
Jul 4, 2014
Laya Gerlock
Laya Gerlock is a Portrait and Product photographer based in the Philippines. His passion is teaching and sharing his knowledge in Photograpy and has been doing this for 6 years.
Share:

There are a lot of things you can do with just two lights, but one of my favorite is creating this On White look with a spill effect. This tutorial will show you how to quickly create this On White look with spill lighting using only 2 lights.
What you need:
- A Camera
- 2 lights – Either Speedlights or Studio strobes
- Flash Triggers
- A softbox, an umbrella or beauty dish as main light
- Big Softbox, White Seamless Paper, or White Cloth – Background light
- Reflector or illustration board – Fill light
Step 1:
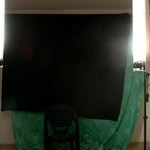
Place your subject really close to your background. Your background will also double duty as your background light. Since your subject is placed really close to the background light the light will spill and wrap around them. For this shot I placed my subject really close to the Big Mama (Westcott Apollo JS).

If you don’t own a big softbox, you can use a white background as the background light. Point a studio strobe towards the background and place your subject right in front f the strobe.

Yet another option if you don’t have a big softbox is use cloth for your background and place a studio strobe pointing at the white cloth from behind.
Step 2:
Place your main light 45 degrees above your subject, and place a reflector below your subject for fill. For this shot I used my DIY Beauty Dish, but you can use an umbrella, a softbox or any other soft light for the main light.

Step 3:
Test out your main light so you could adjust for the exposure of the subject. My usual settings are ISO 200, 1/160 shutter, f8. The power of my sb-600 thru a DIY beauty dish is at 1/2 power.

Step 4:
After getting the exposure for the main light, turn on your background light, I normally set the background light 2 stops higher than my main light. Depending on the lens used, you may get a little bit of flare or low contrast in your shot. While it is best to get it right in camera, if the lens you have produces low contrast, you can get the contrast back later in Lightroom.

It is very important to have a clean lens when using this technique. The background light is very strong and it will be bouncing inside your lens. You will get a lot more flare if you have a dirty lens or filter.
Step 5:
After getting the shot, it’s time to do a little bit of tweaking and add some of the contrast back to the shot. Play around with levels and curves in Photoshop or Lightroom:
- To get the details back from the flares move the shadows slider to the left.
- To add a little bit of highlights to the shot play around with the highlights and lights.

You can also play around with the saturation and the tones if you want but playing around with the curves really makes a big difference.

Here is a Before and After comparison after the edit

Final Shot

More Examples of this technique.


I would like to thank Kriz Nuqui, Sushmita Abantao, and Jennevie Luna and my Girlfriend for modeling.

Laya Gerlock
Laya Gerlock is a Portrait and Product photographer based in the Philippines. His passion is teaching and sharing his knowledge in Photograpy and has been doing this for 6 years.


Join the Discussion
DIYP Comment Policy
Be nice, be on-topic, no personal information or flames.
4 responses to “Using Two Lights To Get A Perfect On White Look”
Another great instructional post from Gerlock! I’m really enjoying his articles on here. Keep it up please:)
Thanks for the support and the comment :)
Another tip is aim the background softbox upwards at a 45 degree angle. It’ll help reduce the flare, and still gives a similar effect.
thanks for the tip :)