


This studio simulation is so good, I am recreating my entire portfolio as CGI
Nov 11, 2018
Stefan Kohler
Stefan Kohler is a full-time retoucher. He’s from Germany and likes bacon. In the last years, he built up a broad community around his retouching classes at the Infinite tool’s website.
Share:
Being kind of a computer geek, I found myself looking for a good way to simulate studio lights. I tried Blender, Cinema 4D, and other 3D programs until I found Set.a.Light 3D. Let me save you the long read. It’s awesome. OK, you can continue now.
I first fell in love with Set.aLight 3D with one of its first versions back in 2015 or so. It was love at first light (sorry! I could not resist the pun). Since those early days, the simulation improved quite a bit, and the latest v2 release officially blew my mind.
Let’s just try to put it in simple words.
What is Set.a.Light 3D?
The simulation is available for both Mac and PC, and it offers a virtual photography studio. You can invite virtual models, place virtual lights and virtual studio tools as well as virtual gadgets.
That sounds pretty easy to implement, but the way Set.aLight 3D renders light is incredibly close to how light “moves” in real life. Frighteningly so. OK, direct lights are easy, but lights and colors and reflections and shadows and bounces are pretty complex and are hard to pre-imagine. This is where Set.a.Light really shines (no pun intended).
Set.a.Light 3D utilizes a gaming engine to calculate the light. If you’ve seen any of the latest computer games, you know what I am talking about. Now get rid of all the violence and blood and you get a very good light rendering engine.
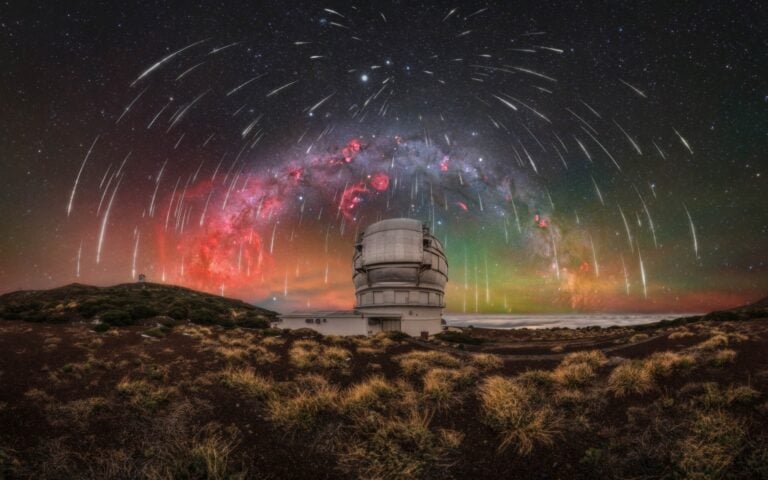
If you want a taste of how good the engine is, let me share an image that was planned with Set.a.Light (left) compared to the real shot (right):

That’s pretty insane, isn’t it? I want to share the setup in Set.a.Light as well:

Yes, you can gel the lights, which is extremely helpful in my opinion. If you ever tried a color-intense shoot you know that colorized light is hard to control and it mixes in an annoying and unpredictable way. This is when the simulation is critical for both me and the model. It means that we don’t need to spend time testing, and have a great setup to start with.
How will your virtual studio look like?
It will look exactly the way you want it to look. The first thing you would like to adjust is obviously the size of your room. Then you can add paper backgrounds (or a cyclorama), set colors for walls, floor, and ceiling and you’re ready to go. There is a bonus in going software, you never need to re-paint your cyclorama. (Set.a.Light render with a gorgeous model on the left. Me re-painting my cyclorama on the right)

Which lights can you use?
I don’t think there is a point in writing down a list. I would just be endless and boring. If you want to get the feel for it, there are 3 categories of lights: monoblocks, hot-shoe strobes, and continuous lights.
You can choose from a wide variety of light modifiers, like strip lights, octagonal and rectangular softboxes, beauty dishes, normal reflectors, umbrellas in all kinds of shapes and forms. I counted a total of 60 lights (which I wish I had along with a big storage room to keep them). Each light has a wide variety of options, like adding grids, diffusers, and gels.
I quickly recreated my softbox paradise here. On the right, you see my brick and mortar studio, along with some random things I’ve put into my studio. On the left, you can see a much cleaner version made with Set.aLight

As you can see, it’s safe to say that Set.a.light 3D has your standard gear covered.
Special lights
Set.a.Light 3D offers some special lights as well. There are Ring lights and a Ring flashes as well as a gobo projector (A.K.A Light Blaster). God, I love gobos. Let’s have a look. This was the planned shoot in Set.a.Light

And the real shoot with a Light Blaster:

What Models are available?
A studio with no models is not fun. The same rule applies to virtual studios.
So Set.a.Light 3D comes with 6 base models (3 female adults, one child, 2 male adults) which can be dressed or nude, change hairstyle, change clothing, have sunglasses and change pose.
Actually, there is a (ridiculously good) posing module. You can control the model down to the limb and this is where the real fun starts. Here are some examples of the built-in poses (there are about 70 of those):

You may use this as a basis for your “shoot” and start moving body parts around as you wish – it’s nuts and it’s really fun.
The render quality
Ok, now to the serious parts. How is the light, can it be used for real simulation?
I am stunned by the details of lighting: Shadows and Highlights are amazingly close to real life. Even the shadows from the models bone structure are rendered very well. Let me pick on a closeup:

I feel the urgent need to retouch this…
Conclusion
As I am working with Set.a.Light 3D for quite a while now, I discovered a few things:
1. My lighting has improved quite a bit. No more annoying “One second <add model name here>, I am gonna move this light a bit, oh – let’s try another modifier then, nope, might be better to just put everything a bit closer to be background, do you happen to have a yellow shirt?” anymore. It’s very easy to plan a shot at home while your partner is watching Netflix. Plus, it’s fun.
2. I am sending the renders to the model and Makeup artist ahead of time as moods. Since I started doing this, I’ve never heard an “I am not that skinny” or “the model does look great, I love her in that shot”. What I hear is “I’ve got a dress like that, but mine is shoulder free” or “I have to mix a cyan lipgloss then”. Everyone on set has a pretty good idea of what’s happening, and what the final outcome has to be. Everyone knows what the shot is about.
3. My assistant has the set plan a few days before the shoot. Down to the gels I need in the softboxes. This is the kind of preparation that both make customers happy and makes everyone more confident about lighting and equipment. This takes away the trial and error from the live shoot because you made all errors at home. On your couch – with Netflix in the background.
4. I discovered a ton of new ideas just by randomly dragging lights around or editing existing setups. It’s so cool because it’s so easy – there is no need to spend a lot of time building complex setups.
Even for customers, I deliver these renderings as moods and it’s not a big deal if an idea gets thrown away. I just keep it for next time, as a base for something different or for a different client. My library of setups is constantly growing. Whenever I get some spare time with a model, I spend a few minutes in my library to get some crazy ideas executed.
5. Set.a.Light 3D saved me a lot of money because I know what’s possible with the light I already own. Using my lights and modifiers in a different, sometimes slightly unconventional way brings new options to the tools that are already there. Lately, I’m working way more with hard lights and my need for new light modifiers is slightly above zero.
Pricing and availability
Set.a.Light 3D comes in three flavors:
- The Studio Version (
$229– currently $174)
This is the full version, it has all the features I’ve talked about in this article. - The Basic Version (
$94– currently $74)
This flavor has some limitations. You can’t set your studio size, you are limited in lights and as far as I understand, the rendering resolution is a bit lower as well. Have a look at the store to see all limitations. - The demo version (well… it’s free)
This is a demo for the studio version, you can use it for two weeks and try everything out.

Stefan Kohler
Stefan Kohler is a full-time retoucher. He’s from Germany and likes bacon. In the last years, he built up a broad community around his retouching classes at the Infinite tool’s website.


Join the Discussion
DIYP Comment Policy
Be nice, be on-topic, no personal information or flames.
8 responses to “This studio simulation is so good, I am recreating my entire portfolio as CGI”
now I don’t have to (or less) interact with models anymore, which is great
Hahahaha, I know what you mean :D
This is quite impressive Stefan. Can you select your camera? Focal length and so on?
Lens, focal length, exposure, apparture, ISO, white balance, aspect ratio and crop factor is adjustable and has an effect on the image – of course.
That looks cool, really, especially when considering you say that it helps you to improve your lighting, of course.
What I like also about the idea of studio lighting virtualisation is especially the time and energy you save with it.
But, do you think that it can be a base to learn studio lighting for beginners or do you think it needs a serious knowledge and real experience (like you have) before it can be manipulated first ?
That‘s a very good question.
For me it was (and is) a great learning tool. For one readon because there is a nice community who shares thoughts and set-files. I will do my very best to take part of that and contribute basically everything I know about light.
Another thing is the struggle with models and posing and lighting – this is overwhelming for everyone, especially when working with inexperienced models (which is also very often the case). Set.a.light takes away that part because most people are more relaxed when there is no pressure – also the setups can be discussed upfront and some people might point out problems even before you enter the studio.
I‘d say you don‘t need to know anything about lighting and you‘ll gain knowledge if you are open minded and listen to others. I‘d also say it will help unrelated to the knowledge you actually have – the setups will just be different in complexity.
Of course there is a risk as well: inexperienced photographers tend to solve problems by dragging more lights to a scene instead of fixing the existing ones, which leads to sets that are not executable because of a lack in equipment.
If you are aware of this: this is an awesome learning tool.
No risk for the last risk with me :D I’m used to use only what I have, it’s not specific to my experience with photography anyway… though there’s a risk I’d be tempted to play ;)
Most important : thanks a lot for your time, answer and wise advices, very informative.
How do you mount your skinny softboxes on the wall?