


This photographer combined light painting and levitation to create a portal to another dimension
Jul 27, 2018
Dunja Đuđić
Dunja Djudjic is a multi-talented artist based in Novi Sad, Serbia. With 15 years of experience as a photographer, she specializes in capturing the beauty of nature, travel, concerts, and fine art. In addition to her photography, Dunja also expresses her creativity through writing, embroidery, and jewelry making.
Share:

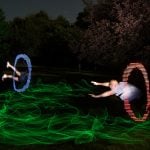
Light painting can give a sense of otherworldly to your images, and so can the levitation. But when you bring those two together – it can take you to another dimension. Pennsylvania-based photographer Swen Cubilette brought levitation and light painting together to create an image that captured my attention immediately. He kindly shared his image with DIYP and chatted with us about how he created this captivating photo.
Gear and settings
To start with the gear, Swen used a Canon 5D MKII paired with a Canon 16-35mm 2.8 L lens. He placed the camera on a tripod and used a remote radio trigger instead of pressing the shutter. For the light painting, he used an Eagletac D25 tactical flashlight and a blue acrylic fluorescent light tube guard. And of course, a stool for the model to lay on so Swen can create the levitation in post. As for the camera settings, the photos were shot at f/2.8, ISO 400, with the shutter speed of 2s and focal length of 23mm.
The shooting process
Swen first found a spot that would make the final image interesting, so he locked his camera onto the tripod at the selected location. Then he used a bucket to wet the ground as to get more reflection from the light painting and to make the elements in the photo look more appealing.
When everything was set up for the shot, he gathered three random debris objects from the environment to use as markers. One of them served as a marker for his focal point, and the other two objects he placed to the left and the right of his focal point marker to get a reference on where to start and stop the light painting portal.
Now that the markers were set, Swen dialed in the settings and made sure that his lens was on manual focus. Since this is an image stack, he had to make sure he used the same amount of light for each image. So, he set the camera to manual, set the exposure time to about 2 seconds and adjusted ISO and F stop to balance out the exposure and to make sure that the background and scene would be properly exposed.
Swen took a total of about 3 images for this image. The first image is a two-second exposure with no light painting to get a clean plate of the background in case he had to mask out some motion blurs of himself from when he light painted the portal. Then he took the second capture of just himself light painting a portal so he had a clean plate of the foreground elements with the proper lighting to use as a mask.
For the third image, he got the stool and placed it right on his focal point marker. He got the model to lie on the stool and hold the “levitation” pose for two seconds while Swen light paints the portal above. He took several shots to make sure to get enough material to work with in post.
Editing
When the shooting was done, Swen exported everything into Lightroom and choose the three images he wanted to use for the edit and stack them. Then he sent the images to Photoshop as layers and began to create his masks. The first image is a clean plate with no lighting for the background which goes on the bottom of the layer stack. He took that layer and mask out everything except for the city lights. The second layer is the clean plate shot with the just the lighting, so he masked out everything in that picture. He prepared it so he could paint over the image with the model as to hide the stool and other elements that need to be edited out to create the levitation effect. After finishing all the masking and got the desired results, he saved the final image and went back to Lightroom to make some additional color edits and tweaks. And this is the final result:
If you’d like to make an attempt of your own, there are plenty of light painting and levitation tutorials on our blog. And Swen gave you a detailed description of how you can create a captivating image like this. Make sure to check out more of his work on his website and follow him on Instagram, Facebook, and Viewbug.

Dunja Đuđić
Dunja Djudjic is a multi-talented artist based in Novi Sad, Serbia. With 15 years of experience as a photographer, she specializes in capturing the beauty of nature, travel, concerts, and fine art. In addition to her photography, Dunja also expresses her creativity through writing, embroidery, and jewelry making.

Join the Discussion
DIYP Comment Policy
Be nice, be on-topic, no personal information or flames.
4 responses to “This photographer combined light painting and levitation to create a portal to another dimension”
This picture is amazing! He is going to go places with work like this.
Brilliant!!!
That is one incredible picture!!!
That’s fantastic.
Kind of a shame that all that creativity is wasted with such a garbage setting, though.
Otherwise awesome