


This is how you make a perfect circle when light-painting with tubes
Feb 27, 2019
Dunja Đuđić
Dunja Djudjic is a multi-talented artist based in Novi Sad, Serbia. With 15 years of experience as a photographer, she specializes in capturing the beauty of nature, travel, concerts, and fine art. In addition to her photography, Dunja also expresses her creativity through writing, embroidery, and jewelry making.
Share:
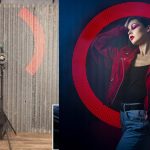
Light painting with tubes is a popular technique and it lets you create all sorts of interesting shapes. But if you want to make this shape a circle, it can be a challenge to get it right and to make it perfect. But Eric Paré and his partner Kim Henry will help you with that. In this video, they share and demonstrate some techniques that will help you light-paint perfect circles in your images.
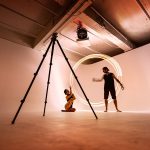
There are a few key aspects to think about when drawing a circle, and one of them is how you hold the tube. Kim notes that Eric likes to stand sideways behind her so he hides from the camera. When drawing a circle, it’s wise to extend the arm fully to have a constant movement of rotation.
A handy trick is to fix a point on the model’s back, which will be the center of the circle. This will help you keep the hand at the same height as you rotate the tube. At the end of rotation, you can open your palm and hold the tube with your thumb and index finger. This will prevent you from bending your elbow and moving the tube away from the center of the circle.
Also, make sure to start and finish the movement behind the model’s legs. This way you won’t get any overlap. Finally, pay attention that the pane on which you’re drawing is parallel to the camera. Otherwise, you won’t get the perfect circle, but it will end up looking distorted.
I hope that you found these tips helpful. So, next time you go out with a model and light-painting tubes, have them in mind and draw some ideal circles. Take a look at some of Eric’s examples below, and if you have any tips of your own, feel free to share them in the comment section.
[Tube light-painting photography tutorial: The perfect circle – #115 | Eric Paré / Xangle]

Dunja Đuđić
Dunja Djudjic is a multi-talented artist based in Novi Sad, Serbia. With 15 years of experience as a photographer, she specializes in capturing the beauty of nature, travel, concerts, and fine art. In addition to her photography, Dunja also expresses her creativity through writing, embroidery, and jewelry making.


Join the Discussion
DIYP Comment Policy
Be nice, be on-topic, no personal information or flames.
5 responses to “This is how you make a perfect circle when light-painting with tubes”
This is the next thing I’ll try
The photos are a single exposure or does he take another for the background?
Always single exposure except for the startrail ones (I won’t ask Kim to stay still in the cold for 20 minutes lol)
The single-exposure thing is explained in this one: https://www.youtube.com/watch?v=EowVZWPdY9g
Merci à toi! :D
Eric Paré – Xangle je te remercie parce que tu as la générosité de partager des astuces que tu as mis du temps à concevoir, là où d’autres préservent jalousement leurs petits secrets. C’est comme ça que le monde avance et j’adore ? Belle journée !