


How to create a perfect, risk free light painting circle
Oct 6, 2022
Gavin Hoey

Udi Tirosh is an entrepreneur, photography inventor, journalist, educator, and writer based in Israel. With over 25 years of experience in the photo-video industry, Udi has built and sold several photography-related brands. Udi has a double degree in mass media communications and computer science.
Share:
A few months ago, I gave a masterclass about how to create colorful portraits. One of the setups was a unique portrait with a model “trapped” inside a light-painted circle. I wanted to share how I created that portrait using a drill, a found garden hose, and a couple of KYU-6 LED lights.
You may hear me saying “don’t try this at home” a couple of times. If you do decide to defy me, please use soft materials like a garden hose and soft KYU-6 lights. (vs., say, a broomstick).
I set the video above to start running from 1:28 for the relevant setup, but I encourage you to watch the entire video for a few other cool setups and tips.
Setting up for light painting
The secret to getting that perfect circle is using a spinning thing with a constant radius. I know DIYP shared a painter’s pole tutorial for perfect light painting circles. But for this setup, it would not work. Besides Sophie, the model, we had Sam and I in the studio, and attaching a painter’s pole to a fast-spinning drill did not sound like a good idea.
Instead, I used a much softer material – a garden hose. A small splitter in the middle of the hose will give the drill something to latch on. Of the two ends, I placed two KYU-6 lights. What I like about this setup is that it’s soft.
So, the drill will spin the hose with the two LEDs at a constant speed and a constant distance from the center, creating the perfect circle around Sophie.
As always, I’ll be using my trusted Olympus, shooting tethered and displayed on BenQ 27″ monitor, which is an absolute delight to look at. For color accuracy, I’ll be using a ColorChecker, and you can see why (and how) it provides better color accuracy in the first part of the video.
Setting the Exposure
This photo will have two elements – a light painting element surrounding the model and, of course, a model. Let’s set the exposure for the light painting first. How long do we need to expose to complete a full circle? Let’s find out.
This is the circle we get from a 1/10 exposure:

Going to 1/4 of a second creates a fuller circle:

This is better, but the backdrop is way too bright. And this makes sense because we have the lights on, so a longer exposure means a brighter image. Let’s turn the lights off:

If you look at the spinning lights, they look kinda like this (note how I shy away from the spinning lights):

For the final image, I added an Elinchrom flash with a gridded softbox at about 45 degrees to the model. This will give her a pop of light to freeze her in the shot.
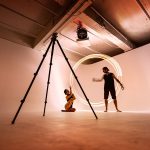
This is the final setup, adding a bit of smoke.

And here is the final image:

Post Processing
In this video, I show how I post-process the images in photoshop and a few other tricks. Like before, I set the video to start at 56:49. To see how I edit the first portraits, simply go to the start of the video.
About the author
Gavin Hoey is a freelance photographer, writer, and trainer of all things photographic. His work is regularly featured in photography magazines, websites, and videos. Gavin has a real passion for sharing his photography and Photoshop knowledge. You can see more of his videos on his Youtube channel and see more of his photos at @thegavinhoey.
We love it when our readers get in touch with us to share their stories. This article was contributed to DIYP by a member of our community. If you would like to contribute an article, please contact us here.


Join the Discussion
DIYP Comment Policy
Be nice, be on-topic, no personal information or flames.