


The Rhino Motion Kit is not cheap, but it’s one heck of a motorized slider
Jan 26, 2019
Udi Tirosh
Udi Tirosh is an entrepreneur, photography inventor, journalist, educator, and writer based in Israel. With over 25 years of experience in the photo-video industry, Udi has built and sold several photography-related brands. Udi has a double degree in mass media communications and computer science.
Share:
We are a small crew, this is why it’s handy to have one moving camera that needs no attention when we shoot. It means one less crew person while getting top notch B cam footage. And our slider package of choice for that is the Rhino Ultimate Slider (Amazon | B&H).
Having an automated motorized slider is a powerful tool to have in your box. It allows the same camera moves that your typical slider will allow. But it also adds an array of abilities to the team that a normal slider does not:
- You can run in unattended mode, freeing a camera person from manning a camera
- You can run time lapses
- You gain 100% repeatability for complex shots
- and you gotta say, it looks darn cool.
Now, we review the previous non-controlled version of this slider and we loved it. (this would also be a great opportunity to review how my hairstyle changed over the years), but the motorized version is a huge step up and is definitely worth the upgrade. Lets get on with the break down:
What’s in the box
The $1,825.00 kit contains everything you need to start working (aside two light stands if you want to set the slider off ground):
- EVO PRO Rails (42″)
- Camera Carriage
- 2 x End Caps with All-Terrain Legs
- EVO Carbon Rails (24″)
- Motion for EVO Sliders
- Arc Motorized Pan Head for Rhino Motion
- Rhino Motion Control Cable
- Mini-USB to USB Cable
- USB Wall Charger
- Allen Wrench
- Slider EVO Carrying Case (42″)
It’s a lot of units but they fit nicely into the carrying case.
Build Quality
The kit is made from four main parts: Rails, Arc (give you panning), motion (the controller) and case. All of them feel very solid.
One thing that can kill a slider is uneven tracks, and the tracks on the Rhino slider are as smooth as you can get. Both the heavyweight aluminum rail and the lighter carbon fiber rails were incredibly even with no bumps, dents, or other defects that come from using lower grade or lower finished materials. I think that this is one of the main differentiators between the higher class gear and the cheap stuff on AliExpress.
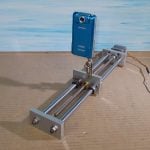
The camera caddy is equipped with six wheels (four outer wheels and two inner wheels) which keep contact with the rail at all time so motion is never interrupted losing and gaining rail-contact.
Everything is made from either aluminum or finished off with a nice bumper rubber.
We’ve been using the set for about a year now, and it has traveled the world with us, so far no complaints.
I would say that when we initially got the unit, the motion controller kept crashing when entering time-lapse mode. We had a quick email exchange with the company and they sent a replacement ever before we sent the broken one in at no charge. While getting the first unit DOA, this is exactly the type of customer support I would expect from a company that stands behind their products.
In the field
This motion kit is now a standard piece in our production kit and goes anywhere with us. It packs very light with the carbon fiber rails. It’s kinda heavy with the aluminum “pro” rails, but our main camera is a Sony A7III and the CF rails are enough for it. The fact that it packs so light, means that we don’t really care if we will use it or no, it is always in the production kit.
Rhino made a clever choice and made the “end” part of the case with a small bump (think “guitar case” with a very, very long neck). This means that the rails can pack with the arc and a small head. This may not seem like a big thing, but it saves time and moving parts during setup and down.
Setting the kit up takes minutes, partly because it’s simple to set up, and partly because it feels sturdy enough to just go-at-it without having to fiddle with them. Even when fully set-up it is self-contained as one unit with the controller magnetically mounted on the side of the slider.
There are a few things that we found annoying at first, and I will share those with you, so save you the time to figure them out. Once you know them, they are easily dealt with.
There aren’t a lot of cables, but it feels like a lot of cables. The Arc, which, provides the pan axis has a “brain” of its own, and it connects with the controller with the long curly cable. That cable likes to “get in the way”. Just make sure it is completely free and dangling to the bottom. There is another cable from the controller to the remote, and lately a third cable from Camera to Arc for time lapse. It would have been nice to have fewer cables. to deal with.
The other big thing is the startup sequence. You can not just connect everything, light everything up and hit GO. The order in which you start the system is important and the components will not recognize each other if you initiate the system in the wrong order. This is not a big thing once you figure this out, but you have to follow that sequence. Lastly, the controller does not “remember” your settings and you have to tell it the slider that you use every single time. I wish I only had to do this on changing rails which we almost never do.
The only real issue that we had was with the motor noise, which is harder to overcome. If you move slowly (up to speed=3) the slider is fairly quiet, at speed=4 the noise is audible enough to appear in any close microphone. The coffee shot was taken at speed=3, using Rode’s filmmaker kit neck mic, and we still had to clear a bit of noise in post.
Design choices
There are some design choices that Rhino made that makes it clear for me that they are listening to their community. I already talked about the useful bump in the case, but there are a few other good decisions that I would like to note.
- To stop the slider there is a silver round lever, the previous version had 2 smaller annoying levers and it is much easier to both lock and unlock the slider now
- There are many ways to mount the slider onto something high. The end pieces have both 1/4-20 and 3/8 threads fo all types of stands. But there is also a middle plate that you can mount on a tripod (for lightweight gear)
- Once the kit is assembled for the first time, putting it up and tearing it down requires no tools. This is a big one because tools always get lost.
- The kit has two configurations, a 42″ and a 24″. I am sure this is somehow factored into the price, but it still feels good to get two sliders for the price of one.
Conclusion
This kit costs $1,825.00 (Amazon | B&H) which puts it in the medium-high range of motorized sliders. It is not perfect, but it ranks incredibly high on our value to price meter. It is an essential piece of our kit and we use it daily. We would recommend it in a heartbeat. In fact, the only reason to hold on this kit is if you want to back up Rhino’s next 4-Axis slider.

Udi Tirosh
Udi Tirosh is an entrepreneur, photography inventor, journalist, educator, and writer based in Israel. With over 25 years of experience in the photo-video industry, Udi has built and sold several photography-related brands. Udi has a double degree in mass media communications and computer science.
Related Posts
 The SYRP Genie II is the perfect motorized slider (just give us the full app already)
 DIYP Reviews The Revolve Motorized Slider
 Build your own motorized custom camera slider from scratch for around $75
 The Trexo Slider is a mini motion control camera slider for creatives who like to pack small and light
Join the Discussion
DIYP Comment Policy
Be nice, be on-topic, no personal information or flames.