


Surf Photography Primer
Jul 4, 2010
Udi Tirosh
Udi Tirosh is an entrepreneur, photography inventor, journalist, educator, and writer based in Israel. With over 25 years of experience in the photo-video industry, Udi has built and sold several photography-related brands. Udi has a double degree in mass media communications and computer science.
Share:
 This Wave photography Primer was written by Dane Grady.
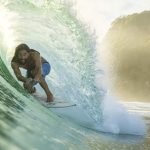
Below, you will find an introductory guide to the beautiful art of Wave Photography, covering all the key components, from choosing a camera to finding the right kind of waves. Enjoy the ride!
Before I can cover what kind of gear you need for Wave Photography, Safety is EXTREMELY important! You should have knowledge of the ocean and ocean currents, and have experience in and be more than comfortable in the surf. Know the area you want to shoot, study the conditions… “know before you go”
Gear Guide
There are three parts to a surf photography system, Two parts are similar to any photography, A camera and a lens. The third part, surf resistant housing, is unique to surf photography.

Choosing a Camera:
The ocean can take a toll on your camera, therefore choose a solid, strong camera body. It is also important to choose a body which is capable of shooting multiple photos at once (burst mode). Each wave passing is very short, and the chances of making a good image increase with the number of photographs you are able to take. A lot of us surf photographers use either Canon or Nikon. I personally use a Canon 40D (Solid magnesium body and 6.5 frame-per-second). A good (and slightly cheaper) camera to start with would be the Canon Rebel.
Choosing a Lens
I like showing everything that’s going on inside the tube, so capturing detail is very important. A wide angle or fisheye lens is key to shooting inside waves. I recommend the Canon 10-22mm.
In fractions of a second the wave can pass you by. You don’t have time to look through the viewing window. The wide angle allows you to keep your face away from the housing and still get an accurate shot.
Waterproofing The Camera

A “Housing” is what you place your camera in to make it water resistant. You need a housing that is designed for shooting in waves, for a lot of the housings on market are constructed for diving, giving it the ability to withstand the depths, rather than surf.
A surf housing consists of 3 main parts: outer body shell, a lens port, and a shutter trigger. Extra features can be added to the outside of the housing to adjust aperture or shutter speed while in the water.
I recommend using Essex Surf Housings. I have put my Essex housing through a gauntlet of tests and have not had one leak. Excellent product.
I also highly recommend a quality swim fin for dealing with currents, and a bodyboarding leash to keep you and your housing together.
Jumping In
This part should help understanding some of the basic concepts of the actual on location setup

Where To Shoot?
I recommend shooting only at a beach where you are comfortable. Choose a sandbar to start out with. The type of waves you should be looking for should be ‘hollow’ and have off shore wind conditions. A ‘non hollow’ wave makes it extremely hard to get a photo inside the tube. This, alongside onshore winds, create mushy, crumbling waves.
Sun, clouds, and landscape are also elements you should look for when choosing your location. Here in Hawaii, mid-morning sunny conditions make for the most vibrant photos. While early mornings, or late evenings make for more dramatic looking images. Cloudy days unfortunately don’t work in our favor.
A few locations I enjoy here in Hawaii that are great for wave photography are Sandy beach, Ke’iki beach, and Pipeline.
Setting Up
Before sealing my camera in the housing and getting in the water, I manually set my exposure on the beach.
Since the inside of the wave is the focus of my photography, in most cases, I will expose for inside the wave, where there is less light and over expose the outside conditions (like sky and ocean)
Shutter speed is also very important. To show clarity and detail in the water, giving it that “frozen” look, I recommend using a shutter speed of 750+. An aperture around f8 will give enough depth of field when wanting to capturing detail.
However choosing an exposure always changes depending on the day, beach and a whole lot of other factors. Experiment, have fun with it, the waves and conditions are always going to be different. No matter what, find what you like best!
After studying the area and choosing your exposure, It’s time to get out there and shoot!

What matters most now is your position in the surf. You need to know how the surf is breaking that day, watch the conditions and where the waves look best. Position yourself to be underneath the wave as it is rolling by. It may be hard at first, but you want to be as close to the hollow point as possible. Getting tossed around is inevitable, but the photos are sure worth it!

I hope you enjoyed reading this guide to Wave Photography. I am awestruck every day by the beauty of our ocean and I hope sharing this guide spreads that appreciation! ALOHA, be safe, and happy shooting!
 About the author: Dane Grady is a 22 years old Hawaiian photographer. Born and raised in Hawaii, Dane became heavily interested in preserving the beauty of the ocean. With five years of love and practice, today, He is making ocean photography his career. See more of his excellent work on danegrady.com.

Udi Tirosh
Udi Tirosh is an entrepreneur, photography inventor, journalist, educator, and writer based in Israel. With over 25 years of experience in the photo-video industry, Udi has built and sold several photography-related brands. Udi has a double degree in mass media communications and computer science.


Join the Discussion
DIYP Comment Policy
Be nice, be on-topic, no personal information or flames.