


Homemade Lenses: What’s All The Fuzz About?
Jun 30, 2010
Udi Tirosh
Udi Tirosh is an entrepreneur, photography inventor, journalist, educator, and writer based in Israel. With over 25 years of experience in the photo-video industry, Udi has built and sold several photography-related brands. Udi has a double degree in mass media communications and computer science.
Share:
") Several weeks ago, you may have read my post on this site entitled Build Your Own Lenses in which I extolled the wonders of homemade lenses and the soft, glowy images they produce.
Several weeks ago, you may have read my post on this site entitled Build Your Own Lenses in which I extolled the wonders of homemade lenses and the soft, glowy images they produce.
In this post, I’m going to explain how to get that softness under control to produce images with interesting and more subtle soft focus effects, such as the photo on the left. (I’ll even show you how homemade lenses can produce crisp, sharp images, if you like that sort of thing.)
A Quick Review
Let’s go back to my favorite simple lens: “The Antipinhole” a single, positive meniscus literally just placed on the lens mount of my camera.

This uncorrected f/ 1.0 lens produces very soft images such as this one:

Spherical Aberration & Aperture
The soft images result from the fact that simple, uncorrected lenses do not focus light perfectly. Instead, they have an array of aberrations, the dominant one typically being Spherical Aberration (SA). SA results from the fact that parallel rays of light passing through the center of an uncorrected lens come to focus at a different point than the light rays passing though the outer part of the lens. The light passing through the lens near the center comes to focus as expected at the focal length. However, light passing through the lens toward the edge focuses at a shorter distance. This results in widening the depth of field, reducing the contrast, and adding a glow around highlights.

So how do we get SA under control? Since it’s caused by the difference in focal length between the center and the edge of a lens, why don’t we just make all the light pass through the center? In fact, when you stop a lens down to, say f/ 32, you’re doing exactly that. In practice, homemade lenses can produce unexpectedly sharp images when stopped down to f/ 16 and beyond.
The next two images should give you a sense of this. They were both produced using a simple homemade lens made from a 75 mm achromat. The first image was shot at f/ 1.5.

And the next image was shot using a paper ring to stop the lens down to f/ 10.

Using Homemade Lenses for Macro
One easy way to put this to good use is to build a simple macro lens. Macro photography is one area where cheap homemade lenses can compete with expensive commercial ones. Generally, for macro photography, you don’t need or want fast lenses. I find I usually use f/ 16 or higher in order to get an acceptably wide depth of field. Even a simple achromat stopped down to f/ 16 can be pretty sharp. Also, adjustable focus, though certainly nice to have, is not a necessity. Precise focus can be attained by adjusting the distance between the camera and the subject. Finally, extreme close up is not difficult. If you want to get closer, just add another spacer or extension tube.
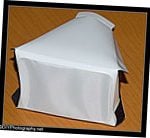
Here’s an example of a homemade macro lens made from the same 75 mm achromat used for the previous shots. The lens is mounted in recycled filter rings and attached to the camera via extension tubes. The location of the diaphragms (shown in the photo) is not critical. They can even be placed in front of the lens, if that works better for your build. (For build details on this lens see the previous post in the series.)

The image below was shot with this lens at f/ 32.

Controlling the Blur in Homemade Lenses
Getting SA under control does not necessarily mean eliminating it altogether. SA is the primary ingredient for producing beautiful soft focus effects. The trick is getting SA to produce images that are generally sharp, and in which the bright highlights are surrounded by a subtle glow.
Let’s take a careful look at what happens as we stop our homemade lens down. Starting wide open (in this case f/ 1.5) we get the expected soft image with a wide, dense glow surrounding our bright subject.

Adding an aperture disk to stop the lens down to f/ 4 sharpens the image somewhat and reduces (but does not completely eliminate) the glow. Notice that both the radius and density of the glow are reduced. That makes sense. All the light is now passing through a small area near the center of the lens. So the SA coused by “focal length error” has been reduced.

But what if we want a sharp subject surrounded by a wider, but more subtle glow? Put another way, what if we want to increase the radius of the glow while reducing the density of the glow? Can we do that? Well, yes. Since we are looking to control the “mix” of light passing through the center and the edge of our lens, we will need a more complex aperture that blocks some of the light passing through the outer part of the lens.
There are many possibilities for such an aperture. We’ll start by borrowing from a classic, commercial soft focus lens: the Rodenstock Imagon.
The photo below shows my attempt at replicating the Imagon. The lens is the same 75 mm achromat used for the previous examples. It was purchased from Surplus Shed for under $10 and mounted in recycled filter rings for easy attachment to my bellows. The paper aperture rings are inserted in between the lens and the bellows.

This was the setup used for the previous two photos of the yellow dandelions. For the sake of discussion, I’ll refer to the disks as disk 1 through 4 starting from the left. The first dandelion image (sbove) was taken without any disk and the second image was taken with disk #1.
Let’s see what happens when we use disk #2, which has a row of small holes immediately surrounding the central opening. Note that the subject is still relatively sharp and is now surrounded by a soft glow that extends a little further from the flower.

Disk #3 has larger holes that are moved a bit further from the center. The image still retains most of its sharpness but the glow has increased in both radius and density. Note that the radius of the glow is almost back to what it was without a disk. However the density is much less.

Finally, disk #4 most closely resembles the disks used by the Imagon. It has two rows of small outer holes. The result is somewhere in between the previous two. Again we see a relatively sharp subject surrounded by a controlled amount of glow.

Just the Beginning
The examples above barely scratch the surface of possible apertures to control or manipulate SA for artistic purposes. The basic ingredients are not complicated. Start with a simple positive lens with a healthy amount of SA (see my previous post for a refresher on that) and add an aperture that limits the amount of light passing through the outer part of the lens. You can start with the example disks I’ve shown or experiment with your own designs. (Or if you need a few more ideas, check here and here. I also suspect that the Bokeh Masters Kit could provide interesting possibilities.)
I’ll leave you with a few more example images shot with homemade soft focus lenses.


John Swierzbin is a photographer obsessed with DIY lenses, if you wish to learn more about them. please visit the Homemade Lens Group as well as his photostream both on flickr. There, you’ll be able to see many more examples of homemade lenses and the images they produce.

Udi Tirosh
Udi Tirosh is an entrepreneur, photography inventor, journalist, educator, and writer based in Israel. With over 25 years of experience in the photo-video industry, Udi has built and sold several photography-related brands. Udi has a double degree in mass media communications and computer science.


Join the Discussion
DIYP Comment Policy
Be nice, be on-topic, no personal information or flames.
One response to “Homemade Lenses: What’s All The Fuzz About?”
I’m new to interchangeable lens photography. I bought a used Canon 5dc w/50MM f/1.8 lens and I’ve been learning with that. Though I have always been into macro shots. I have some lenses, as in just the glass(double-concave, double-convex, etc.), and I was looking for some way to mount them to the front of my prime lens. Is there an accessory for this?