


Stick In A Can (Poorman’s Solution For 3D Lighting)
Aug 2, 2010
Udi Tirosh
Udi Tirosh is an entrepreneur, photography inventor, journalist, educator, and writer based in Israel. With over 25 years of experience in the photo-video industry, Udi has built and sold several photography-related brands. Udi has a double degree in mass media communications and computer science.
Share:
") A long while back I got familiar with Stick In a Can method for light positioning through the (sadly retired) Pro Photo Life Blog by Jim Talkington. In this post, I’ll show how to make one of those and what are some great uses for them.
A long while back I got familiar with Stick In a Can method for light positioning through the (sadly retired) Pro Photo Life Blog by Jim Talkington. In this post, I’ll show how to make one of those and what are some great uses for them.
A stick in a can is the poorman’s solution for positioning lights in three dimensional space. Basically it combines a stick, which provides some height and a cement filled can which provides anchoring weight. It works great for positioning worklights, reflectors and just about anything you can clamp.
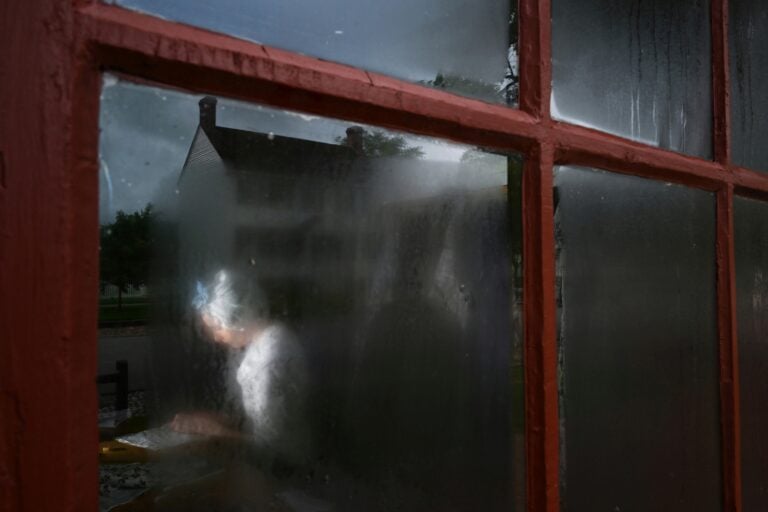
The Caterpillar above was shot using one of those stick in a can and some magic. (more on the magic in a future post).
As you may imagine, that cement stuff is pretty heavy so this constitutes a great solution for a studio , not so much for on location photography. It also provide a great solution for silencing songbirds if you are the mob kind of guy.
Step 1 – Get hold of a can, or preferably cans.
While the entire stick in a can solution is pretty easy, this step is the easiest of all. You can use any kind of can that you like. Canned food, chemical storage cans, paint cans. Really any can would do. Actually Bacon Spam cans are not that great.
Cement, at least the type that I was using, weigh about 2 Kilos for every litter, take that into account when deciding on can size. about 2-3 litter cans are great. Also low wide cans are better than tall thin cans.
I love pickles, so I got me a couple of eight liter pickles can. Please don’t ask where all the pickles went. I’d be forced to lie.

Step 2 – Attach a Stick
In the end, the stick would be embedded in cement, kinda like Han Solo and the Carbonite thing. However, It is not easy to place the stick once the can is filled with cement. This is why it is important to fix the stick first.
I use a 2cm by 4cm beam for the stick, however, any similar size will work. As for height, you can make those as high as you want. I think it’s best to make ’em as high as possible.
Since we already have an empty clean can, you can be pretty anal (like am) about placing the stick. You can use a straight angle to make a like which is 100% perpendicular to the floor.

Now, using a nail and hammer, make two small holes on that line. Those holes will be leads for the screws.
Attach the stick from the inside of the can and screw two wood screws from the outside. You should end up with the stick being very close to the edge of the can.

Step 3 – Cement It
Mix whatever cement you are using and pour it into the can. Make sure you clean any leftovers that fell on the floor. Once this stuff dries it is very hard to clean it.

Step 4 – Use it for lights
As I said in the beginning of this post, this solution is great when working with worklights. You can clam one, two or as many work lights as you want to get a some bright light. It a convenient way to light a cycwall or large backdrops in general.
Depending on the size of the light that you are using, you may want to clamp your worklights with an additional A clamp.
It works great if you just need a “regular” light coming from the side. The nice thing about CFL worklights is that they are so cold, you can flag them with cardboard.

but it also works great for booming lights over head, with an additional long stick and short stick. Just make a straight angle using more A clamps to make sure the horizontal bar doesn’t sink down.

Step 5 – Use it for backdrop mounting
If you have two of those, they can be use to mount a backdrop. Now they are heavy so I would not bring them on location unless I really (and I mean really) had to. And for the basement/studio I already have the low profile mount. Still, A bar clamped between two of those will make an excellent backdrop system.
The link at the top of the post, that directs to Jim Talkington’s video really shows some spectacular stuff you can do with those sticks.

Udi Tirosh
Udi Tirosh is an entrepreneur, photography inventor, journalist, educator, and writer based in Israel. With over 25 years of experience in the photo-video industry, Udi has built and sold several photography-related brands. Udi has a double degree in mass media communications and computer science.


Join the Discussion
DIYP Comment Policy
Be nice, be on-topic, no personal information or flames.