


RAW Photo Processing Workflow: From Import to Export in 15 Steps
Nov 11, 2025
Darlene Lleno
Darlene Lleno brings a unique perspective to DIY Photography as someone who grew up surrounded by camera gear but chose words over lenses. With five years of writing experience, she specializes in photography content that’s both technically informed and genuinely passionate. Growing up with a photographer twin brother meant camera talk was everyday conversation in her household. While he mastered capturing moments, Darlene discovered she preferred being the subject and the storyteller behind the scenes. As a travel enthusiast and mother of two, she understands the importance of preserving life’s precious moments. When not exploring new destinations or writing for DIY Photography, you’ll find her reading or tending to her garden. Her approach to photography writing is refreshingly authentic, she may not be behind the camera, but she knows exactly what it takes to help others capture the shots that matter most.
Share:

RAW photo processing gives you total control over how your final images look. This uncompressed format captures everything your camera sensor records without automatic adjustments baked in. You get maximum flexibility to tweak exposure, color, and detail later.
Processing RAW files takes more work than shooting JPEGs straight from your camera. But the quality boost makes that extra time worth it for serious work. A solid workflow keeps your editing fast and your results consistent across shoots.
Why RAW Photo Processing Beats Working with JPEGs
RAW files pack way more information than JPEGs from your camera body. Your sensor captures 12 to 14 bits of color data per pixel. JPEGs squash this down to just 8 bits and throw away detail forever.
This extra data gives you a good recovery power during editing sessions. Overexposed highlights that look blown out in JPEG often come back fine. Underexposed shadows reveal hidden detail when you brighten them up. RAW files handle extreme adjustments without falling apart at all.
White balance becomes totally flexible with RAW photo processing too. You can shift from daylight to tungsten or any custom temperature easily. JPEGs bake white balance permanently so temperature shifts look terrible fast.
Color grading works better with RAW’s wider range of available colors. You can push hues further without creating ugly banding or posterization. The smooth color transitions stay intact even with aggressive adjustments applied.

Understanding Different RAW File Formats
Camera brands use their own RAW formats which creates some headaches. Canon shoots CR2 and CR3 files while Nikon creates NEF files. Sony makes ARW files and Fujifilm produces RAF files for their cameras.
Adobe created the DNG format as an open standard anyone can use. Some cameras shoot DNG natively while others let you convert to it. DNG files ensure better compatibility across different software and future systems.
Your RAW software needs to support your specific camera model properly. New cameras require software updates to read their files at all. Check compatibility lists before buying a new camera body for safety.

Step 1: Import and Organize Your RAW Files
Start your RAW photo processing by importing files from your memory cards. Connect your card reader and let your software detect the new images. Most programs show preview thumbnails before transferring anything to your computer.
Copy your RAW files to at least two locations immediately during import. Save to your computer’s hard drive and an external drive simultaneously. This protects your work from the very start before anything can go wrong.
Create a folder structure that makes sense for how you actually shoot. Many photographers organize by date first, then by project or subject type. Use consistent naming like “2025_10_27_City_Park_Photoshoot” for easy searching later. Others prefer organizing by client name or event at the top level.
Add basic keywords and metadata during import to save time hunting later. Include location, event type, and general subject to help you find stuff. Don’t overdo keywords initially though since you can add more after culling.
Setting Up Smart Import Presets
Apply basic import presets to streamline your workflow from the very start. Add your copyright information as metadata to all files automatically during transfer. Apply a camera-specific color profile that matches your exact camera body model.
Some photographers add 1-star ratings to all imported images as a baseline marker. This marks them as reviewed and ready for the culling process next. It helps distinguish imported files from ones you haven’t looked at yet.
Preview images at decent size before importing everything you shot blindly. Delete obvious junk like accidental button presses or lens cap shots now. This cuts clutter in your catalog right from the start of everything.
Generate standard previews rather than full 1:1 for faster initial browsing speed. You can build high resolution previews later for images you actually edit. This speeds up imports a ton for big shooting days with thousands of frames.
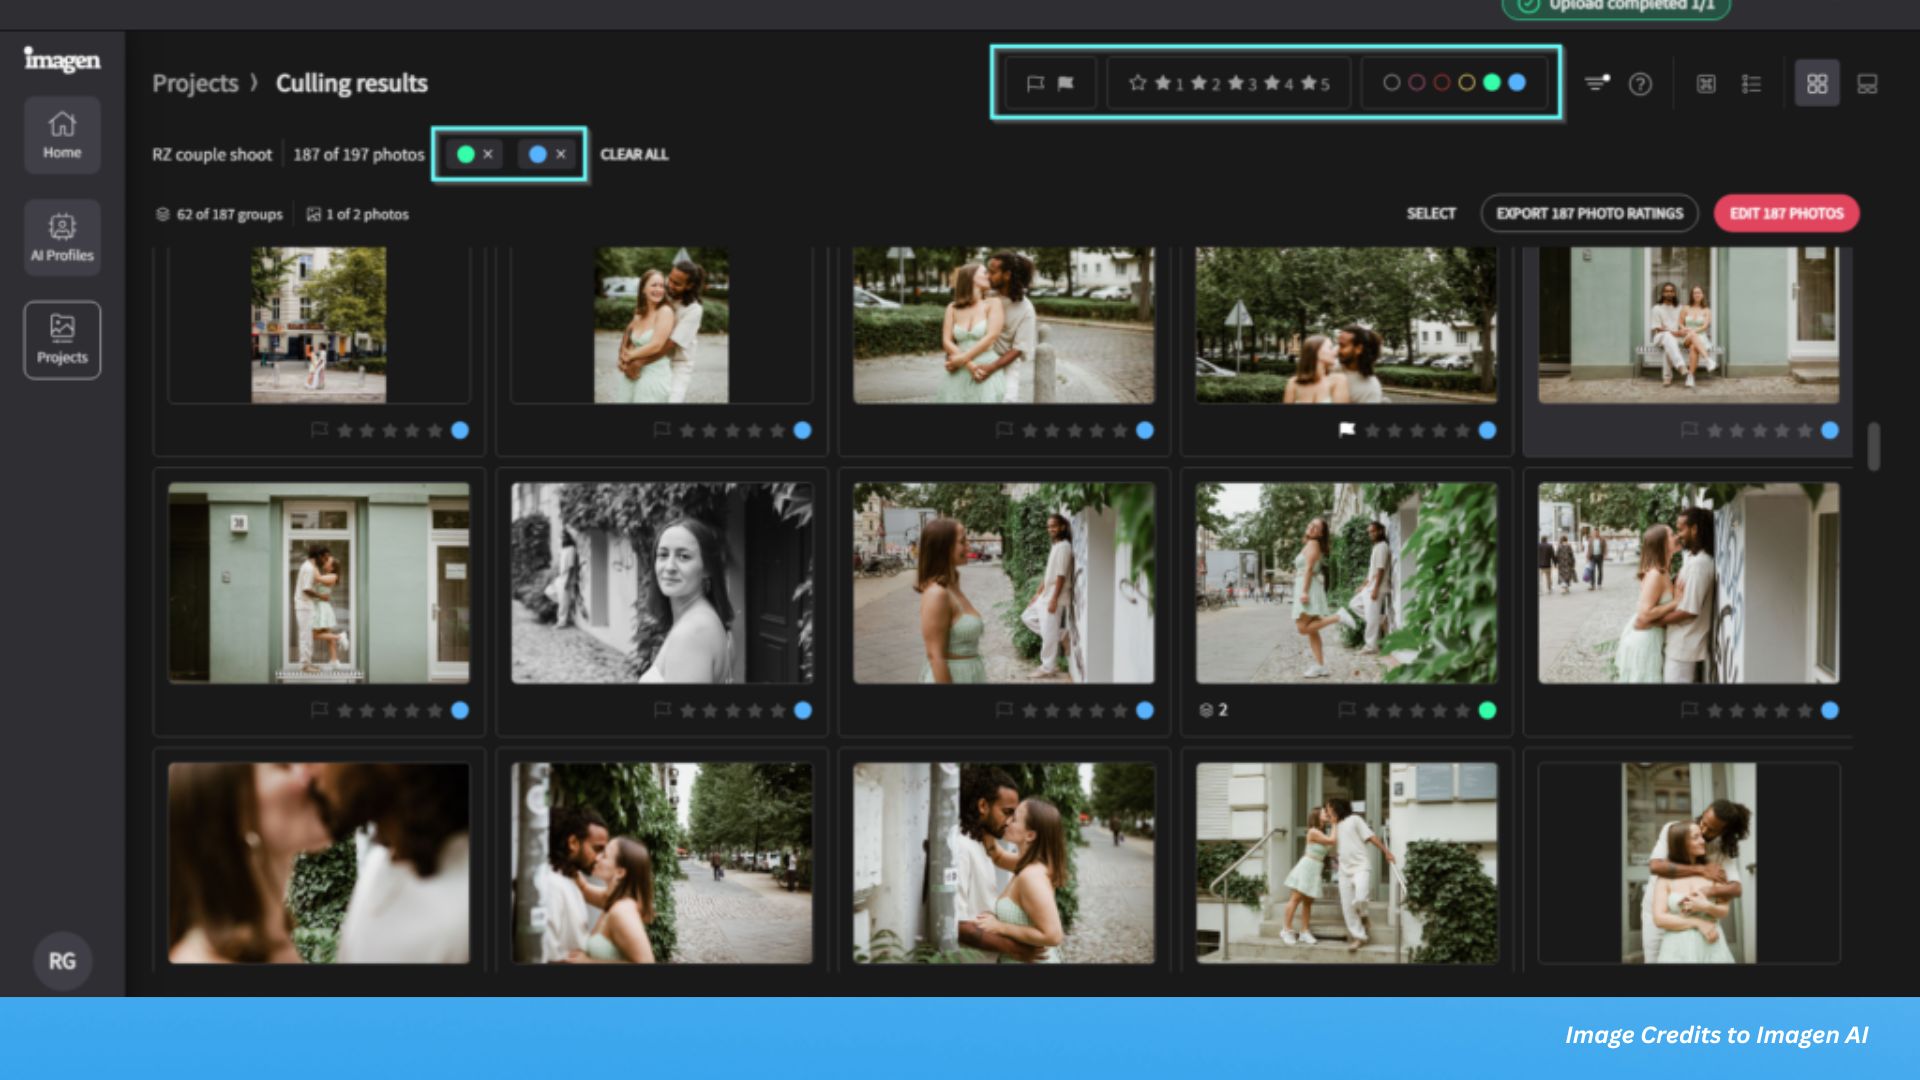
Step 2: Cull and Select Your Best RAW Images
Culling separates keepers from trash before you waste time editing bad shots. Go through imported images quickly and mark obvious rejects for deletion right away. Blurry frames, bad expressions, and technical mistakes get trashed immediately without mercy.
Use star ratings or color labels to flag potential keepers as you go. Many photographers use simple systems like 1 star for maybe and 2 stars for good. This lets you narrow down to your very best work in multiple passes.
Don’t overthink comparisons during your first pass through everything shot. Make quick gut calls about technical quality and basic composition strength. You can refine selections in a second pass after seeing all frames together.
Delete rejected images or move them to separate folders if you’re cautious. Keeping obvious failures clutters your workspace and slows browsing down badly. Most rejects never become useful later despite what you tell yourself when hoarding.
Making a Second Selection Pass
Refine your selections by making a second pass to identify your absolute best. Use 4 or 5-star ratings to flag the photos you’ll actually edit. This progressive narrowing helps you focus energy on images worth the time.
Compare similar shots side by side to pick the absolute best version available. Most software offers compare modes specifically for this purpose during selection work. Look for sharpest eyes, best expression, and cleanest backgrounds among similar frames shot.
View images full screen for better judgment of sharpness and facial expressions. Toggle between fit view and 100% zoom to check critical focus points carefully. This catches softness that completely disappears at small thumbnail sizes shown.

Step 3: Review Exposure and Check for Problems
Check for overexposed or underexposed areas using your software’s built-in exposure warnings. Most programs show red for blown highlights and blue for crushed shadows. These clipping warnings help you spot problems before editing starts in earnest.
Use your RAW file’s greater dynamic range to recover details where possible. Highlights can often be pulled back significantly from what looks blown out. Shadows reveal hidden information when you lift them carefully during processing.
The histogram shows you the actual distribution of tones in your image. The graph should touch both edges without hard walls of stacked pixels. Evaluate whether your exposure needs major correction or just minor tweaking overall.
Make mental notes about which images need aggressive recovery work versus minor adjustments. This helps you plan your editing time and decide which images are worth saving. Some blown highlights in unimportant areas are totally acceptable in most work.

Step 4: Adjust White Balance First
Set white balance based on the actual lighting conditions you photographed under. This affects every other color adjustment you make so get it right first. Use the eyedropper tool on a neutral gray area if one exists anywhere.
Auto white balance provides a decent starting point for most outdoor daylight scenes. But indoor lighting and mixed sources need manual adjustment for accuracy. Tweak temperature and tint sliders until colors look accurate and believable to your eye.
Warmer color temperatures add yellow and orange tones throughout your images overall. This works great for sunrise, sunset, and cozy indoor feeling scenes. Push too far though and skin tones look jaundiced and sickly instead of healthy.
Cooler temperatures add blue tones that feel clean, modern, and crisp looking. This suits corporate work, winter scenes, and some product photography styles well. Overcooling makes everything look sterile and completely unappealing though so watch it carefully.
Fine-Tuning Color Temperature
Tint adjustments shift between green and magenta on the perpendicular color axis. Use this to fix nasty color casts from fluorescent office lights everywhere. Most outdoor daylight needs almost no tint adjustment at all usually unless weird.
Test your white balance on skin tones if you shot people anywhere. Skin should look natural and healthy, not too orange or too blue. This provides the best reference for whether your temperature is actually correct.
Save custom white balance presets for lighting situations you shoot regularly and often. Studio strobe settings, indoor venue lighting, and outdoor golden hour can all get presets. This speeds up processing images shot under the same conditions every time.

Step 5: Correct Lens Problems and Geometry
Enable profile corrections to automatically fix distortion, vignetting, and chromatic aberration issues. Most RAW processors recognize your lens from file metadata and apply the right profile. This handles most optical problems in one click without manual work needed.
Lens corrections fix optical problems that all lenses create to some degree physically. Distortion makes straight lines curve near frame edges in predictable patterns. Vignetting darkens corners from lens design limitations we can’t avoid completely.
Chromatic aberration creates colored fringing along high contrast edges in bright images. Purple and green fringes show up most in backlit situations with strong contrast. The defringe tool removes these automatically in most cases pretty effectively now.
Manual distortion correction helps when automatic profiles aren’t available for older lenses. Drag the distortion slider to straighten curved lines near your frame edges carefully. Barrel distortion curves lines outward while pincushion bends them inward toward center.
Fixing Perspective and Straightening
Straighten horizons using the angle tool to fix tilted cameras creating slanted images. Most RAW processors offer automatic horizon detection that works pretty well usually now. Draw along what should be level and the software calculates rotation needed.
Vertical perspective correction straightens buildings that lean backward from tilting your camera up. This saves you from needing separate perspective tools in other software programs later. Drag the vertical slider until walls look perfectly upright and parallel properly.
Horizontal perspective fixes converging lines when you shoot at an angle to subjects. This helps with architectural work and product photography shots on tables especially. Be careful not to introduce weird distortions in other frame parts though accidentally.
Crop to improve composition by removing distracting junk at your frame edges now. Follow the rule of thirds by placing subjects on intersection grid points. Or intentionally break the rule for specific creative effects that actually work better.

Step 6: Make Basic Tone Adjustments to RAW Files
Start RAW photo processing with global adjustments that affect your entire image evenly. Fix obvious exposure problems first before diving into specific small areas anywhere. Adjust the exposure slider until midtones look correct and natural to your eye.
Create a balanced image by adjusting exposure, contrast, highlights, shadows, whites, and blacks. Work through these sliders systematically to establish your base exposure first. Get the foundation right before moving to color and local adjustments later.
The highlights slider recovers blown out bright areas in your RAW files dramatically. Push it negative to bring back detail in skies and other bright spots. This works infinitely better in RAW than JPEG thanks to hidden headroom captured.
The shadows slider lifts dark areas to reveal detail hiding in darkness effectively. Be careful not to introduce nasty noise by pushing it too far up though. Check shadow areas at 100% zoom after making big shadow adjustments always.
Setting White and Black Points
Whites and blacks sliders set your pure white and black anchor points properly. Hold Alt or Option while dragging to see clipping warnings appear clearly on screen. Adjust until you get true white and black where appropriate without losing important detail.
Adjust overall contrast to give your image proper punch and visual separation needed. The contrast slider affects the entire tonal range at once globally throughout. You’ll refine this later with curves and local work but get close now.
The tone curve gives you exact control over specific tonal brightness ranges precisely. Create points on the curve and drag them to adjust shadows, mids, and highlights. An S-curve adds contrast while keeping blacks and whites properly anchored under control.
Step 7: Refine Colors with Targeted Tools
Color adjustments completely transform the mood and feel of your images dramatically. Start with the vibrance slider instead of saturation for more natural looking results. Vibrance boosts muted colors while protecting already saturated tones from going nuclear bright.
Fine tune individual colors using the HSL panel for precise surgical control next. Adjust hue to shift specific colors toward different parts of the color spectrum. Change saturation of individual colors independently for surgical control over each one separately. Alter luminance to make specific colors lighter or darker without touching other colors.
Color grading tools let you add creative tints to different tonal ranges selectively. Add warmth to highlights for golden hour vibes that feel nostalgic and soft. Cool down shadows for moody contrast in portrait photography work beautifully.
Split toning adds different color tints to shadows and highlights completely separately. Warm highlights and cool shadows create classic looks that feel timeless and elegant. Experiment with different color combinations for unique personal signature styles you develop.

Step 8: Use AI Tools for Advanced RAW Photo Processing
AI-powered tools have become core features in 2025 RAW processing software across platforms. These smart technologies make complex edits faster and more accurate than traditional methods. The results often exceed what manual adjustments can achieve in reasonable time frames.
AI noise reduction has revolutionized how we handle high ISO images in processing. Tools like DxO’s DeepPrime use artificial intelligence to remove noise while preserving fine detail. These AI tools work way better than traditional sliders for challenging high ISO shots.
The technology analyzes your image structure and removes noise intelligently without destroying texture. This lets you shoot at higher ISOs with more confidence than ever before. The results look cleaner with more retained sharpness than older noise reduction methods.
AI-Powered Masking Saves Massive Time
Subject detection automatically separates your main subject from the background instantly with accuracy. The AI analyzes your image and creates accurate masks in just seconds. This works for people, animals, vehicles, and even complex subjects like detailed trees.
Sky selection creates perfect masks for replacing or adjusting skies independently from the foreground. The AI handles tricky areas like tree branches against the sky amazingly well now. You can dramatically change sky exposure and color without affecting your foreground elements.
Background masking lets you blur, darken, or color grade everything behind your subject easily. This creates separation and makes subjects pop without tedious manual brushing work. Refine AI masks with manual brushing when they occasionally miss small tricky areas.
These automatic masks save massive amounts of time compared to manual brushing from years ago. What used to take 10 minutes of careful brushing now happens in seconds. The accuracy continues improving as AI technology develops and learns more.

Step 9: Apply Local Adjustments for Targeted Edits
Local adjustments let you edit specific areas without touching the entire image globally. Graduated filters still work great for darkening skies or brightening foregrounds selectively. Drag from one side toward the middle to create smooth gradual transitions between areas.
Radial filters create circular adjustment areas for spotlighting subjects or adding artistic vignettes. Invert the mask to affect outside the circle instead of inside the selection. Feather the edges heavily for smooth blending that looks totally natural and unforced.
Adjustment brushes give you freehand control over literally any area you want precisely. Paint adjustments onto faces, clothing, or backgrounds as needed for specific targeted fixes. Adjust flow and density for subtle building of effects over multiple careful strokes.
Combine AI masks with traditional adjustment tools for maximum control over edits. Start with AI subject detection, then refine with brushes and filters as needed. This hybrid approach gives you speed plus precision in your workflow daily.
Creative Local Adjustment Techniques
Dodge and burn by painting lighter or darker values onto specific targeted areas. This traditional darkroom technique shapes light and dimension in your images beautifully still. Subtle dodging and burning can dramatically improve portraits and product shots especially well.
Color grade specific areas using local adjustment color tools for subject separation clearly. Warm up faces while cooling down backgrounds to make subjects pop out strongly. Add color contrast between subject and environment for more visual interest and depth.
Selective sharpening applies extra crispness only where you actually need it most importantly. Sharpen eyes, jewelry, and important details while leaving skin texture softer and natural. This creates dimension and draws viewer attention to key elements effectively every time.
Local clarity adjustments add micro contrast for emphasizing texture in specific chosen areas. Increase clarity on landscapes and architecture for amazing detail pop throughout frames. Reduce clarity on skin for softer, way more flattering portrait rendering results always.

Step 10: Sharpen and Handle Noise in RAW Files
Every RAW file needs sharpening since sensors capture slightly soft images by nature. Apply sharpening in your RAW processor instead of later in Photoshop when possible. This gives you better control specific to your exact camera sensor characteristics built in.
Start with the amount slider to control overall sharpening intensity being applied. Increase until details look crisp without creating obvious ugly halos around hard edges. Check at 100% magnification to see actual sharpening effects accurately displayed on screen.
Adjust radius to control how wide the sharpening effect spreads outward from edges. Smaller radius values work better for high resolution images with very fine detail. Larger radius suits lower resolution files or softer subjects like some flattering portraits.
Use masking to limit sharpening to actual edges only in your entire frame. Hold Alt or Option while dragging the mask slider to see clearly affected areas. White areas get sharpened while black areas stay completely untouched by the sharpening effect.
Controlling Digital Noise with Modern Tools
Luminance noise appears as grainy texture in smooth areas like perfectly clean skies. Reduce this with the luminance slider but don’t kill it completely dead everywhere. Some grain looks natural while perfectly smooth looks fake and plastic always to eyes.
Color noise shows up as red, green, and blue speckles in shadow areas annoyingly. This looks terrible and should be reduced hard with the color noise slider. You can usually max this slider out without hurting actual image quality at all.
AI-powered noise reduction tools have become standard in current RAW processing software. These tools analyze your image structure intelligently and remove noise while preserving important details. The results significantly exceed what traditional sliders alone can achieve for difficult files.
Detail and contrast sliders help preserve texture while reducing luminance noise levels. Increase these when you need really aggressive luminance noise reduction applied heavily. They prevent that overly smooth plastic look that ruins good portrait edits badly.

Step 11: Apply Presets and Sync Edits Across Images
Develop presets save your favorite adjustment combinations for quick one-click application to images. Create presets for your standard portrait edits, landscape looks, and black and white conversions. This speeds up processing similar images absolutely dramatically when you have hundreds of files.
Start with a base preset that handles your standard lens corrections and camera profiles. Apply this to all imports for a totally consistent starting point every single time. Then stack additional creative presets on top as needed per specific individual image.
Apply finishing touches like subtle global sharpening to polish your images completely. Add a creative color profile or preset to establish a consistent recognizable style. These final adjustments tie everything together and create your signature look across work.
Sync edits across similar photos taken under identical lighting conditions for consistency. Copy and paste your development settings to maintain a consistent cohesive look across sets. This works great for wedding ceremonies, sports sequences, and controlled studio sessions especially.
Building Your Preset Library
Create different presets for different lighting situations you encounter shooting regularly and often. Indoor tungsten, outdoor golden hour, and cloudy day presets all help speed work. Matching presets to common situations gives you way better starting points than generic ones.
Organize presets into clear categories for easy finding when you actually need them. Group by style type, subject matter, or lighting condition logically for your brain. Good organization prevents scrolling through hundreds of presets hunting for the right specific one.
Name presets really descriptively so you remember what they actually do months later. “Moody Portrait” means way more than “Preset 47” when you revisit your library. Include key settings in names like “BW High Contrast Plus 2 Stops Exposure Boost”.
Test new presets on various image types before trusting them on important paid work. Some presets work amazingly on certain subjects but fail hard on completely different ones. Know each preset’s actual strengths and limitations through real world testing first always.

Step 12: Batch Process Similar RAW Images
Batch processing applies identical edits to multiple images at once for major speed. This saves absolutely huge amounts of time on shoots with consistent lighting throughout sessions. Wedding ceremonies, sports sequences, and studio sessions benefit most from smart efficient batching.
Edit one image completely first as your template for the entire similar batch. Get exposure, color, and tone exactly right on this single hero reference image. Then sync or copy these settings to all similar images simultaneously in one click.
Review batch processed images individually to catch outliers needing manual adjustment still though. Different poses, slightly different exposures, or moved subjects might need tweaking after batching. Batch processing gets you 80% there but not 100% finished on absolutely everything.
Create virtual copies to test different looks on the same RAW file easily. This lets you compare multiple editing directions without duplicating the actual original file ever. Most RAW processors handle virtuals super efficiently without using any extra disk space.
When Not to Batch Process
Unique compositions and lighting situations need individual careful attention always without any exception. Don’t batch process across dramatically different scenes or completely different subjects ever blindly. The time savings absolutely aren’t worth ruining images with totally wrong settings applied.
Portraits with different skin tones shouldn’t share identical color adjustments at all ever. Each person needs individual color treatment for accurate skin tone reproduction always properly. Faces require way more careful individual processing than landscapes typically need overall usually.

Step 13: Convert to Black and White Thoughtfully
Black and white conversion removes color to emphasize pure tone, texture, and composition. Don’t just hit desaturate when processing RAW files in monochrome though. Use proper black and white tools that give you full detailed color channel control.
Adjust individual color channels to control how different colors convert to final gray tones. Make skies darker by reducing blue channel brightness values significantly down lower. Lighten skin tones by increasing red channel values for flattering portrait results nicely.
Add contrast through the tone curve after your basic conversion completes fully first. Black and white images usually need way more contrast than their color versions. Don’t fear pushing blacks darker and whites brighter quite significantly here for impact.
Apply grain to give your black and white images that classic timeless film feeling. Start super subtle and increase until it looks intentional but not overdone at all. Different grain sizes suit different subjects and moods effectively in various distinct ways.
Black and White Processing Techniques
Dodge and burn becomes even more important in black and white work. Without color to create separation, you rely entirely on pure tonal contrast alone. Shape light to guide viewer eyes through intentional careful brightness variations strategically throughout.
Local contrast adjustments using clarity add texture without affecting any color information lost. This works amazingly for landscapes, architecture, and detail-rich subjects. Be super careful with faces though since too much clarity emphasizes every tiny skin flaw.

Step 14: Export Your Processed RAW Files
Export settings determine how your edited RAW files get saved for actual everyday use. Choose JPEG for web sharing, client delivery, and general everyday use cases broadly. Select TIFF when you need to edit further in Photoshop without any quality loss.
For online sharing and social media platforms, export at 1080 to 2048 pixels long. This balances quality with reasonable file sizes for web use and mobile viewing. Use sRGB color space with screen sharpening for any web or social media exports.
For high-quality printing at labs, export as JPEG or TIFF with Adobe RGB. You can also use ProPhoto RGB for maximum color range in prints. Client delivery typically needs high-resolution JPEGs with maximum quality settings applied for flexibility.
Apply output sharpening specific to your delivery medium during the export process always. Screen sharpening differs a lot from print sharpening in both amount and radius. Let your software handle this automatically based on the output type you select.
Organizing Your Exported Files
Create a super clear folder structure for exported images separate from RAW source originals. Keep exports organized by purpose like web gallery, client delivery, or print orders. This prevents total confusion about which files serve which specific purpose down the road.
Include export settings in filenames when you create multiple versions of the same images. Add resolution, color space, or purpose tags to help identify files instantly later. Something like “ImageName_Web_sRGB_2000px” explains everything at a quick glance, always clearly.
Watermark exported images before sharing publicly when copyright matters to you personally here. Add subtle signatures or logos to discourage unauthorized use by random people online. Don’t make watermarks so huge and prominent they completely ruin the actual underlying image.

Step 15: Archive Your RAW Files Properly
Keep your original RAW files archived permanently on multiple different physical drives always. Storage is super cheap compared to losing irreplaceable images from important shoots gone forever. Follow the 3-2-1 backup rule with three copies on two media plus one offsite.
External hard drives provide really affordable storage for large growing RAW photo libraries. Buy quality drives from reputable brands for actual reliability you can truly trust. Replace drives every three to five years before they fail from a simple age.
Cloud storage services offer convenient automatic offsite backup for important client work files. Upload selects rather than every single RAW file to save money on monthly storage. Bandwidth and monthly storage costs add up pretty quickly for massive full libraries.
Keep your RAW files in original folders with sidecar edit files together always permanently. Don’t separate the XMP or catalog files that store your processing adjustments made. These edits represent literal hours of work worth preserving alongside the original files.
Converting to DNG for Long-Term Storage
Consider converting your RAW files to DNG format for long-term archiving purposes carefully. Adobe’s DNG is an open standard that ensures future compatibility across different software programs. Some photographers convert during import while others convert only finished selects they keep.
This protects your work as proprietary RAW formats may become unsupported over decades. Camera companies sometimes abandon older formats when introducing new camera lines. DNG provides insurance against format obsolescence threatening your archive access later.
Long Term File Management
Review and clean up your archives periodically to remove obvious total junk regularly. Failed experiments and terrible shots don’t need permanent storage taking up space forever. Be absolutely ruthless about deleting clear rejects during regular archive maintenance review sessions.
Verify your backups actually work by testing file recovery at least occasionally sometimes. Backups you can’t actually restore are completely worthless when real disaster strikes hard. Run test restores at least annually to ensure your whole system works properly.
Update your storage and backup strategy as technology evolves over time inevitably forward. What works perfectly today might not work at all in five or ten years. Stay reasonably current with storage technologies and best practices for real long-term longevity.

Master RAW Photo Processing for Better Final Images
RAW photo processing gives you complete creative control over your final image results. The extra data in RAW files lets you push adjustments way further without destroying quality. This flexibility makes the learning curve and extra time absolutely worthwhile for serious committed work.
A consistent workflow keeps your editing efficient as your skills steadily improve over time. These 15 steps provide a solid framework you can customize to fit your personal unique style. Practice processing regularly to build real speed and develop your distinctive artistic vision.

Darlene Lleno
Darlene Lleno brings a unique perspective to DIY Photography as someone who grew up surrounded by camera gear but chose words over lenses. With five years of writing experience, she specializes in photography content that’s both technically informed and genuinely passionate. Growing up with a photographer twin brother meant camera talk was everyday conversation in her household. While he mastered capturing moments, Darlene discovered she preferred being the subject and the storyteller behind the scenes. As a travel enthusiast and mother of two, she understands the importance of preserving life’s precious moments. When not exploring new destinations or writing for DIY Photography, you’ll find her reading or tending to her garden. Her approach to photography writing is refreshingly authentic, she may not be behind the camera, but she knows exactly what it takes to help others capture the shots that matter most.


Join the Discussion
DIYP Comment Policy
Be nice, be on-topic, no personal information or flames.
One response to “RAW Photo Processing Workflow: From Import to Export in 15 Steps”
What a wonderful, well-written and very helpful article.
This will be extremely useful as I re-read it a few times as I follow through the guidance in processing some files, as I did with a file the first time I read through it. No more guessing and trying to get a good result.
I am so grateful I found this great article.