


The most powerful 10 second toning tip you’ve never heard of!
Jul 10, 2016
Joseph Parry
Joseph Parry is a Commercial and Editorial photographer based in the UK that provides cinematic photography and ounces of humour. Follow him on Instagram for stories and kick ass imagery.
Share:

Here’s a colour toning tip I picked up from Barrington Russell last year and I still use it to this day! What if I told you that within just 10 seconds of your time you could create complementary / harmonious colours on any image?
Depending on how much darkness, contrast, light etc is in your image as well as the colour pallet you currently have this effect will change drastically, but it’s always reliable and always cool. I can almost guarantee you’ll always find a great finishing tone to your image!
Let’s do this!
step 01: Take your image.

Step 02: Create a new layer and fill it with a dark blue colour (you can start with whatever colour you like, but I find dark blue works great as a base!

Step 03: Set the blend layer to “Exclusion”.

Step 04: Now press CMD+U / CTRL+U to bring up the Hue/Saturation box and slide that Hue around!

Step 05: Once you’ve picked your fancy tone the layer down (I like around 17%) and BOOM!

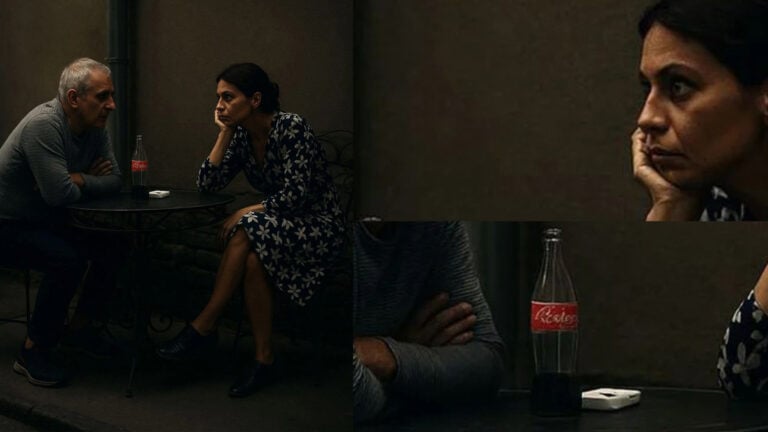
Before and After:


How is that for an insanely awesome 10 second toning tip? Don’t tell me. It’s awesome ;)
Have a productive week my friends!
-JP

Joseph Parry
Joseph Parry is a Commercial and Editorial photographer based in the UK that provides cinematic photography and ounces of humour. Follow him on Instagram for stories and kick ass imagery.


Join the Discussion
DIYP Comment Policy
Be nice, be on-topic, no personal information or flames.
20 responses to “The most powerful 10 second toning tip you’ve never heard of!”
I liked the “Before” picture better ;)
Being honest, the before looks better.
and after shall look better?
In this example I don’t think it’s flattered the model though I do like the effect on the background, suppose with this technique it’d be easy to add a mask so it’s only applied to the background. Cool tip! Thanks for sharing! :)
I completely agree with you.
I agree that the before is far better to my eye.
You just saved me 10 seconds over and over and over again by NOT doing that. Before was far better. Don’t show the poor model what you did to her skin.
agreed
This is just the same as the Split Tone panel in Lightroom which is more intuitive as well.
I choose before
looks like an instagram filter
I agree…”before” was better (but even “before” ain’t so great).
maybe if you combine it with some ‘blend-if’s’ and a mask..
That’s exactly what I did on a test image, but then that kinda defeats the whole 10-second thing. I achieved pretty much the same results by just adding a curve layer and pulling up the dark end of the blue (or whatever color you want) curve, which was much easier and more controllable.
Dude… Joseph… Joseph Parry… I loved DIYP since forever, and now you’re ruining it with clickbait titles.
Yeah, I would have to agree with a lot of people that this didn’t really add much in to the overall tone, and any benefit to the darks was ruined by the discoloration to the skin.
I was able to bring out some pleasant tones by changing the blue layers “blend if” values to only effect the darks, but then that kinda defeats the whole 10-second thing, doesn’t it?
I achieved pretty much the same results by just adding a curve layer and pulling up the dark end of the blue curve, which was much easier and more controllable.
How is that for an insanely awesome 10 second toning tip? Pointless springs to mind.
boy, tough crowd. I think it’s a good “tool” to know about. There are a lot of these that aren’t nearly always useful, like lighten the shadows with a dark great in a muted color, or desaturating the red shadows with a luminance mask, etc. The trick is when to use which tool!
I will agree, i do prefer the first image better. The second one just looks a bit ‘muddy’ to me, no offense. A method that gives far more granular control with respect to color is the Selective Color layer. Adjusting the mids and darks specifically, gives spectacular tones (as does the r/g/b channels in a Curves layer). Save either, create an action to run them and you can tone any photo you want in the time it takes to click the Action button :)
Team Before here too.