


Photographing Aurora – Reality vs Expectation
Apr 25, 2017
Ekant Veer

We love it when our readers get in touch with us to share their stories. This article was contributed to DIYP by a member of our community. If you would like to contribute an article, please contact us here.
Share:

We just had a beautiful Aurora Australis hit New Zealand a couple of days ago. I was fortunate enough to catch a quiet spot to myself where I could take in the atmosphere and shoot a few images. My favourite from the night was a panorama shot of the Aurora to the south and the galactic core rising to the south east – it was the shot I planned and it seemed to turn out nicely [check out this blogpost if you want to learn how to stitch astro panoramas]. So nicely, it got published in the National newspaper and got me a fair bit of attention on my various social media sites. The frenzy that started with a few keen astronomers and astrophotographers led to a lot of people rushing to similar spots the night after to see if they can watch the aurora. Unfortunately, there were a few disappointed folk who not only couldn’t find a clear view, but also didn’t realise what you see in photos isn’t what you see with the naked eye.
I want to take this opportunity to try and explain the difference between what you see with the naked eye vs what the camera picks up and what subsequently gets shared on social media. To get a full understanding, let’s start with some basic biology.
The Human Eye
Our eyes are made up of two main photo-receptor cells – these are the cells that are responsible for picking up light and helping us to see. Cones are fantastic at picking up details and colour but they are pretty useless in dark situations. Rods, on the other hand, are able to process a lot more light BUT are not able to process colours and details too well. The result, is that in the dark we tend to see things in monochrome/black & white. Rods also take some time to ‘activate’ – that is, when you walk from a light room into a dark room it takes a while for your eyes to adjust and get used to the dark scene. At first, you might not see anything but after 10-15 minutes it’s much easier to see in a darker environment. However, as soon as something bright gets shined into your eyes (like a torch or even a mobile phone screen) the rods shut down and the cones take over. When you look back into a dark space you have let the rods re-activate all over again, meaning you have to wait another 10-15 minutes or so.
What does this mean for aurora spotting?
Why does this matter? Well, for starters, unless you’re in a really bright space, like within the polar circles, the likelihood of you seeing enough brightness from an aurora so that you see colour is quite low. You may see some faint glows but not the vibrant, bright colours like I have in my photo above. Secondly, if you are flashing your torch around or constantly looking at your phone you will be very unlikely to allow your eyes to adjust to the darkness. Astronomy and aurora spotting in particular require patience, something I know I’m not very good at, but it takes discipline. If you do need light then think about getting a red torch light – it affects your eyes far less than bright white light.
What does it look like to the naked eye?
Here’s the best I could do to try and simulate the difference between what you see once your eyes have adjusted. If you just turn up and stick your head out of the door of the car you will likely not see much at all, but after a little while in the darkness you could see the structure, light and movement, but very little colour. The night I was out I could see a faint green glow and that’s about it. If you have a DSLR and a tripod you can get significantly more light information. What I typically do when I get to a nice spot is set my camera up, take a quick test shot and use that to gauge if there’s any action.

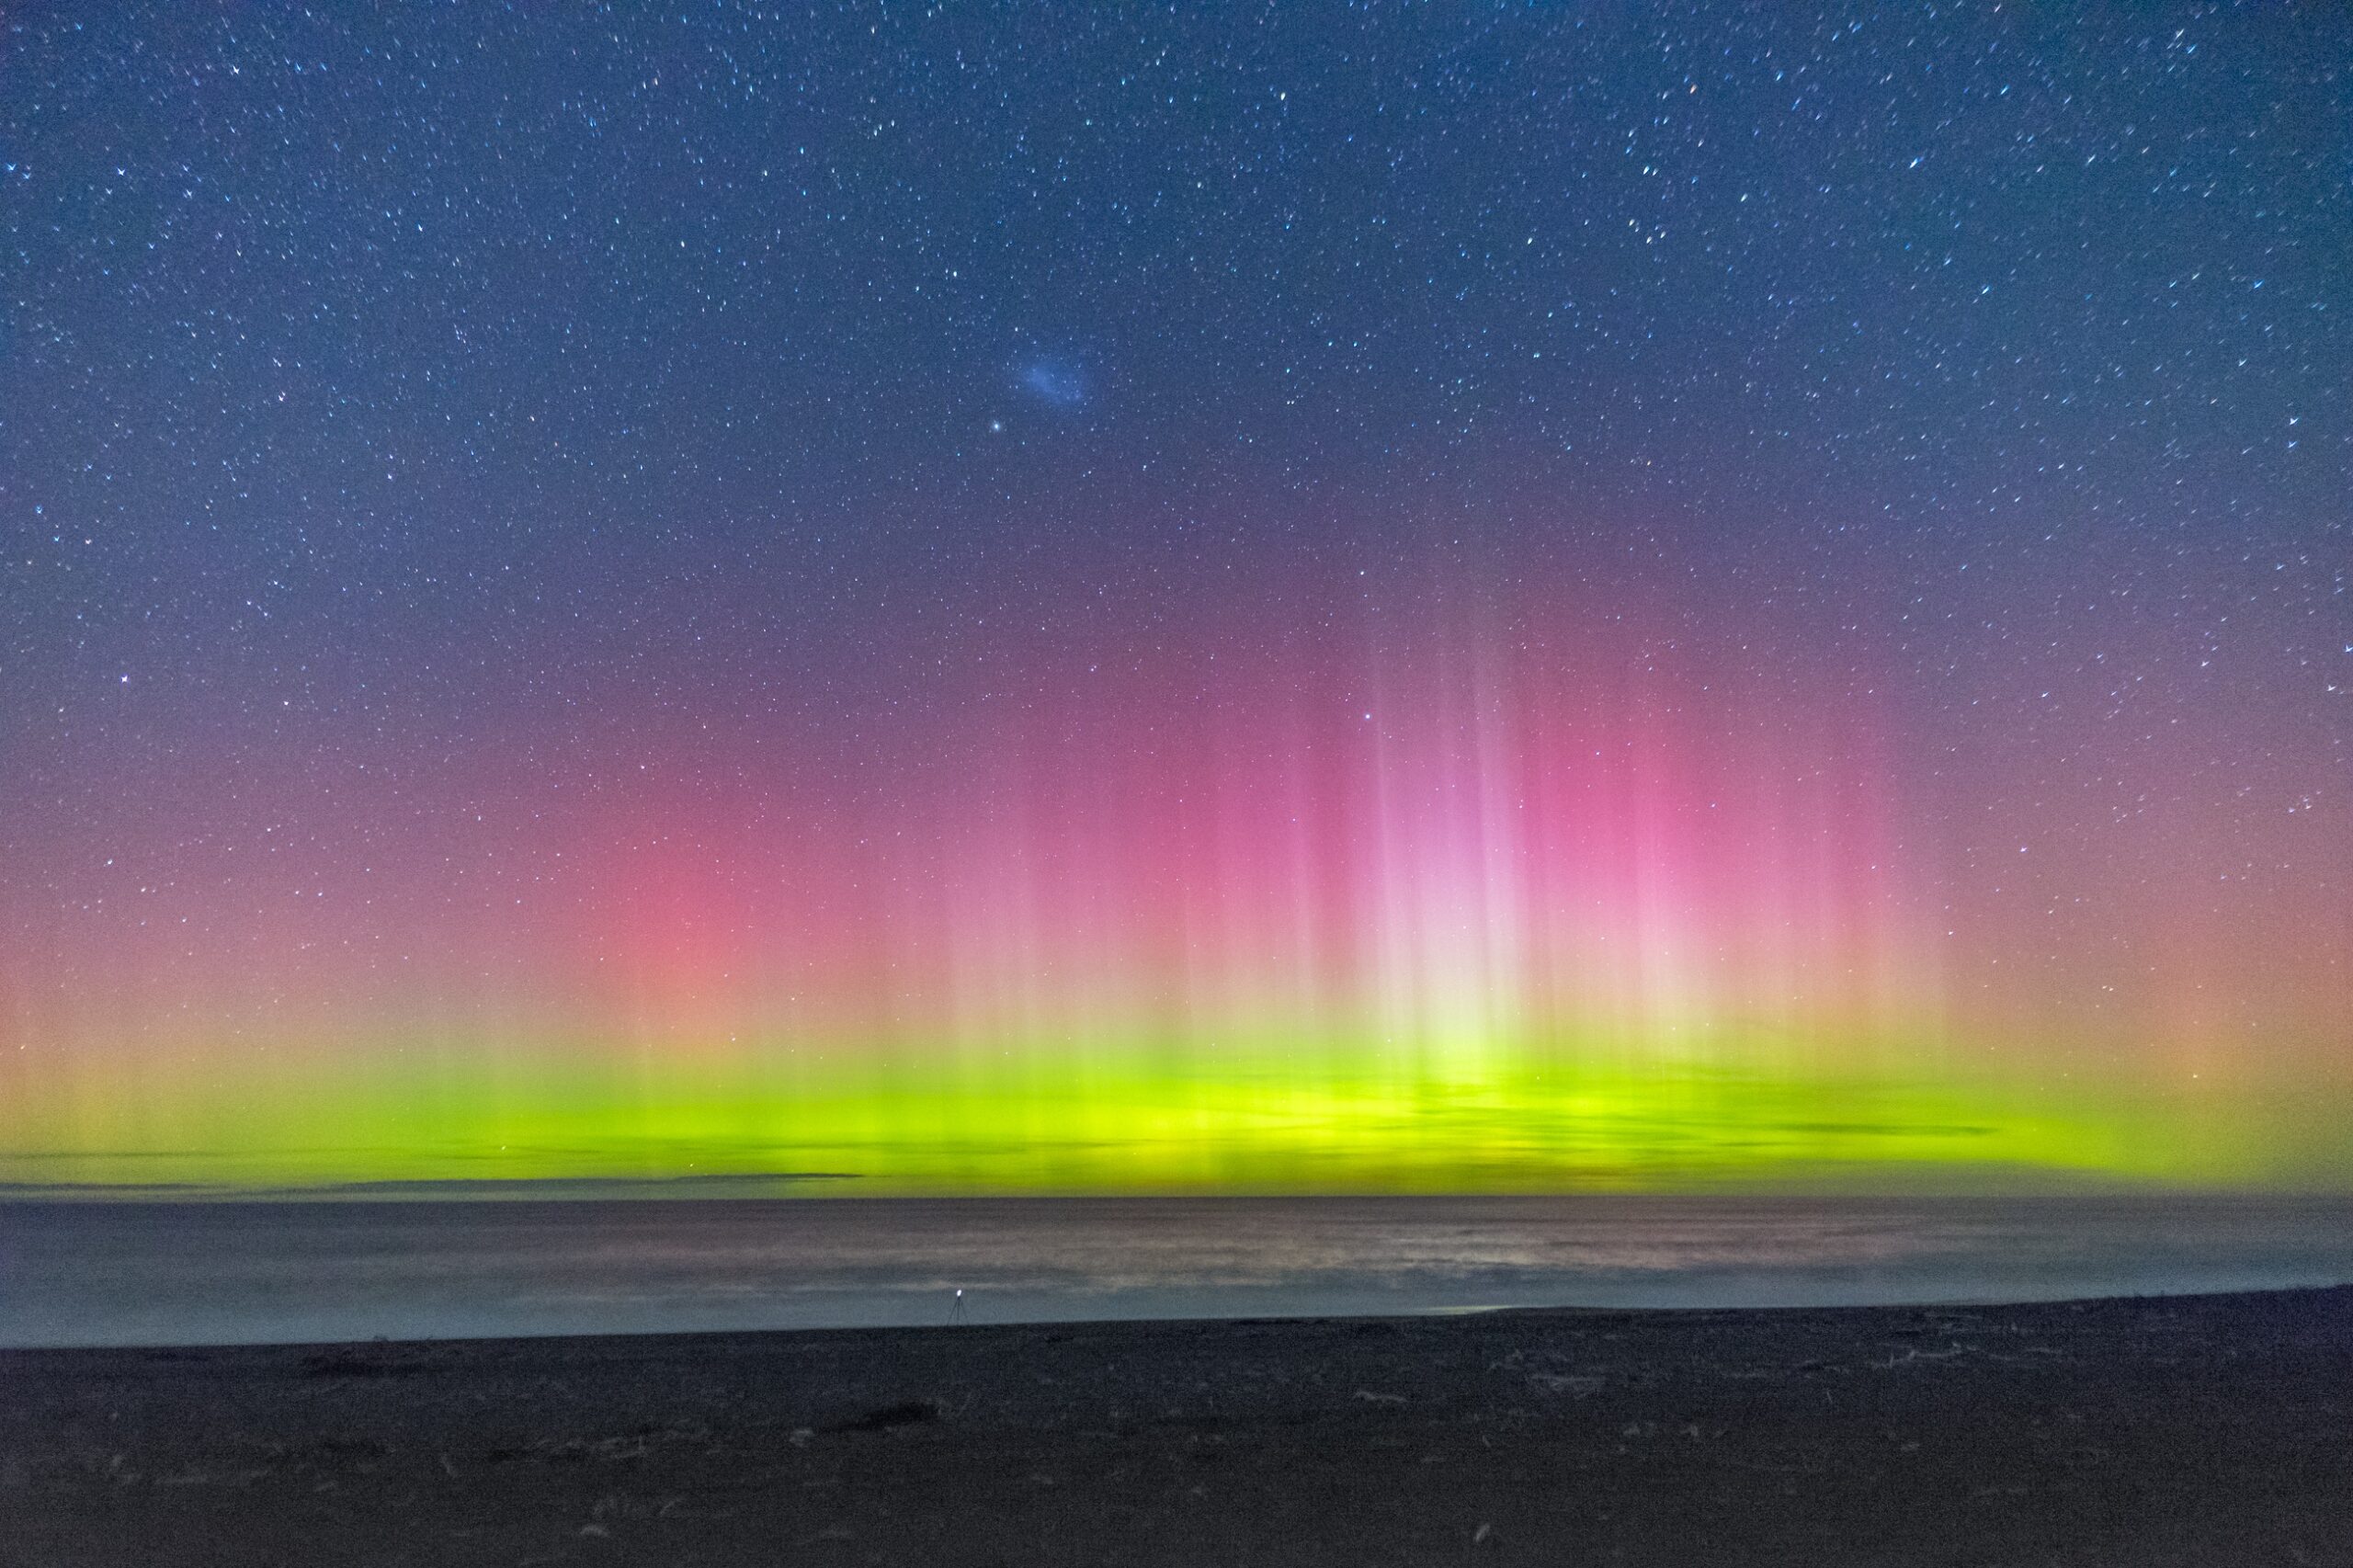
The most exciting thing about the aurora is that it does move around in the sky. So, you could well see movement even if you don’t see colour. Here’s a timelapse from the other night for those that are interested:
Conclusion and Etiquette
Basically, if seeing the Aurora is on your bucket list then absolutely go and do it, but make sure your expectations are tempered. If you are close to the poles you will get far, far more light, colour and movement. BUT, if you’re further away from the poles, then the best you’ll likely get is some awesome pillars of light dancing back and forth but nothing like you see in photos. The best you can do is to maximise your chances of getting a great show. So, here are a few pointers:
- Sign up for alerts – when a big aurora storm is happening you’ll get told. Unfortunately, these can’t be predicted more than a few days out at a time. There’s no way to plan a trip to New Zealand to view the Aurora – it may happen, it may not. I sign up to SpaceWeatherLive’s updates.
- Minimise light pollution – move away from populated areas – and make sure you have a clear view to the South (for those in the Southern Hemisphere looking for Aurora Australis, like me) or North (for those in the Northern Hemisphere searching for Aurora Borealis) check Dark Site Finder for some hints of locations. Remember, the moon counts as a BIG light polluter. If it’s a full moon, you will likely not see much at all.
- BE SAFE. Go with a group of others. Drive to the conditions. Make sure you let people know where you’re going. Keep in cell range. Too many people get hurt traipsing around in the dark. Don’t become a statistic.
- If you arrive at a popular aurora viewing area DON’T fire up your high beams or leave your lights on unnecessarily. Park the car, switch all lights off. There will be others around who will suddenly get blinded by your headlights or have their photos wrecked by the glare.
- Try to keep torches pointed downwards while walking around. When you get to a spot you like, switch all lights off. Again, let your eyes adjust and don’t blind others. This includes not using flash. I know grabbing a selfie with the aurora might sound cool – I’ve done it myself. Just don’t do it while there are heaps of others around.
- Be friendly. Share the space with others. If someone wants help, offer it. If you don’t know what you’re doing and see a person with decent gear taking shots, politely ask for help but they may be too focused. It’s ok, some people are private. For the record, if you see me, come and say hello – I love meeting others.
- Keep trying. You may not get it the first time. It’s a game of patience, remember. Keep trying and it’ll happen. I’ve been lucky enough to see a few now but last Saturday’s was the biggest. I look forward to seeing more
If you’re new to aurora shooting, here’s a short video I put together from last year to help. Good luck and have fun!
About the Author
Ekant Veer is an Associate Professor of Marketing at the University of Canterbury, New Zealand. When he’s not in the classroom he’s usually somewhere in the hills and mountains around Canterbury, taking landscape photos and enjoying nature in all its beauty. If you’d like to see more of his work, check out his website, like his Facebook page, and follow him on Instagram and his YouTube channel. This article was also published here and shared with permission.
We love it when our readers get in touch with us to share their stories. This article was contributed to DIYP by a member of our community. If you would like to contribute an article, please contact us here.
Related Posts
 Expectation vs Reality in Street Photography
 Comedian creates amazing videos showing the difference between client budget and client expectation
 James Webb Space Telescope exceeds expectation after finished mirror alignment
 These photos may show a hand-built miniature world, but they feel like today’s reality
Join the Discussion
DIYP Comment Policy
Be nice, be on-topic, no personal information or flames.
2 responses to “Photographing Aurora – Reality vs Expectation”
Moste of the time the colour temperature of the shooten image is to high. Even if the sky is bright. I tried several times to give them an natural look. So first thing i do us not just looking at the aurora but just at the blue sky and if there is on the white snow. If your sky gives natural dark blue and your snow looks natural white whit an natural glow of the aurora your picture is fantastic…. so i faled in many times but did the best i can ?
What you see is entirely dependant on where you are in the world and what the current aurora activity is. Sometimes it looks like a glowing mist, others it lights up the whole sky. Granted, I am biased as I live in the northernmost metropolitan area in the US, ~120 miles from the arctic circle. So I can just go out on my deck and take photos.
I consider this a B-Roll shot but I was trying to diagnose other issues with my D7200 when I took this last night. We had cloud cover rolling in, so I took them fast. 2.5″ f/4 (as fast as the 12-24mm lens I has goes) ISO 1000. Really need to get a faster lens to cut down on the ‘fuzzyness’ of the aurora to run a faster shutter speed. I can get down to 1/2 second on good nights with my 50mm f/1.8.
http://pre08.deviantart.net/15ba/th/pre/i/2017/115/9/b/4_25_17_aurora_over_north_pole_by_aknorthpolar-db72a7s.jpg