


How to remove red skin in Photoshop in under one minute
Dec 24, 2018
Dunja Đuđić Kalinin
Dunja Djudjic is a multi-talented artist based in Novi Sad, Serbia. With 15 years of experience as a photographer, she specializes in capturing the beauty of nature, travel, concerts, and fine art. In addition to her photography, Dunja also expresses her creativity through writing, embroidery, and jewelry making.
Share:

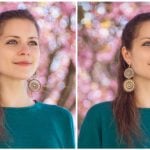
If you shoot outdoor portraits during Christmas season in Northern Hemisphere, your subjects’ skin may look red due to the cold. But there’s a quick and effective way to fix it in Photoshop. Unmesh Dinda of PiXimperfect will show you a quick tip for removing the red patches from skin, and it will take you less than a minute to do it.
When you open the photo in Photoshop, start by creating a new Hue/Saturation adjustment layer. Grab the little hand tool within the adjustment layer and click on the red area that you want to fix.

Now, move the Hue and Saturation sliders all the way to the right. Make the range narrower and stop at the point where it affects just the red patches that you want to fix. You can also use the outer sliders to make the transition smoother. When you’re happy with the selection, bring the Hue and Saturation sliders back to 0.
From here on, increase the lightness, and adjust the hue and saturation a bit if necessary. You’ll notice that this will affect all reds in the image, and we don’t want that. So, click on the layer mask and hit Ctrl/Cmd + I to invert it.


Finally, grab the Brush tool, set the foreground color to white, and simply paint over the red areas that you want to remove. And you’re done!
Have you tried out this technique before? I use it to remove redness from the skin and I find it pretty handy and effective. Do you have any other techniques to recommend? Feel free to share them in the comments.
[1-Minute Photoshop – Remove Red Patches from Skin | PiXimperfect]

Dunja Đuđić Kalinin
Dunja Djudjic is a multi-talented artist based in Novi Sad, Serbia. With 15 years of experience as a photographer, she specializes in capturing the beauty of nature, travel, concerts, and fine art. In addition to her photography, Dunja also expresses her creativity through writing, embroidery, and jewelry making.


Join the Discussion
DIYP Comment Policy
Be nice, be on-topic, no personal information or flames.