


How To Photograph Darth Vader With The Spiffy Gear™ Light Blaster
Share:
I have had a Spiffy Gear Light Blaster in my camera bag for a while now, but it wasn’t until recently that I came up with a concept that I though was cool enough to really unlock the creative potential of the Blaster.
The concept that I came up with was to photograph Darth Vader with the Light Blaster, and in this article I am going to share exactly how I used the Spiffy Gear Light Blaster to create this series of photos.

What Is a Spiffy Gear Light Blaster?
The Light Blaster is essentially a housing that attaches to a speedlight strobe (it doesn’t much matter what brand of strobe it is), and projects the light from the strobe through a slide or a pattern with an attached lens.
This is what this bad boy looks like when its assembled:

Darth Vader Light Blaster Photography Concept
The Light Blaster is a pretty unique tool – you can use it to project images from slides onto flat surfaces, like a backdrop or wall. You can also project textures and shapes – all you need is a slide with the image, texture or shape you want to use.
(Depending on how you position the Blaster, you can also project images, textures or shapes right onto your subjects too.)
But for the Darth Vader photos, instead of projecting an image onto a background, I wanted to make it look like streaks of light shining through smoke from an imagined battle, in a kind of cool sci fi looking pattern.
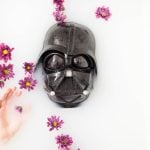
Of course, the real Darth Vader was unavailable – something about taking the TIE Fighter in for detailing, so I ended up with my five year old son to pose as Vader.
On a side note, I think its pretty funny that a five year old is this into Star Wars, considering that the original movie came out the same year I was born. In the photos, he is wearing his home made paper mache Darth Vader mask, a Batman cape and a black sweater and jeans. We shot this whole series on a whim one Saturday morning just to do something fun together.

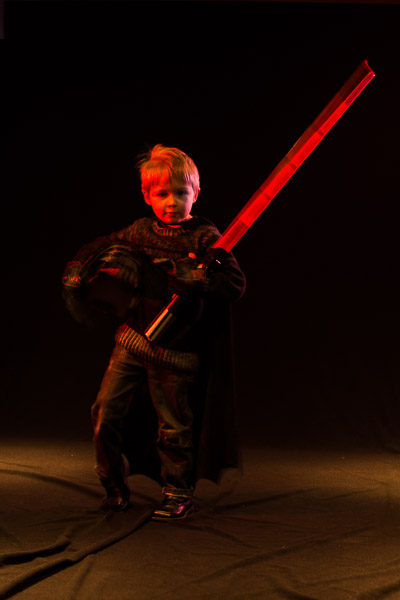
Step 1: Set the Camera To Capture Vader’s Lightsaber
I wanted these photos to be fun and have a sense of motion, so first I set up the camera to show light streaks from Vader’s lightsaber while he swung it around.
The lightsaber is a toy with a red light in it. Its not very bright, so we had to make the studio pretty much completely dark by closing all the blinds and then hanging blankets over the windows and doors.
Then, I put my camera on a tripod and set up the shot to capture just the light from the lightsaber.
Because it was so dark, my camera would not focus, so I turned on the lights, focused the camera on my subject, then switched the lens to manual focus and turned off the lights. While I was shooting, I was careful to make sure that Vader just stayed more or less at the same spot where I knew he was in focus.
Here is how the photo looked with only the lightsaber:

To get the exposure I liked took a little experimentation.
I started by setting a medium ISO (ISO 800), a big aperture (f/2.8) and a slow shutter speed (1/15th). Then I adjusted the shutter speed to get the amount of blur in the lightsaber that I liked and the aperture to control the brightness of the exposure. Too short of a shutter speed and there wasn’t enough blur. Too long and all you could see was a red haze. I settled on 1/8th of a second for most of the shots and an aperture of f/4.
Step 2: Set Up Strobe Lighting
I used two small speedlight strobes with bare heads to light Darth Vader from either side. The strobes are set on light stands with bare heads to either side of the subject. I used a few different combinations, but for most of the photos, one strobe has a blue gel while the other has a red gel.
(A gel is a colored piece of plastic that goes over the flash head to produce light with a certain color).
It is also important to note here that you have to set your camera to use rear curtain sync when combining ambient (from the lightsaber) and strobe lighting.
Rear curtain sync freezes the subject with strobe light at the end of the exposure, which eliminates ghosting that might otherwise be present if the subject is moving and lit by ambient light.
I manually set the power and zoom of the speedlight strobes to taste – I wanted them to be pretty dim and not overpower the image.
Here is how the photo looked with speedlight rim lighting:

As you can also see, I was using a black backdrop, but I think it would have worked just as well without anything.
Step 3: Add the Light Blaster And Smoke
I used a 20mm lens on the Light Blaster to get a good spread of light through the smoke (a longer lens would throw a more concise spread of light).
I didn’t have a slide or a Creative Kit pattern that would produce the random pattern of light streaks that I wanted, so I made a custom slide for the Blaster with a clear piece of plastic and a black sharpie marker. I also put a blue gel into the Light Blaster with my home made pattern slide so that the light streaks would be blue.
I had Darth hold up a white towel so that I could see the intensity and spread of the light and so that I could focus the lens on the Light Blaster.
Once I had the Light Blaster set up, it was time to add the smoke. I started with just a little smoke so that I could see how the steaks of light were projecting from the Light Blaster and to make sure that the Light Blaster flash settings were correct.
Here is how the photo looked with just a little smoke:
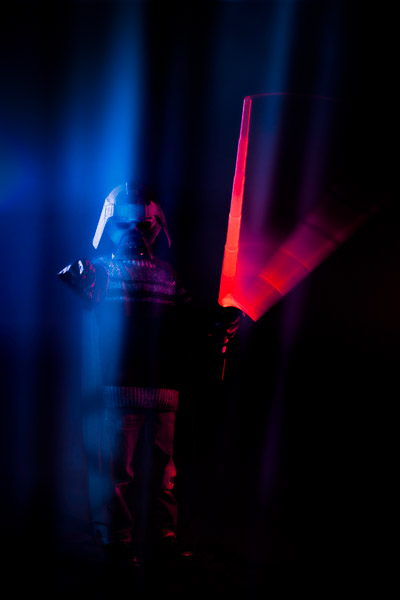
From there I experimented with the position of the Light Blaster to get the sort of light streaks through the smoke that I was looking for. I ended up with the light blaster positioned right beside the camera, basically firing directly at the subject for most of the shots.
Step 4: Have Fun Playing Star Wars
Once I had everything nailed down, it was time to have some fun. I cranked up the smoke and asked my son to do a series of poses, jumps and moves worthy of a Sith lord while I hit the shutter release.
Because it was pretty much pitch black in the studio and because the camera was in manual focus on a tripod, I didn’t even have to look through the camera viewfinder to press the shutter release.
Again, it took a little experimentation to get our timing right, but I think we nailed it in the end.

(In case you are wondering, smoke from a smoke machine will in fact set off your smoke alarm – although it took a lot more smoke than the usual burnt grilled cheese.)
Step 5: Postprocessing
When we were done shooting, I uploaded all the photos to my computer and into Lightroom.
I took a lot of photos – there is quite a bit of randomness involved when you’re photographing a Sith lord jumping around in the dark waving a lightsaber.
The first thing I did was to cull my photos down to a handful of picks.
Then I applied my usual Lightroom adjustments – lens correction, tweak the exposure, add contrast, enhance the blacks, add some vibrancy etc.
To finish the photos off, I used Topaz Adjust and applied the “Low Key” preset. I don’t use Topaz Adjust very often, but it can add a really cool pop to photos like this so I though I’d give it a try.
I tried a whole bunch of presets in Topaz Adjust. Anything with detail enhancement looked aweful with the smoke – which was pretty much the opposite of what I was expecting, but eventually I found the “Low Key” preset, which gave the finished photos a really neat smooth, dark and vibrant look that I really like.

Beneath Darth Vader’s Mask
All of this might seem kind of complicated – but the entire shoot took less than a half hour and my son and I had a blast doing it (sorry, I couldn’t resist).
Questions or Comments?
If you have any questions about the Light Blaster, lighting or camera settings, please leave a comment below!
What do you think of the creative possibilities of using a Light Blaster with a smoke machine?

JP Danko
JP Danko is a commercial photographer based in Toronto, Canada. JP can change a lens mid-rappel, swap a memory card while treading water, or use a camel as a light stand.


Join the Discussion
DIYP Comment Policy
Be nice, be on-topic, no personal information or flames.
3 responses to “How To Photograph Darth Vader With The Spiffy Gear™ Light Blaster”
NICE!
I should probably build a princess laia costume for my daughter …
I guess this is cute and all, and have I have a kid so I understand shooting stuff like this but this feels like blog stuffing. I have a fair amount of respect for most of the writers (including Danko) however, it seems like there is an increase in posts but decrease in content going on at DIY. I don’t care if you all don’t post everyday, I do care that I’m reading actual tips, techniques, and game changing news and projects.
I think this is awesome. And what a great way to bond with our little peanuts. There are plenty of cool themes that come to mind that projecting with the light blaster can bring to life. Thanks for sharing.