


How to make DIY 2-in-1 food photography backgrounds for $30
Apr 17, 2018
Dunja Đuđić
Dunja Djudjic is a multi-talented artist based in Novi Sad, Serbia. With 15 years of experience as a photographer, she specializes in capturing the beauty of nature, travel, concerts, and fine art. In addition to her photography, Dunja also expresses her creativity through writing, embroidery, and jewelry making.
Share:
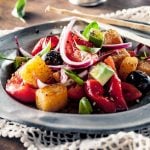
If you are into food photography, here is a creative and affordable project you might want to try. Food photographer Joanie Simon shares an idea for making your own backgrounds for food shots. They’re affordable, lightweight, but also versatile: you can use them either as surfaces or backgrounds. Also, making these requires only a few components, yet you can be as creative as you like with colors and textures.
I described these backgrounds as “2-in-1” because you can use a single board and paint it on both sides. Therefore, you can make two different colored or textured backgrounds with the same board, one on either side, which makes it even more affordable.
What you will need
Here’s what Joanie used for the project. You can get everything at Home Depot or Amazon, and perhaps you already have some of these at home:
- Laminated plywood (suggested dimensions: 2ft x 4ft x 3/16”)
- Joint compound
- Putty knife
- Blending brush
- Paint
- Matte finish spray
Making the backgrounds
Before we get to the painting part, let me refer to a few extra tips Joanie shares in the video. First, make sure that you do all the painting outside; you don’t want to inhale all those fumes from the paint. Second, it’s good to mention that Joanie first tried using foamcore for this project. However, it bent when the joint compound dried, so laminated plywood is definitely a better idea. Third, keep in mind that you need to leave time for the joint compound to dry well before applying paint.
So, once you’ve got all the ingredients, start by applying the joint compound onto the plywood using a putty knife. Play with textures but don’t make the surface too rough: the plates or cups night get wobbly once you line them up on your DIY board if it’s too textured.

When you’re done with the joint compound, leave it to dry for at least 24 hours. After this, it’s ready for painting. Again, you can get really creative. You could paint it just in white, as Joanie did with one of her backgrounds. But you can also play with colors and shades. In one of her backgrounds, Joanie applied a dark color first before applying a “messy” pastel layer over the top of it using a blending brush so that the dark color showed through. She finished it off with a dash of spray paint. Make sure to watch the video and pick up plenty more ideas for experimenting.
Joanie recommends using muted colors and paints with a matte finish because you don’t want the background to draw the attention away from the food. But, if your creative vision is different, feel free to express it. : )
Finally, when the paint is dry and you’re happy with how it looks, add two to three coats of matte finish spray. This will prevent any reflections, but also make the surface easier to clean if anything spills on it.
Here are the three backgrounds Joanie made:

Personally, this is the kind of a DIY project I would really enjoy trying out. I am a sucker for anything that involves painting, I find it therapeutic. Plus, I like food photography and plan to devote more of my time to it. So, I am definitely trying this one out. How do you like it?
[DIY Backdrops for Food Photography via Picture Correct]

Dunja Đuđić
Dunja Djudjic is a multi-talented artist based in Novi Sad, Serbia. With 15 years of experience as a photographer, she specializes in capturing the beauty of nature, travel, concerts, and fine art. In addition to her photography, Dunja also expresses her creativity through writing, embroidery, and jewelry making.
Related Posts
 What’s a food stylist and why you need one for food photography
 Professional food photographer debunks myths of nasty food styling hacks
 Here’s what food photographers need to have in their food styling kit
 The first AI food photo generator has launched for restaurant menus – should food photographers be worried?
Join the Discussion
DIYP Comment Policy
Be nice, be on-topic, no personal information or flames.
One response to “How to make DIY 2-in-1 food photography backgrounds for $30”
Such a cool lady with a great video.