


How to construct the world’s most well built and best looking DIY light box
May 22, 2018
John Aldred
John Aldred is a photographer with over 25 years of experience in the portrait and commercial worlds. He is based in Scotland and has been an early adopter – and occasional beta tester – of almost every digital imaging technology in that time. As well as his creative visual work, John uses 3D printing, electronics and programming to create his own photography and filmmaking tools and consults for a number of brands across the industry.
Share:

It’s always interesting to see how those who have some kind of actual construction skill tackle photography related projects. For example, if any of us needed a lightbox for a small product shoot, we may typically venture off toward Amazon. Or we might be impatient and want to build our own, so we grab a cardboard box, and start hacking away at it with a knife.
For a woodworker, though, like Glenn Scott at DIY Creators, a cardboard box just isn’t enough. After recently requiring a lightbox to shoot some small products, Glen decided to build his own. He uses common woodworking techniques to construct it, and the result is just magnificent. A purpose-built wooden lightbox that looks like it fits right in with your furniture.
It’s fascinating to see this level of craftsmanship and attention to detail put into something so simple. Especially when it’s so inexpensive to just go and buy one ready made. But if it’s something you’re going to be using regularly, and you want something custom built for your own space and needs, you just can’t beat taking pride in one you’ve built yourself.
Glen begins by cutting up some pieces of 2×1 to length. He needs to build frames for the front, back, two sides (inside and out) and top surfaces. Don’t they all look neat laid out next to each other?

To join the pieces together, Glen used simple butt joints with pocket hole screws. You can get as fancy as you like with this, with mortise & tenons, dovetails, box joints or however you wish it to look. But, as they’re not going to be holding a heavy load, glued and screwed butt joints will work well. Just make sure your cuts are straight.

As Glen was using standard 2×1 for the whole frame, he built a simple jig to hold the pieces of wood square while he screwed them together. A spot of glue was placed along the edges where each pair of pieces meet. With everything assembled, Glen had two inside end frames, two outside end frames, top, back and front frames.

To attach the basic interior frame together, Glen uses wood glue, with brad nails to hold things together while the glue sets. As some of the pocket holes for the screws are visible after this process, Glen covers the holes with filler, which he then sands down as smooth as possible to the surface of the wood.
Translucent white material was stapled to the interior of the top, and the exterior of the two sides. The inside of the top panel received an extra piece of 2×1 to help cover the exposed edge of material at the front of the box. On the ends, the two trim frames were added to hide the edges from exterior view.

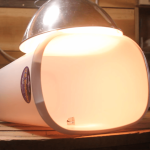
The final result is a very nice looking lightbox, with plenty of room inside for small products. There is the chance that the wood may interfere with reflections on certain items, but depending on the types of products you plan to shoot, that may not be an issue. If it turns out that it is, you can always paint the wood inside the box white to match the material.

Taking such a project to this extreme and level of detail may seem like overkill for most. Especially when you can buy one quite inexpensively.
But, if you have a passion for woodworking and a regular need for a solid lightbox, then why not?

John Aldred
John Aldred is a photographer with over 25 years of experience in the portrait and commercial worlds. He is based in Scotland and has been an early adopter – and occasional beta tester – of almost every digital imaging technology in that time. As well as his creative visual work, John uses 3D printing, electronics and programming to create his own photography and filmmaking tools and consults for a number of brands across the industry.


Join the Discussion
DIYP Comment Policy
Be nice, be on-topic, no personal information or flames.
8 responses to “How to construct the world’s most well built and best looking DIY light box”
Great job! I need tools worth a couple of thousands dollars to build it but it’s well done.
Its cheaper than you think Motti as you don’t have to buy power tools. You can build up your arms to hand hold that heavy lens at the same time. You can use a hand Mitre box with hand mitre saw to cut the timber square and to length, a cheap 12v or 18v battery powered drill with a screwdriver bit to match the screws you use and a few (2 or 4) small F clamps.
If you use a softwood like pine, you can staple the cloth to the timber with an office stapler, or buy a small to 8oz hammer and a box of tacks instead of the stapler. Trimming the cloth can be done with a craft knife, very sharp pocket knife but watch you don’t cut your fingers A pair of cheap clear eye glasses for eye protection and cotton wool in the ears when using the hammer and you are done. Minimal power needed, using the hand saw will build muscle (if you make something on a regular basis) and the satisfaction of making something from scratch is s great felling. If you have never done carpentry before look for a friend to guide you through the process. I was luck as I went to a school that taught carpentry so had an excellent teacher, and 40 year or so afterwards, I still remember clearly what I was taught. The internet is full of free plans and you tube will also have instructional videos on how to saw properly etc.
The problem is once you have made one thing and enjoyed doing so, photography and your new found hobby of carpentry will compete for funding. :-)
Yes, that’s true. I was just kidding. I have miter box, drill and everything else to accomplish that but as I mentioned above, it is so much more fun with power tools. :-)
Looks like a a miter saw and a drill would get the job done, and that’s if you go the strictly power tool route. Hardly thousands of dollars. If you go the Harbor Freight route, maybe a couple of hundred.
Was just joking :-). Yes, it can be done with a hand saw and careful work it’s just so much more fun with power tools.
I don’t want to spoil the fun, but…
… hiding drill holes with wood cement/plastic wood and then sanding over it? Dude, where is your sense of honor as a woodworker? There are tons of other options that are not visible from outside as well – such as (but not only) wooden dowels.
Also – if I understand the concept correctly – the diffusor cloth (why not use white matte acrylic sheets or clear ones from home depot plus some sanding paper if you are on a budget?) is attached to the inner frame with a pneumatic tacker, which is then fused permanently with the outer frame using the tacker again. Plastic wood to cover up the indents. That leaves us with zero options to replace the sheets once they get torn, dirty or baggy. Which will eventually happen.
If you absolutely MUST use white cloth, IMHO the good old velcro would do much better here. It comes in a self adhesive flavour or the sew-on type (granny’s sewing machine to the rescue!). The latter can also be attached to the corpus with the staple gun, BTDT.
And, yes, the brownish wood skeleton will reveal itself in reflective/shiny objects, which you potentially want to avoid by painting it matt white.
I built a “cage” made of lexan sheets for my highspeed demolition experiments to protect gear and humans from flying debris which is shown here: http://bartheld.net/ag13/slide050.html. This could be repurposed as a light box as well. Strap hinges allowed folding the apparatus flat after use. Unfortunately without a rear support, there was quite some sag which might be relevant in the 2nd use case.
Thinking of some high power magnets to keep stuff together…
Hey Volker, I was intrigued when you provided some very good insight on how DIY Creator could have done his photo light box better. However when I saw your link of what you’ve done… it honestly doesn’t compare. I’m not trying to start an online battle, but might I suggest that you up your game before you put others down.
Hi…I was wondering if u made a cut list?