


How I created This Gorgeous RED Portrait
Aug 12, 2015
Richard Powazynski

We love it when our readers get in touch with us to share their stories. This article was contributed to DIYP by a member of our community. If you would like to contribute an article, please contact us here.
Share:

For no particular reason red was never my first choice when it came to planning the colour pallette of a photo shoot, so a while back I decided that at some point I would throw myself wholly at it and try and create some beautiful high impact images. Like with all my ideas it had taken root and I knew that given time it would grow into a concept that would eventually be realised…
Then a few months ago I was given the opportunity to shoot in an aircraft hangar at my local airport, now being granted access to such an incredible location I knew I wanted to plan and shoot an editorial that had a very rich, elegant almost regal feel to it whilst having this emphasis on the colour red. After weeks of planning looks and working with the stylist and various designers, the morning of the shoot we faced a massive problem. The problem wasn’t the freezing temperatures or the snow flurries but that fact that we now only had two hours to shoot as opposed to having the entire day as planned! As a result not only did we have to cut our shoot time but we had to accept that we may not have time to shoot all eight of the planned looks.

Focusing on finding a solution we made the decision to prioritise the looks based on the editorial and the story we were trying to tell. However being mindful of the time and effort that had gone into the pre-planning and not wanting to miss out on an opportunity to photograph some of the beautiful outfits and accessories we had been given we decided, once our time was up, that we would find an alternative location to shoot any of looks that remained. In essence the Rougé images we’re not what we had planned to accomplish that day however as is the nature of this type of photography you have to be adaptable and be prepared for all eventualities, which is something I’m learning more about with every shoot.
Having said that these images didn’t come without their own set of challenges. Upon finishing the editorial and with only this final look remaining when we came to leave the snow had gotten worse and the brunt of the snowstorm was fast approaching. Once again pushed for time decisions had to be made; the models make-up remained the same albeit a couple of touch-ups, her hair went up as we knew the remaining look had the golden crown and the location we moved to ended up being a small forest just down the road.
Gear
- Canon 6D
- Canon EF 24105mm f/4L IS USM
- Macbook Pro 15”
- Wacom Intuos Pro M
Arriving at an almost deserted car park we got the usual funny looks from a couple of dog walkers as one by one we got out of the car and started putting together the final look. To save time and to try and keep the model from freezing and also because the dress allowed for it, the model kept her jeans and boots on underneath, very elegant I know! Then collectively we carried the dress as the model tried to maneuver through the gates avoiding all the mud. No less than 10 metres from the car we picked a spot, dropped down a sheet to prevent the dress from getting dirty and we began to shoot. Knowing that we didn’t have long I decided on this occasion it would be best to keep things simple and use only the available natural light.
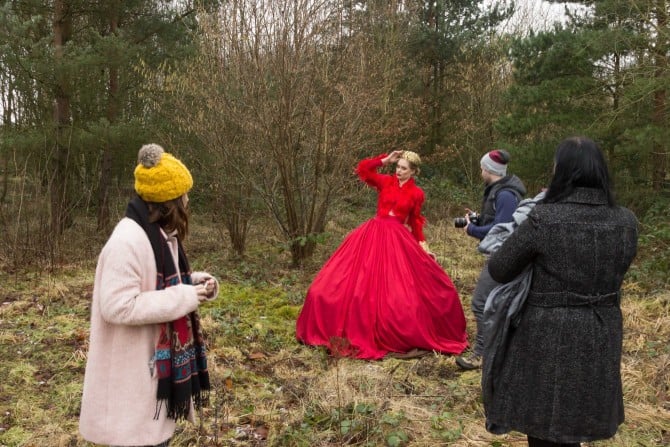
So there we were a small group of creatives with beautiful garments and accessories, standing in a muddy field, freezing cold, the snow falling heavier, trying to create magic…
Back in the comfort of the studio and fully thawed out I knew once I began reviewing the events of the day that the images which ultimately became Rougé wouldn’t fit the story of the editorial, simply because of the differing locations. But rather than focus on the negativity of this realisation I took it as an opportunity to have a bit of fun when it came to the post production. Keeping in mind that these images would have to look and feel different from those of the editorial and for those who’ve seen the opening scene of Star Trek Into Darkness I set upon the challenge of creating something otherworldly.
Post Processing
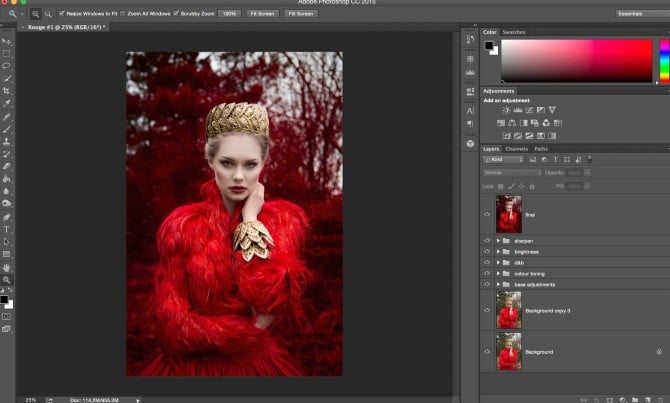
In order to build a solid base I began by analysing the image; highlighting areas that needed particular attention such as stray hairs, rubbish in the background, creases in the clothing I wanted to make less obvious or completely remove and so on. I also made notes on things like the overall exposure, contrast and colour pallette. Once this step was complete and mainly using the clone stamp tool, I began to clean up the images based on some of those observations. One thing I did in particular was clone some of the feathers in the jacket to cover areas of the models skin that I didn’t want to be on show. Next I focused my attention on the model and her skin. Utilising the healing brush I cleaned up any spots, blemishes and stray hairs, whilst also making any adjustment to ensure the makeup was perfect. To finish I applied some dodging and burning to enhance and contour the model’s face.
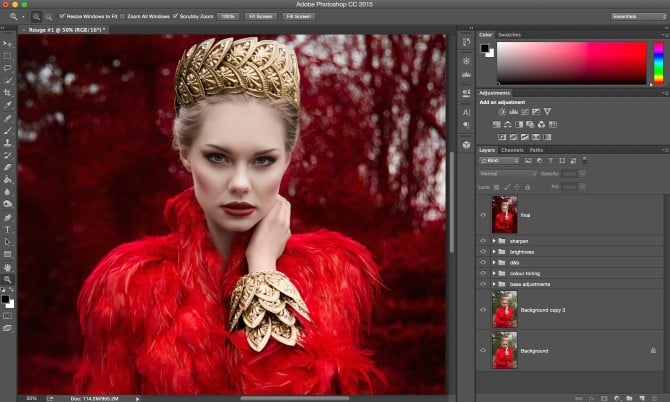
Once the image was cleaned up I set upon the task of adjusting the colour of the background. With the plan to make such an extreme change I knew the first thing I had to do was create a mask of the model and her outfit so that they could be separately adjusted later on. I started off using the quick selection tool and refining the edges but to make a better selection of the feathers in the jacket, at times I had to do it by hand. Once the mask was created I used a combination of adjustment layers including hue/saturation and colour balance to selectively change the green and yellow hues of the background into red, it took several layers and a lot of tweaking of each until the effect was perfect. With the background elements of the image now the hue and saturation of red I had in mind I set upon adjusting the red in the jacket and dress so that they didn’t get lost in the overall image. Focusing on the gold crown and cuff the idea was to add some saturation and vibrance to make them really stand out. Finally with the model’s skin tone I knew I wanted it to be paler so again using a hue/saturation adjustment layer I reduced the red and yellow in the model skin.
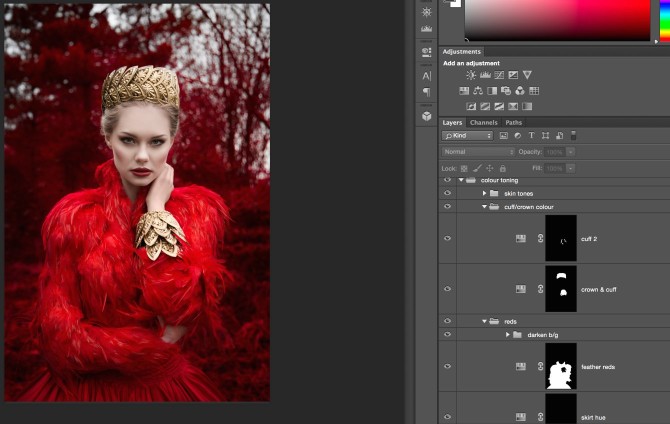
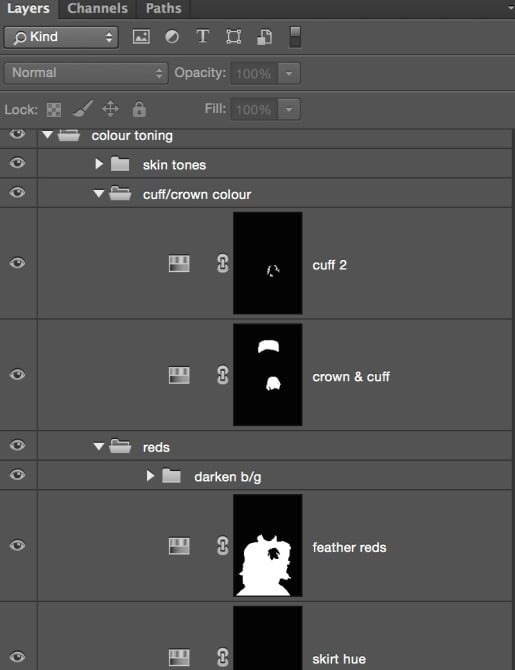
With the overall colour toning complete I applied further dodging and burning to add more depth to the image and make it pop; starting with the background which was darkened slightly I then moved on to the feather jacket and the gold accessories. Finally in terms of adjustments I selectively applied some sharpening using high pass filters. As I do with all my images at this point I went back to the first layer where I analysed the image to check nothing had been missed, then I zoomed in on the image and worked my way around to ensure I was certain of the adjustments I made.

Finally happy with the images and knowing the end result was different to those of the editorial it suddenly occurred to me that I now had images that could be instantly released, which was a surprise for the team as usually the turnaround on images when shooting editorials can be several months. Overall I would say there are two things you should take away from this firstly is that a warm model is a happy model, or at the very least when it’s not possible make a conscious effort as it does make all the difference. I now tend to carry on location shoots hand warmers, extra layers of clothing, flasks of coffee and sleeping bags, yes lightweight sleeping bags! Secondly if something goes wrong on a shoot try and embrace it as you never know what you might create, in fact some of my favourite images have similar stories.
About The Author
Richard Powazynski is an editorial and fashion photographer based in the UK. You can see more of his work on his website, Instagram and Facebook and peek his mind on his twitter.
We love it when our readers get in touch with us to share their stories. This article was contributed to DIYP by a member of our community. If you would like to contribute an article, please contact us here.


Join the Discussion
DIYP Comment Policy
Be nice, be on-topic, no personal information or flames.
2 responses to “How I created This Gorgeous RED Portrait”
would love to the see the post processing video of this shoot
would love to see the original shoot to see the difference