


Dramatic Lighting for Pole Dancing Fitness Instructors
Share:
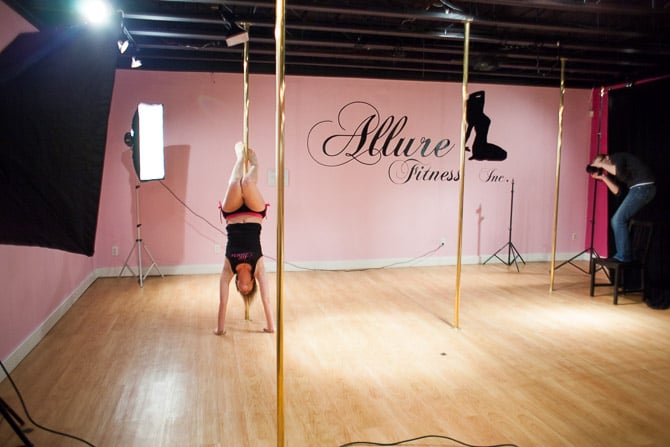
Allure Fitness is local ladies only gym, but with fitness classes such as Zumba, yoga, suspension yoga, pilates and of course pole dancing for fitness – this isn’t your mom’s aerobics studio (well, actually it could be since they have members of all ages, shapes and sizes).
My wife has been a member there for a while, and she had noticed that the quality of imagery that Allure has been using on their website and promotional material didn’t really match the cool, sexy, modern brand image that the fitness studio is all about – so she managed to talk the owner into some new promotional photography.

Read on to find out how we used dramatic lighting to photograph the Allure pole dancing fitness instructors.
Lighting Monkey
Before we dive in, I should point out that this was my wife’s gig – she took all of the photos in this post. I was just brought in to help with the lighting.
(She arranged to trade photos for pole dancing lessons, which is what I call a win all around.)
And by the way, if you’re used to working as the prime photographer, working as an assistant is a lot different!
(Especially if you are having gear issues, and every photography session has gear issues…)
As an assistant, a few things that I noticed in particular were how important it was to anticipate what your photographer will need or want, before they think of it. And, how important it is for the photographer to be clear about what they need or want.
Although my wife and I work together on photography gigs quite often (and we are often told that we sound like an old cantankerous married couple, which of course we are), I think we could both use a read of Jeff’s “How to Be A Great Photo Assistant” and “Assistant’s Expectations From Photographers“.

Lighting Concepts
Speaking of lighting, this was actually a pretty tricky space to light.
First of all, based on their experiences with previous photographers, the fitness instructor’s were concerned that while pole dancing may look very sexy and glamorous, the faces they make while doing it are not (it is actually extremely strenuous).
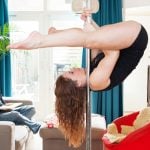
That consideration led us to a back lighting / rim lighting setup that would leave our models mostly silhouetted, hiding a lot of those ugly facial expressions.
Secondly, dance studios and fitness studios are notoriously difficult lighting environments – there are mirrors everywhere!
We did take precautions to limit the amount of spill from our lights, but in the future I would make sure I had everything gridded for even more control.
And, even though the fitness studio was a fairly large room, there were a ton of poles, suspension yoga straps and other obstructions everywhere – and a fairly low ceiling which all led to a very tight shooting area.
Finally, we decided to use the pink studio wall as the backdrop. In hindsight, a beat up dance studio wall was not the best choice for a background, the paint is not as uniform in the photos as it looks in real life – which is also partially a problem with the amount of light spill from our lighting setup. However, instead of worrying about the background lighting too much, we decided to use the light spill shadows to create a kind of spotlight look.

Dramatic Silhouette Lighting Diagram
Here is a sketch of the lighting setup that we used for the majority of the photos:

The silhouette rim lighting was created with a large softbox (an Elinchrom BRX 500 with a Westcott 36″ x 48″ softbox) to camera left – which also lit the pink wall background – and a strip softbox (an Elinchrom BRX 250 with a Westcott 12″ x 36″ softbox) to camera right. Just behind the pole we also had a small overhead softbox (Nikon SB-800 with a LumiQuest 10″ x 14″ softbox) hair light. Triggering was done with the Cactus V6 which is a pretty interesting product – review coming soon.
All of the lights are set to the same exposure, which was ISO 100, f8, 1/250th.
We set up a large black backdrop behind the camera to try and block some of the mirrors directly across from our lighting setup.
We didn’t want the photos to be a true silhouette – we still wanted to see detail and there was enough light spill bouncing around the room that we didn’t need to use a front fill light or reflector.
Here are a few behind the scenes photos of the setup:


Pretty Lighting Change Up
With each fitness instructor we did a series of photos with our main dramatic lighting setup, but we also changed things up to a more traditional pretty lighting setup.
To do this we simply moved the large softbox from behind the model to in front of the model while also raising the height of the light and angling it down. You can see this lighting configuration in the third behind the scenes photo above.
This is what the resulting photos look like with this lighting change.

Post Production
I would say that the final images have a medium level of post production editing applied.
In Lightroom I applied our usual basic edits: lens profile correction, white balance, contrast, black level and shadow adjustments. Then in Photoshop I touched up any blemishes and did some minor skin smoothing using gaussian blur and a layer mask. I also applied Topaz Detail with a layer mask to just the models and liquify tweaks where necessary.
Back in Lightroom, I applied a few final gradients along with color adjustments and clarity to bring out just a little more pop – and that’s it.
Here is an example of a before and after image:

What I Would Improve Next Time
The biggest problem I had was controlling the light in a dance studio with a light colored floor and mirrors everywhere. The next time I find myself photographing pole dancing fitness instructors, I think I will put up a black curtain all the way around the shoot location to block all spill and use just strip lights (as in strip softboxes) with grids.
And speaking of strip lights, I think it would be fun to use some gels, maybe a smoke machine… to add a little more authenticity to the finished photographs.

JP Danko
JP Danko is a commercial photographer based in Toronto, Canada. JP can change a lens mid-rappel, swap a memory card while treading water, or use a camel as a light stand.
Related Posts
 Dutch Photographer Shows The Athletic Side Of Pole Dancing In Original Photo Series “Pole Fitness”
 On Assignment: Strip Lighting Pole Dancers for Allure Fitness
 Fitness instructor obliviously captures Myanmar military coup on video while dancing away
 ‘Pole dancing’ bear gets spicey in front of trail cam
Join the Discussion
DIYP Comment Policy
Be nice, be on-topic, no personal information or flames.
7 responses to “Dramatic Lighting for Pole Dancing Fitness Instructors”
can I ask why the 50mm?
That’s the longest lens we could fit in the space and still frame a full body shot.
great and about that black cloths…in walmart they have it there for 13 dollars…bed sheets…but still works to stop light from leflexting back…
Great tip thanks! I think I will go pick up a bunch of them.
I use a 10-22 to get a full shot, but I shoot free movement and tend to get really close to my subjects, since I dance as well I can anticipate the movement and dance along with them using a fill flash and don’t use static lighting. But thanks for the tips as I have girls that just want pole shots sometimes, yes black sheets from a discount store are the bomb in these situations.
What’s the best camera to use for pole photography. I’m working for my local gym to do their photoshoots. I’d really like to get a good camera but I’m not sure what is best. I know the lens is important to get. I’m looking at the nikon d5100 or the d750 with an f/2.8 lens. What would you suggest?
I’m looking to do my first pole photo shoot (used to photographing horses)!!
It’s a very high ceiling studio and the girls want a black backdrop – they don’t mind their faces on show (don’t want it silhouette) – am I better covering the other mirrors in the studio and adding 2 soft box lights angling to them in front of them to show them up against the black? Or do you think I’ll only need one light?