


DIYP reviews the X-Rite ColorChecker Passport Video
Jun 14, 2016
John Aldred
John Aldred is a photographer with over 25 years of experience in the portrait and commercial worlds. He is based in Scotland and has been an early adopter – and occasional beta tester – of almost every digital imaging technology in that time. As well as his creative visual work, John uses 3D printing, electronics and programming to create his own photography and filmmaking tools and consults for a number of brands across the industry.
Share:

When it comes to getting consistent colour with your stills photography, regardless of the lighting conditions, camera model, or even brand, I can’t think of anything I’d rather have with me than the X-Rite ColorChecker Passport (CCP). It just works, pretty much flawlessly.
For video, though, it’s not quite as useful. So, when X-Rite announced that they had released two new products aimed specifically at video shooters, the ColorChecker Video and the ColorChecker Passport Video (CCPV), I had to check them out and see for myself.
The ColorChecker comes in two sizes. The larger ColorChecker Classic is primarily geared towards studio shooters, where it has a consistent place to live in a moderately clean environment. The ColorChecker Passport is a pocket sized version that’s more useful for location shooters who want the accuracy and consistency it provides when out on location.

The problem with the CCP for Video
After I first got hold of a ColorChecker Passport a few years ago, I instantly became a fan. Whenever I head out the door with a camera, there’s one in packed into a bag, so that no matter which camera I’m shooting with, I can get perfect and consistent colours every time, as long as I’m shooting stills.
But the CCP has a big problem when it comes to video. It lacks the standard chromatic colours used with the vectorscope in software such as Premiere Pro and DaVinci Resolve.

You’ve really no idea where any of the colours are actually supposed to sit on the vectorscope which means that beyond basic white balancing, there isn’t much you can do with it.
Fortunately, DaVinci Resolve added support for the ColorChecker Passport in Version 11. Unfortunately, it was very inconsistent in its results, and trying to match footage from different cameras was often still a bit of a nightmare.
ColorChecker Passport Video to the rescue!
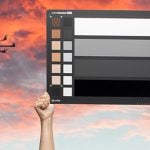
Externally, the CCP and CCPV appear identical and they share the same white balancing target, but that is pretty much where the similarities end. The familiar 24 colour swatch panel of the CCP has been replaced in the CCPV by four sets of six swatches.
First, six chromatic colours (red, magenta, blue, cyan, green and yellow) and then six skin tones ranging from light to dark with different undertones show us exactly where our colours lie on the vectorscope.

Six linear greyscale chips provide for an even balance throughout the exposure, with six extreme highlight & shadow chips, including a high gloss black let us get consistent contrast from shot to shot.
The white balance swatches and range of rainbow colours of the CCP have also been replaced. This time by white, 40 IRE grey (the video version of 18% grey), and high gloss black exposure targets. These ensure consistent exposure and contrast between clips. The full size ColorChecker Video also has a fourth “Deep Grey” swatch to help balancing the shadows.

On the other side, along with the white balance target, the CCPV also offers a black & white focus target, which can be handy if you’re having to deal with low contrast subjects, or shooting a very flat colour profile that makes it difficult to focus.
The larger ColorChecker Video does not contain the focus target, instead it simply provides a bigger white balance target.
So how does it work?
Unlike the CCP, there’s no real camera profiling here. It simply acts as a reference to adjust your footage once you get it into the computer and load it into your editing software, but the CCPV’s job starts before we’ve even begun recording.
The first task is setting the white balance. With a DSLR, shooting video is a lot like shooting JPG, meaning that we have very little latitude in post to make big correction adjustments. So unless you’re using a camera capable of shooting raw video, you’re going to want to get this right.
While the process will vary slightly from camera to camera and between brands, it’s usually pretty straight forward.
If you don’t know how to do this, check your camera’s manual. In essence, you want to tell your camera that you want to set a custom white balance, fill your frame with the WB target, and then take the shot.

After white balancing your camera, the black, white and 40 IRE grey swatches on the CCPV help us get a good exposure.
This is one of those times when spot metering comes in extremely useful. I simply place my AF point over the 40 IRE grey panel, and flick my dials around or add NDs to give me a good exposure.

You’ll notice in the shot above that black isn’t really showing as a single solid shade of black. This is because the black swatch is a glossy black, in an attempt to eliminate as much contamination from the material surface of the swatch itself from throwing your results.
This, obviously, means that it will reflect at least some light sources. It’s not a big issue, just something to be aware of, and in general use when you have a subject holding it, you usually won’t even notice. If you do, you can just have your subject hold it at a slightly different angle.
Here you can see that the ColorChecker Video’s black area on the right indicates pure black when it’s reflecting the dark environment, whereas the ColorChecker Passport Video’s black area is not completely black, as it’s reflecting the sky and branches above.

Occasionally you may need to add ND to get a good exposure with your shutter speed & aperture locked and your ISO as low as it will go. In such instances, I’ll white balance again just to help counter any colour cast that the NDs might have introduced (which it often does, even with expensive NDs – I use Schneider 4×5.65″ ND filters).
Now you’re pretty much ready to shoot.
With your subject in the frame, simply have them hold up the ColorChecker Passport Video. Close in on it, if possible, and capture a few seconds under the same light in which you’ll be shooting your footage, and you have your reference footage.

As long as the light doesn’t change, your settings don’t change, and you don’t need to add or remove ND, you’re good to go, only needing to capture the CCPV at the beginning of your filming.
If you’re moving around a lot, or the light’s rapidly changing, you need to constantly add more or take away some ND, or you’re going between indoor and outdoor, then you’ll want to white balance your camera again and capture a new short sequence of the CCPV each time something changes.
It sounds like a lot of extra work, and while it definitely takes some getting used to, it’s really not. The little extra time it takes to do this on set saves a lot more time in post and takes out 99% of the guesswork.
For the first few days playing around with the CCPV, I would get lazy and forget to re-white balance between different lighting conditions. I’d also forget to reshoot the colour swatches, and when it came time to edit, several clips would be out from the rest; Not by a massive margin, but enough that it was noticeable.
There’s no software supplied with the ColorChecker Passport Video, which makes sense, because there isn’t really a “standard” video editing system, and workflows are even more varied.
If you want some more workflow information, X-Rite have a free webinar coming up on June 20th, explaining how to use the ColorChecker Video products in your workflow.
In the interests of completeness
We did have one slight issue with the ColorChecker Passport Video, which required sending it back to X-Rite and getting a replacement. Somehow, the ink from the focus target had managed to transfer itself over to the white balance target.
Exactly how this happened is unclear and after chatting with X-Rite, we were confident that this was an isolated incident. They say they’ve received no other reports of this happening, and we’ve had no problems at all with the replacement unit. I certainly wouldn’t let it put you off.
The Pros
- Having correct RMBCGY colour swatches that match up with the vectorscope is a big enough pro alone for me, but the range of skin tones is a really nice feature.
- It’s small enough to slip into a bag or your pocket to take out with you on location, but it’s a double edged sword. It means it’s also easy to leave it laying around and lose it, or forget about it. Convenience outweighs carelessness in this instance. My “slight niggle” below offers a solution to resolve this potential loss.
- The white balance target is spot on between multiple cameras, and the black, 40IRE grey and white swatches for perfect exposure during capture, and contrast in post.
- I mentioned above that DaVinci Resolve had added ColorChecker Passport support in Version 11. Well, it seems it’s been improved slightly in the latest Version 12.5 release, but this version has also added support for the ColorChecker Passport Video.
- In non-scientific quick tests, I found that the CCP support in DaVinci Resolve still isn’t perfect, but the CCPV support seems pretty solid, and you’ve still got the vectorscope as a backup.
The Cons
- The only real con is that you have to use it far more often with video, but that’s not really the fault of the CCPV, it’s just the nature of the beast.
In the studio, under consistent lighting and exposure, you only need to use it at the beginning of your shoot, and you’re good for every take until something changes.
On location, where lighting conditions can often change quite rapidly, you may have to use it for almost every single take, especially if you’re getting slight colour casts from light reflecting off leaves in woodland, or blue sky reflecting off the surface of a river, for example.
- The only other potential con is kind of a catch 22, at least for me. The white balance target can seem a little small, especially if you’re using a really wide lens. The full size ColorChecker Video solves this problem, however it’s a bit large and unwieldy for using on location (which is 99% of what I shoot) if you don’t have an assistant with you.
In the studio, the full size ColorChecker Video is perfect, but it’s something to bear in mind when choosing which one to purchase and figuring out which best suits your needs.
One slight niggle
When I purchased my original ColorChecker Passport, it came with a lanyard that attached to the CCP letting me hang it off a light stand or tripod. It ended up staying in the box unused because you actually need to reprofile your camera very little. If you’re shooting at the same locations regularly, or under the same lights all the time, once you’ve created a handful of profiles, you’re pretty much covered for most situations you’re shooting in.
Then I’d only need to use it when I had extreme situations to deal with, and I’d still only need to use it once or twice during a session. So, it stayed in the bag most of the time.
X-Rite have since decided to no longer include a lanyard with the ColorChecker Passport mostly for the kind of reasons I explained above, but they also don’t include one with the ColorChecker Passport Video. This is where I found I really needed one.
I’m using the ColorChecker Passport Video far more often during a video shoot than I ever did with the ColorChecker Passport with stills. Having the lanyard lets me hang it off a tripod or a light stand where it’s easily accessible throughout the session.
Where I mentioned above that I kept forgetting to reuse it at the beginning of each take, that’s mostly because I didn’t have the lanyard, and would put the CCPV back in my bag after I used it. Putting it back in my bag after use was also to prevent losing it or forgetting about it and leaving it on location after I go.
After attaching a wriststrap lanyard to the CCPV and hanging it from a tripod between takes, I started to remember to use it much more, because it was always there in view. Leaving it behind at the location or losing it also became a non-issue, because I’d notice it as soon as I went to pack my tripod away.
Hopefully, X-Rite will revisit this decision at some point and start to include one again, at least with the ColorChecker Passport Video. For now, there’s plenty of options over on Amazon, and I would definitely recommend picking one up, especially while you’re getting used to fitting the CCPV into your video workflow.
The verdict
My recommendation is simple. If you shoot video regularly, then buy it. Well, buy one of them, either the ColorChecker Passport Video, or the larger ColorChecker Video. Which one will depend entirely on your needs and circumstances, but definitely get one of them.
The shooting workflow does take some getting used to, but it’s made my post workflow so much easier to deal with. It’s made things far more accurate and consistent than the guesswork that was previously involved when attempting to match different clips or shots from multiple cameras, while also letting me spend less time at the computer.
It’s found a permanent place in my bag next to its older CCP sibling.
- X-Rite ColorChecker Video: 98.99 on Amazon or B&H (MSRP $129.00 / £92+VAT)
- X-Rite ColorChecker Video Passport: 114.99 on Amazon or B&H (MSRP $149.00 / £105+VAT)

John Aldred
John Aldred is a photographer with over 25 years of experience in the portrait and commercial worlds. He is based in Scotland and has been an early adopter – and occasional beta tester – of almost every digital imaging technology in that time. As well as his creative visual work, John uses 3D printing, electronics and programming to create his own photography and filmmaking tools and consults for a number of brands across the industry.


Join the Discussion
DIYP Comment Policy
Be nice, be on-topic, no personal information or flames.
8 responses to “DIYP reviews the X-Rite ColorChecker Passport Video”
Great info, a helpful review for sure!
Thanks, Richie. :)
Great review John. If I can only afford one passport for both video and stills, which one would you recommend?
That’s a really tough question to answer, because the purpose and workflow with both is pretty different, and I’ve thought a lot about it since getting hold of the CCPV, because quite a few people have asked me this.
I’d say it depends on whether you primarily shoot stills or video, really.
If you’re mostly a stills guy, and occasional video shooter, I’d say go for the original ColorChecker Passport, because the workflow with it for stills in LR/ACR is a breeze. In a pinch, you can use it as a starting point for video, especially with DaVinci Resolve’s support for it improving now, but you’ll definitely want to do more tweaking to get things correct with video, before you start on your final grading.
If, on the other hand, you’re mostly shooting video, and the stills are secondary, I’d say go for the ColorChecker Passport Video, because if you’re comfortable in your video editing software, you could potentially bring a still into something like DaVinci Resolve, do your corrections in there, and then export a 3DLUT file out that you can bring into Photoshop to correct everything over. But, doing it that way is a much more involved workflow, and the 3DLUT would be getting applied to the raster image in Photoshop, not the actual raw data.
OK, thanks, will get the video version and continue to use a plain gray card for stills.
Can I use Colorchecker Passport Photo to edit video?
In theory, sure, because Resolve has a calibration thing that works with it. The problem is that it’s not very consistent. And as you can see from the screenshots above, it’s all over the place on the vectorscope, so you’ve really no idea where or how those colours are supposed to line up.
Thank, great review. Is it possible to use ColorChecker Passport Video to use for editing photos in Capture One 21 or Adobe Lightroom?