


DIY Camera Accessories: 10 Genius Builds to Boost Your Photography Game
Jun 12, 2025
Dunja Đuđić
Dunja Djudjic is a multi-talented artist based in Novi Sad, Serbia. With 15 years of experience as a photographer, she specializes in capturing the beauty of nature, travel, concerts, and fine art. In addition to her photography, Dunja also expresses her creativity through writing, embroidery, and jewelry making.
Share:

If you’re looking to enhance your photography kit without draining your wallet, DIY camera accessories are the perfect solution. After all, that’s what probably brought you to this blog in the first place. From homemade softboxes to clever motion tools, these builds offer professional-level functionality at a fraction of the cost. Plus, you’ll have fun making them, because there are some quite unusual ones.
In this article we bring you ten ideas for photography accessories you can make on your own. You’ll also find some building and safety tips, as well as some bonus ideas to level up your photography and video game in a fun, creative, and DIY photography way.
Why Build DIY Camera Accessories?
Cost-effective solutions compared to commercial gear
Photography gear can be expensive, especially for newbies who are just starting out. Or, perhaps, you just want to test out some new ideas or creative techniques. In cases like this, DIY camera accessories offer a budget-friendly alternative to costly store-bought gear. With everyday materials or inexpensive items from a hardware store, you can replicate lighting tools, stabilization gear, and modifiers that often cost hundreds of dollars. It’s a smart way to stretch your budget while still growing your photography setup.
Creative control and customization
One of the biggest benefits of building your own gear is having full control over its design and functionality. Whether you need a specific size, shape, or material, DIY builds let you customize your accessories to meet your exact shooting needs. Want a warmer light source? Use a different diffusion material. Need a more compact rig? Build it to fit your bag. This flexibility gives you a level of personalization that off-the-shelf products often lack.
Great for learning photography fundamentals
Making your own accessories gives you hands-on insight into how light, movement, and camera support affect your images. You’ll start thinking more intentionally about exposure, direction, intensity, and stability. It’s a great way to develop your technical understanding while reinforcing the core principles of photography.
If you’ve already tried building your own softbox or experimenting with other DIY lighting setups, these accessories are the logical next step. They enhance what you’ve already created. They offer new ways to control light, manage camera motion, and much more. It’s about building a complete, functional toolkit, one project at a time.
So, I hope you’re ready. Buckle up, we’re starting with the ten DIY camera accessories to inspire you and help you build and expand your own DIY photography kit.
10 DIY Camera Accessories You Can Make at Home
1. DIY Softbox
Whether you’re capturing portraits, product images, or food shots, a softbox helps reduce harsh shadows and spreads light evenly across your subject. While commercial softboxes can be expensive, you can build one at home for under $20 using basic materials you probably already have.
To create your DIY softbox, start with a cardboard box or foam board as the base structure. This forms the shape and body of your light modifier. Carefully cut your panels into a trapezoid or rectangular form using a utility knife and a ruler. Clean, straight edges will make your softbox easier to assemble and much more stable.
Next, line the interior of the box with a reflective surface. Aluminum foil works great—it’s inexpensive, readily available, and effectively boosts the light’s intensity by bouncing it through the box. Apply the foil in sections to avoid tearing and make sure it adheres smoothly to prevent uneven reflections. If you’re feeling a bit fancy, you can also experiment with reflective mylar, a car windshield sunshade, or even silver gift wrap.
Once your panels are ready, assemble them into the box shape. Use strong tape like duct tape or gaffer’s tape to secure the edges. Reinforce the corners with extra cardboard or craft sticks if you want the structure to last more than one or two shoots. A sturdy build will help your diffuser stay taut and prevent the box from sagging over time.
Now it’s time for the key component: the diffuser panel. This is what transforms harsh light into that beautiful, soft glow. A white shower curtain is a favorite DIY option—cheap, durable, and great for larger boxes. For smaller softboxes or tabletop setups, tracing paper or baking parchment also works well. Cut your diffusion material slightly larger than the front opening of your box so you can stretch it smoothly over the frame. Tape it tightly along the edges or use Velcro if you want to make it removable for bulb changes.
Finally, install your light source. A daylight-balanced LED or CFL bulb (preferably 5,000–5,500K) is the safest and most efficient choice. These bulbs stay cool and are bright enough to light your subject evenly. You can use a clamp light, desk lamp, or a simple socket fixture to hold the bulb. Mount the light at the back of the softbox or even position the whole box over an existing light source—whatever works for your space and setup.
Before flipping the switch, double-check your build for safety. Make sure no foil is loose near the bulb, and that your materials aren’t at risk of overheating. Once powered on, you should see a soft, flattering light glow through the diffuser without any harsh hotspots. If the light feels uneven, adjust the bulb’s position and smooth out any wrinkles in the diffusion material.
[Related reading: How to Make a DIY Softbox: A Guide for Photographers]
2. DIY Camera Slider
Pro Version
A smooth, controlled camera slide adds an instant cinematic touch to your video work. It works great for B-roll, interviews, time-lapses, product shots… You name it. Building your own motorized slider is not only possible but surprisingly affordable. You just gotta be handy with tools and have access to a 3D printer. Or a friend who does. :)
This DIY camera slider project, originally designed by Michael Klements at The DIY Life, combines a simple sliding rail with a motorized pan axis. The result is a motion system that not only moves your camera smoothly from point A to point B, but also rotates it to track your subject along the way.
Michael’s DIY camera slider combines aluminum extrusion rails, Nema 17 stepper motors, and 3D-printed parts to create a motorized slider with a panning head that can track your subject as it moves.
Klements provides STL files, Arduino code, and a full parts list, making it easy to replicate. If you already own a 3D printer, you can build it for under $100. The setup is powered by quiet TMC2208 stepper drivers and controlled via Arduino or a custom PCB.
The tracking function uses simple math-based logic to adjust the pan as the slider moves—not true AI, but very effective. With some tweaks, you could even upgrade it to smart tracking using an ESP32Cam or Raspberry Pi.
It handles mid-weight mirrorless cameras like the Canon EOS M50 with ease. If you’re ready to move beyond static shots, this DIY slider is a smart, budget-friendly upgrade.
[Related reading: This motorised DIY camera slider can be built for under $100 and lets you track objects as it moves]
Simple (Mobile) Version
I just can’t write about a DIY camera slider without mentioning one of my favorite DIY camera accessories. Sometimes, the simplest ideas are the most ingenious ones. If you’re a phone shooter, you can make a DIY camera slider from – are you ready – a syringe. It’s a simple, cheap build, and mobile filmmakers will adore it. DIY spirit is strong with this one!
[Related reading: Make your footage smooth as butter with this simple syringe slider]
You can also create a simple DIY camera slider from a towel. Just place your camera on a towel and slowly drag it across the table or the floor as you shoot. This also works with a camera or a mobile phone mounted on a tripod, which is placed on a large beach towel.
3. DIY Track Dolly
Sliders are great for short, smooth moves, but sometimes you need longer, more dynamic shots. Enter DIY track dolly. It’s a simple, affordable setup that gives you buttery camera movement over much longer distances, perfect for tracking shots, interviews, or cinematic B-roll.
The good news is you can build one for around $50 using basic materials. The core is a 2’x2′ plywood platform with four angle brackets attached underneath. Roller skate wheels mounted to each bracket form a stable V-groove that runs smoothly along two lengths of PVC pipe, which serve as your tracks.
To keep your tripod steady, consider adding a rim or small barrier on top of the board to prevent slipping during movement. This is especially important if you’re filming outdoors or on uneven terrain. Speaking of which, this build isn’t limited to indoor use. With longer PVC lengths (10ft to 50ft or more), you can easily set it up outside for dramatic tracking shots.
It’s not only affordable, but also scalable, easy to customize, and surprisingly smooth when done right. If you’re shooting solo or working with minimal gear, a dolly is a huge step up from handheld footage. Below, you’ll find a more in-depth explanation on how to build one, so go ahead and take a look.
[Related reading: How to build your own DIY track dolly for under $50]
4. DIY Aerial Shots
You need a drone to get aerial photos and videos, right? Right? Well, not necessarily. With a little creativity, you can fake aerial shots using a smartphone, a gimbal or phone mount, and a boom pole. It’s an affordable, lightweight setup that delivers impressive overhead footage without ever leaving the ground.
Just mount your phone to a gimbal or a phone mount you’d use on a tripod. Attach it to a long carbon fiber boom pole and there ya go – your silly-looking but delivering DIY “drone”. Any lightweight phone or action cam with a stabilizer will work with this setup. Juts make sure it’s not too heavy to hold and control at arm’s length.
It’s a surprisingly versatile trick for tight spaces, crowded events, or restricted airspace. Sure, people may stare or call it a giant selfie stick. But hey, the results speak for themselves, and that’s what counts.
[Related reading: No drone? This is how to fake aerial shots with your phone]
5. DIY Ring Light with LED Strip and Cake Pan
If you’re after flattering, soft lighting for portraits, videos, or product photography, you need a ring light in your kit. But instead of spending cash on a commercial model, you can build a surprisingly effective DIY version for a fraction of the cost. All you need is a cake pan, LED strip, and a little DIY photography spirit, of course.
To start, get a 14″ aluminum cake pan and make sure it’s silver on the inside. This reflective surface will help bounce and spread the light evenly. Avoid non-reflective or dark-colored pans. Next, take a 12V daylight-balanced flexible LED strip and run it around the inner wall of the cake pan. You can secure it with double-sided tape or hot glue. Lay the strip evenly and avoid overlapping. This way, you’ll get uniform brightness and reduce hot spots.
Once the LEDs are in place, connect them to a 12V power adapter. Make sure your adapter matches the power rating of your LED strip. If it doesn’t come with a plug or switch, consider adding one for convenience.
Now cut a circle of diffusion material slightly larger than the pan’s opening (similar to when you’re making the DIY softbox). You can go for photographic diffusion fabric, but you can also use white shower curtain, tracing paper, or any thin white fabric. Pro tip: ask your friend who embroiders or sews to give you some, we always have some leftovers. You’re welcome.
Now, stretch the diffusion material across the front of the pan, securing it tightly with tape, glue, or even Velcro if you want to make it removable. Finally, mount the finished ring light onto a light stand or tripod. You can drill a hole in the back of the cake pan to screw in a bracket or repurpose a clamp or friction arm to hold it in place.
Once you power it up, you’ll have a soft, circular light perfect for face lighting or macro photography.
[Related rearing: How to make a quality DIY video light using LED strips and a cake pan for only $40]
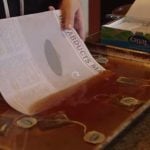
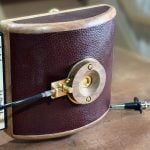
6. DIY Waist Level Viewfinder
Here’s a fun one, and a bit of a niche build. A waist-level viewfinder was common in older medium-format and twin-lens reflex cameras. If you want to recreate this experience with your digital camera, it’s surprisingly easy to do it. You may need a 3D printer, but it’s totally doable without it, so no worries if you don’t have one.
To get started, you’ll need three main optical components: a small convex lens, a mirror (preferably first-surface), and a Fresnel lens. These work together to reflect and magnify your camera’s screen or electronic viewfinder image, giving you that classic top-down viewing experience.
You’ll also need a box or enclosure to hold everything in place. This is where the 3D printer can come in handy, but you can easily pull it off with black foam core board or cardboard! Cut and assemble a rectangular box just large enough to house your lens and mirror assembly. Leave openings at the top (for viewing) and the bottom (which will sit above your camera screen).
Position the mirror at a 45-degree angle inside the box so that it reflects the image from your screen upward toward the convex lens. Mount the Fresnel lens at the top viewing window to help magnify the image. Let me warn you ahead so you don’t get discouraged: you’ll need to experiment a bit with distances and angles to get a clear, usable view. So, consider just lightly and temporarily taping parts in place while testing.
Once everything is aligned, glue or tape the components securely inside the housing. You can attach the whole unit to your camera using Velcro or a removable adhesive so it stays in place while you shoot. The result isn’t just a gimmick with a nostalgic feel. It’s genuinely useful for low-angle compositions and more stabilized handheld shots. I think it would also be super-handy for discreet street photography.
[Related reading: How to make your own DIY optical waist-level viewfinder for any camera]
7. DIY Lens Hood
Lens hoods are essential for blocking unwanted light and reducing lens flare, especially when shooting outdoors or under harsh lighting. In case you don’t have one, and you need it, you can make it in just minutes. You literally need a printer, some cardboard or foam board, and scissors.
You can download free printable PDF templates designed for different camera lenses. These hoods are optimized for 1.5x and 1.6x crop sensors, making them perfect for most hobbyist and enthusiast shooters.
To build one, go to the site and find your lens manufacturer and model. Download the corresponding PDF, print it on thick paper or lightweight card stock, and carefully cut along the outline. Fold along the indicated lines to shape the hood, then secure the edges with tape or glue. You can also trace the shape on sturdy cardboard or poster board if you like, and then cut and fold the shape of your lens hood. You can use Velcro or an elastic band to attach it to your lens.
There are two common styles to choose from. First, you have petal hoods, which are great for wide-angle lenses and keep your corners from vignetting. And second, rounded hoods, which offer all-around protection. They’re lightweight, compact, and completely recyclable, which makes them ideal for travel or as a backup if you’ve misplaced your original hood.
While these DIY hoods aren’t as rugged as plastic or metal ones, they still do the job. They shield your lens from stray light and help you capture clearer, more contrast-rich images. Plus, if you damage or lose one, just print and cut another.
8. DIY Pinhole Lens
Pinhole photography is one of the oldest forms of image-making, and there’s something so magical in it! While it was originally done fully analog, you can also do it with your digital camera. To begin, you’ll need a body cap for your camera. Find the center, and carefully drill a small hole in it. This is just the base opening; you’ll create the actual pinhole on a separate piece of thin metal. You can use a piece of aluminum foil or, better yet, a small square cut from a soda can. The latter is less flimsy, yet thin enough, so I’d always opt for that.
Once you have your aluminum piece, use a very fine sewing needle to make the pinhole in it. For better control, try pressing the needle into a pencil eraser to use it like a screwdriver. Twist gently to form a clean, circular hole. A smaller, neater hole will give you sharper images, while anything jagged or off-center can cause heavy vignetting or blur. So, patience and focus will be your best friends here. Just like they are in photography.
Once your pinhole is ready, tape it over the opening in your body cap. Use gaffer tape or black electrical tape, and be careful to center the pinhole exactly. If it’s off by even a millimeter, you’ll notice uneven exposure across your frame. Attach the modified body cap to your camera, and there you go—your very own DIY pinhole lens.
To shoot, switch to Live View, since the viewfinder won’t show anything with no glass or electronics involved. Be prepared for longer exposures and soft-focus results. Boosting your ISO and shooting in bright daylight can help compensate for the tiny aperture (often equivalent to f/100 or smaller).
[Related reading: Pinhole photography with a digital camera]
The beauty of this build is that it costs almost nothing and offers a completely different shooting experience. It’s unpredictable and oddly liberating, perfect for experimenting with light and shadow in a whole new way. And if you want to take it a step further, you can also build the analog version from a soda can. And boy will you need patience here – your final image will be ready after weeks or even months!
If pinhole photography has caught your attention, we have a complete pinhole photography guide to help you learn more. As always, feel free to share your results with us if you decide to play with this technique.
9. Rain Cover for Your Camera with Ziplock Bag
I personally hate bringing my camera when the weather’s unpredictable. However, shooting in the rain or snow doesn’t need to mean risking your gear. A quick DIY camera rain cover made from a Ziploc bag can save your gear from water damage in a pinch. It’s practically free, and takes less than five minutes to put together.
Start with a large, heavy-duty Ziploc freezer bag. Needless to say, the sturdier, the better. Lay it flat and use a pair of scissors to carefully cut a hole in one corner just large enough for your camera lens to poke through. You want a snug fit, so cut gradually and test as you go.
Next, insert your camera into the bag lens-first, guiding the lens through the hole. Then, take a rubber band or gaffer tape and secure the bag tightly around the lens barrel, creating a water-resistant seal. Make sure the lens glass is clear and uncovered; you can also add a lens hood to help keep rain off the front element.
Leave the Ziploc open slightly at the back so your hands can access the camera controls. If you’re using a viewfinder, you can cut a small hole and tape around it for better visibility. You can even add a second small ziplock or clear sandwich bag around the eyepiece for extra clarity. While this won’t hold up in a torrential downpour, it’s more than enough protection for light rain, snow, splashes, and misty weather. And the best part? If it tears, fogs up, or gets in the way, you can toss it, grab a fresh one, and keep shooting.
A plastic bag is something I always keep in my camera bag. And it’s not even the one tailored for protecting my gear from the elements, just a regular, flimsy grocery store bag. I slap it onto my camera bag or straight onto my camera if I want to shoot. I have long hair, so a hairband is also something that’s always with me. In other words, I can whip up a makeshift rain protection for my gear at any time. Pretty convenient, and I strongly recommend it.

10. DIY Snoot or Honeycomb Grid with Straws
If you’re looking for dramatic, directional lighting, this simple DIY camera accessory is a must-try. A snoot focuses your flash into a narrow beam, which is perfect for dramatic portraits, product photography, or macro. And with a quick upgrade, you can turn it into a honeycomb grid for even more directional control.
To build the snoot, grab a sheet of black craft foam—the flexible kind sold at most art supply stores. Cut it so the long edge wraps snugly around your flash or speedlight head. Run a strip of gaffer tape along one short edge, roll the foam into a tube, and seal the seam tightly. Press along the taped edge so it holds its shape without bulging or unraveling.
Now, slip the snoot over your flash. Because the foam is flexible, you can pinch or mold the front to shape the light beam on the fly. It’s a simple but effective DIY lighting modifier that can dramatically reduce spill and add focus to your scene.
[Related Reading: DIY – Homemade Speedlite “Snoot”]
Want to level it up? Add a honeycomb grid using black drinking straws. Cut the straws into short lengths, about 2 to 3 cm, depending on how narrow you want the beam. Glue them side by side into the front opening of your snoot. The straws act like tiny light tunnels, tightening the spread and keeping your beam razor-sharp. You can also mount the grid inside a small square of foam board and tape it onto the front of your snoot if you prefer a removable option.
This combo is one of those DIY camera accessories that punches well above its weight. It’s quick to make, costs next to nothing, and truly levels up your creative possibilities.
[Related Reading: How To Make a DIY Honeycomb Strobe / Flash / Speedlight Grid with Straws]
Bonus Tips: Extra DIY Camera Accessories and Hacks
Not all great DIY camera accessories involve tape and foam. Sometimes, the smartest hacks are hiding in your pocket (or your fishing tackle box). So, here are some bonus tips that are easy to try. They’re surprisingly effective and cost almost nothing.
[Related Reading: DIY Camera Accessories: 10 Genius Builds to Boost Your Photography Game]
Remote Shutter Release Hack with Headphones
When taking long exposures, night photography, and self-portraits with your smartphone, it’s handy to have a way of triggering the shutter remotely. You can buy a dedicated Bluetooth remote, but you don’t have to. Wired or Bluetooth earphones with volume controlare all you need (I use these).I actually only recently discovered this (by accident, of course). So, I’m sharing it here in case there are more people like me.
Anyway, it’s simple. Just plug your headphones in or connect them via Bluetooth. Open your camera app, and press the volume button to snap a shot or start a video. Ta-daaa! It eliminates camera shake for long exposure photography, and it’s perfect for self-portraits if you want to use the rear camera and don’t want to run back and forth to deal with the self-timer.
It’s one of those ultra-simple DIY camera accessories that’s incredibly useful in the field and doesn’t require building anything at all. And if you’re like me, earphones are something you always have with you!
[Related Reading: DIY Portrait Photography: A Complete Guide to Stunning Portraits on a Budget]
DIY Camera Movement Tricks with a 360˚ Camera
Looking for epic camera motion for your 360˚ camera on a zero-dollar budget? All you need are a few household items. With smart execution and built-in stabilization, you can create cinematic moves that look like they came from a pro rig.
Here are some ideas:
- Scene tracking shot: Strap the camera to your chest, sit on a rolling chair, and glide backward to follow action.
- Poor man’s dolly zoom: Attach your 360 camera to a selfie stick, then create the zoom effect in post-production using software like After Effects.
- Spinning stairwell shot: This is my favorite. Suspend your camera from a fishing rod and drop it down the center of a stairwell. Thanks to modern stabilization, the spinning is smoothed out for a trippy, dreamlike glide.
- Tiny planet trick: Hold the camera low to the ground on a selfie stick and reverse the footage in post to create that Interstellar-style “ocean world” shot.
- Fake drone shot: Remember the “fake aerial shot” I mentioned earlier? You can use your 360˚ camera to pull it off, too. Mount the camera on a long telescopic pole and go wild!
[Related reading: Five epic camera movements you can pull off with your 360 camera and $0 budget]
Pro Tips for DIY Camera Accessories That Last
Building your own gear is rewarding, but a few smart habits can help your DIY camera accessories not only perform well, but also last long. I mean, why invest time into building something if you’re only going to use it once? So, here are some tips to make your DIY photography gear feel more professional.
Use Durable Materials Where It Counts
Cheap builds don’t have to feel cheap. Reinforce structural parts with foam board, thick cardboard, or corrugated plastic. Use duct tape, gaffer tape, and strong glue instead of flimsy craft glue for joints. If your accessory moves, bends, or bears weight, prioritize rigidity and stability. If you use a heat glue gun, don’t use it to connect places that will warm up. It will re-melt the glue, and you’ll make a huge mess. Go ahead, guess how I know. :)
Keep It Modular and Replaceable
Many DIY accessories benefit from being modular or removable. Use Velcro, zip ties, or friction-fit joints rather than gluing everything permanently. This makes repairs, upgrades, and adjustments easier—plus, you can reuse parts for future projects.
Avoid Heat-Sensitive Builds Around Lighting
If you’re making lighting modifiers like softboxes or ring lights, always use LED or CFL bulbs, as they stay cool. Avoid incandescent or halogen bulbs, which can melt materials or become fire hazards.
Label and Store Your DIY Camera Accessories
Label your homemade modifiers and mounts with a permanent marker or masking tape. You’ll find this especially useful if you’ve made multiples or cut-specific sizes. Keep them stored flat, padded, or boxed to prevent warping or accidental crushing.
Test Before You Rely On It
Always run a test shoot with your DIY gear before using it for a real project. This helps catch issues with light quality, structural integrity, or camera fit early, saving you frustration in the middle of a shoot.
Don’t Be Afraid to Modify
DIY photography projects are all about trial and error. Don’t worry if your first attempt isn’t perfect. Improve it, reinforce it, redesign it. Before long, you’ll have gear that works as well as anything you can buy.
Final Word
DIY camera accessories are more than just budget hacks. They’re a hands-on way to understand your gear, improve your photography, and unlock new creative possibilities. Whether you’re building a softbox from cardboard, crafting a pinhole lens, or rigging up a faux drone shot, these projects let you shoot smarter without spending more. They’re not only cheap, but also fun. And frankly, some of them are quite a conversation starter.
So, pick your favorite, get the tools and supplies, and start building. I suggest starting small, experimenting often, and what I always say – don’t be afraid to make mistakes. With a little time and imagination, you’ll turn household items into pro-level tools. And who knows, your next favorite DIY camera accessory might just come from your recycle bin.
FAQ: DIY Camera Accessories
Are DIY camera accessories reliable enough for serious photography?
Absolutely! if built carefully with the right materials, many DIY camera accessories can perform just as well as commercial gear. While they may not be as durable or sleek, they offer full functionality and are especially useful for controlled environments like home studios.
What’s the cheapest DIY accessory I can make that actually helps?
A reflector made from a car sunshade or foam board is under $5 and works wonders for portrait lighting. Another favorite: printable lens hoods: completely free and super effective against lens flare.
Can beginners make DIY photography accessories without tools or experience?
Yes. Most of the projects in this guide require only basic tools and supplies. Even first-time DIYers can build softboxes, snoots, or pinhole lenses using items found at home or from a local hardware store.
How do I know if my DIY camera accessory is safe to use?
First of all, use common sense while building, and test thoroughly. Avoid heat-sensitive materials near light sources, double-check any attachments that go on your camera body or lens, and always do a dry run before using homemade gear on an important shoot.
Do I really need DIY photography gear when modern cameras have so many features?
While cameras have evolved, lighting, stabilization, and creative control still benefit from the right accessories. DIY solutions give you customizable, cost-effective options that can match your shooting style, help you learn how light and gear work, and of course – help you spend some quality time in your workshop.

Dunja Đuđić
Dunja Djudjic is a multi-talented artist based in Novi Sad, Serbia. With 15 years of experience as a photographer, she specializes in capturing the beauty of nature, travel, concerts, and fine art. In addition to her photography, Dunja also expresses her creativity through writing, embroidery, and jewelry making.

Join the Discussion
DIYP Comment Policy
Be nice, be on-topic, no personal information or flames.