


Create Seamless White Portraits In Your… Anywhere
Mar 7, 2010
Udi Tirosh
Udi Tirosh is an entrepreneur, photography inventor, journalist, educator, and writer based in Israel. With over 25 years of experience in the photo-video industry, Udi has built and sold several photography-related brands. Udi has a double degree in mass media communications and computer science.
Share:
 I’ve had it happen when I heard a veteran photog telling another, “This one? You cannot do this one, you don’t have the gear”.
Now, as the name of the site suggests, this is not what I consider a good answer. A better answer would be a breakdown of the shoot, trying to get some understanding of what is a must for it, what gear is needed and how can we make up for the gear we don’t have. Maybe with another piece of gear; maybe in post; and maybe by changing one of the underlying assumptions that we initially had when thinking about the shoot.
Photographer Scott Bourke (flickr) shows this exact king of thinking in his Sportraits session. There is a nice how to video and then some thoughts. I’d love to hear your take on dealing with gear shortage in the comments.
Now I know this vid is a little raw, but it has some very good point to it.
Now let’s see how Scott handles his seamless white:
First off, Scott has a theme that goes well with white. Spotrtairts. This allows him to create a series of shots, all using the same techniques. While this is not mandatory it is certainly helping in getting the most out of the setup and method.
Now, let’s go through the drill of breaking down a seamless white shot and see how Scott handled each of the challenges involved.
There are two things that have to be taken into consideration in seamless white shots, background lighting (and background for that matter) and subject lighting.
Background
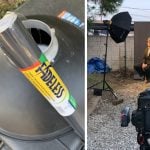
In general background has to be brighter than the subject in about 1.5-2 stops to get it nice and white. That’s kinda hard to do with using just one hot shoe strobe. However, Scott squeezed the most of what he had, which it not much in terms of equipment: 2 Cactus KF36s, one stand and a brolli.
For starters, Scott did not go for lighting the entire backdrop, just the part that surrounded the “jump”. This allowed the flash to be closer to the background and therefore “stronger”. The remains will be filled later in post. Is it more time consuming? Yes. Is it a good option when you are frugal? Definitely!
Light is going to “splash” back from that wall, we’ll talk about this in a bit.
For flare management, Scott ‘gobo’ed the flash with a white foamboard. White you say? Yes, so the ‘gobo’ed light bounces back to the back wall. It is not much, but it helped squeezing every bit of power from that tiny flash.
The light stand for this? An old bicycle’s seat.
Subject
The subject for most Sportraits (which are self portraits) is Scott himself. Subject lighting is classic – one flash off a reflective brolli.
This is where the back splash comes in. The light coming from the back creates some great contour on Scott.
Lately, as with any self portrait, you need to click the shutter release. Kinda hard when you are in front of the camera. Scott uses a wireless trigger, but the timer function and some trial and error will do just fine.
Post
Scott uses some PS to refine the portrait. This is fine in my book. As I said, time consuming, but if you only have that much equipment to go on, any trick you can pull is justified. I’m not going to go into the post part, just watch the vid, there are some killer layers and extraction tips hiding inside.
To sum up, I am going to quote the last words from Scott’s clip: “you don’t need a huge studio … you should be able to do this in your own home“.
Scott is has a great blog over at the photo journey, it has some great tips and great photography. He is also taking question on this post here. If you like the portraits above, you can check out his Sportraits series here.

Udi Tirosh
Udi Tirosh is an entrepreneur, photography inventor, journalist, educator, and writer based in Israel. With over 25 years of experience in the photo-video industry, Udi has built and sold several photography-related brands. Udi has a double degree in mass media communications and computer science.


Join the Discussion
DIYP Comment Policy
Be nice, be on-topic, no personal information or flames.