


Capture First-Person Video of Your Shoots with a DIY Hot Shoe Adapter
Apr 7, 2014
Allen Mowery
Allen Mowery is a Nationally-published Commercial & Editorial Photographer with over 20 years of experience. He has shot for major brands as well small clients. When not shooting client work or chasing overgrown wildlife from his yard, he loves to capture the stories of the people and culture around him.
Share:
 I am slothful. I am impatient. And, above all else, I am cheap…a beautiful trifecta that led me to this little project.
For the longest time, I have been wanting a way to easily capture point-of-view (POV) footage of my shoots as a way to document the exact moment an image is taken. This serves a variety of functions ranging from satiating my own vanity to allowing me to show others the “big picture” that eventually became a final image.
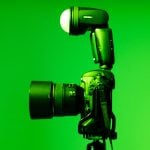
Essentially, I wanted something like this adapter from B&H that would allow me to attach a small camera to my hot shoe for documenting a shoot. However, I never really felt like buying one, buying one would require me to wait for it to arrive (like it was going to be THAT much longer than the year I’ve already sat on this), and, why buy something you can make yourself, right? So, I set about pulling odds and ends I had laying around to make my dream finally come true! ::snickers with excitement::
First, a Test and Sample
Like any inquisitive child, I attached an el cheapo Samsung point-and-shoot to the apparatus, slipped it into my camera’s hot shoe, and went out exploring in the woods. Below is a little sampling.
The Materials
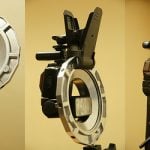
1) I had found an old cold/hot shoe adapter with a sync cord attachment that I decided could be sacrificed for the project. (Now I’m going to have to find a way to create a new sync cord adapter…)
 2) The second part needed was a ¼”-20 machine screw (in the ¾-inch variety) that would serve for mounting my gloriously-low-tech accessories to my gloriously-low-tech SLR. Fortunately, I have a (dwindling) stash sitting around that I have used for a variety of projects, such as my DIY super clamp and my DIY desktop mic stand.
3) For solidifying the entire contraption I went straight for my go-to in all situations requiring low-tech welding, JB KwikWeld, a beautiful little steel-reinforced epoxy mixture that sets within a couple minutes and works perfect for any small bonding job.
For those who give a rat’s ass, my father used the original JB Weld to mend anything and everything…kind of his own alternative to Duck Tape. He once used mounds of the stuff to repair huge sections on the bottom of an aging fiberglass canoe…the thing looked like it had leprosy, but it worked like a charm! I owe him a debt of gratitude for instilling within me the principles of cheap-assery.
4) To finish it off, I used two hex nuts that came in my little packet of machine screws as spacers to ensure I’d have a secure and adjustable fit for my accessories.
The Tools
Small, flat-headed screw drivers, like those commonly used in electronics repair, will probably be your best friends here. I also pulled in a hammer, a stubby phillips-head screw driver, and a hunting knife. A project is never complete around our house until blood and pain are introduced in epic proportions.
Turning Trash Into…More Functional Trash
1) I had to remove the little contact plate in the hot shoe to be able to reach the tiny screws underneath. Once the screws were pulled out, the rest of the metal assembly fell off easily.

2) Over the years, I have used many devices for securing access to boxes of various shapes and sizes. However, seeing as how this one in particular was small and made of plastic, I opted to forego the crowbar and, after cutting off the sync cord, used one of those tiny screwdrivers mentioned to pry around the middle seam to open up the adapter.

3) There was still the little business of that pesky large contact point in the center of the upper portion, so I knocked that loose with a hammer and screwdriver and slid it out.

4) The hole that remained from the large contact point still wasn’t large enough, so I widened it with my hunting knife to slip the screw through.
5) Next, I prepared my epoxy mixture, slipped the screw through the hole, and began filling the inside of the two halves of the adapter with the wonderful goop, holding it together for a couple minutes to make sure it was set.

For those who haven’t worked with epoxy before or actually went beyond the ninth grade, I’m telling you, the stuff does smell like death warmed over.

6) For good measure, I added a little super glue around the seam when things were dried.
7) Thread on the hex nuts to the appropriate positions, and you are good to go!

The Final Vote
Pros
- It was cheap, I could use parts I already had, and I didn’t have to wait for it to ship
- It allowed me to do what I wanted to do — attach a small camera on top of my larger camera and capture a video feed of what my larger camera was seeing and doing.
- It can be used for a variety of applications, including mounting something like a Zoom microphone for those shooting video with dSLR.
Cons
- It’s not as simple to operate as, what I assume, the commercially-available models are.
- Mine apparently wasn’t completely centered properly, so it hangs to the left. (It’s okay to make jokes…they all do.)
- I haven’t devised a way to sync the video and the camera shutter, if it’s even possible. Deciphering which frame is from which particular second of video is a manual task.
- Because your video camera is mounted to your SLR, it moves with your SLR…which is great…but also bad… The video you capture is just as bouncy and randomly-wandering as your SLR can tend to be. So, it’s a double-edge sword on that front.
- I need a GoPro…but, since I’m too cheap to buy one yet, I’d settle for a good substitute. I’m currently taking recommendations…
And, there you have it, a general overview of how I spent much of a Saturday afternoon.

What ways have you attempted to do something similar? Do you actively capture first-person POV videos from your shoots? Tell me in the comments below!

Allen Mowery
Allen Mowery is a Nationally-published Commercial & Editorial Photographer with over 20 years of experience. He has shot for major brands as well small clients. When not shooting client work or chasing overgrown wildlife from his yard, he loves to capture the stories of the people and culture around him.


Join the Discussion
DIYP Comment Policy
Be nice, be on-topic, no personal information or flames.
13 responses to “Capture First-Person Video of Your Shoots with a DIY Hot Shoe Adapter”
Hi Allen!
Thanks for your tutorial, I had quite the same idea some time ago.
I didn’t want to have a video though, but more or less some making-of shots.
A GoPro would be almost perfect for this purpose:
– ultra wide angle
– time lapse function
– quite small
(- I already have one :P )
Guess I’m gonna have to get an adapter..
UPDATE:
Just got my adapter – feels great on my 60D with battery grip!
Not significantly heavier, not out of balance.
what the heck, sorry for the 3 images!! o_O”
Awesome, man! Definitely gonna have to spring the $5 to get a commercial model :-)
A great idea on two levels really. I’ve been musing on the subject of how to engage more with youtube/vimeo etc. as a way of promoting my business. Using a smaller point and shoot to film a POV documentary shoots is pretty clever actually, I like it.
As the commentor below mentioned, a GoPro would be ideal for this. Not least of all because they handle changing light conditions incredibly well.
Thanks!
Great idea, but you can get one for $5 shipped, http://www.amazon.com/HDE-Tripod-Screw-Shoe-Adapter/dp/B005005EEM/ref=sr_1_4?ie=UTF8&qid=1396881840&sr=8-4&keywords=cold+shoe+thread+mount
Then consider the psot to be about what to do with one once you’ve spent your dollars :)
+ 0.99$ for Gopro Mount: http://www.ebay.ca/itm/Tripod-Mount-Adapter-for-GoPro-Hero-1-Hero-2-and-Hero-3-camera-/251275384664?pt=LH_DefaultDomain_0&hash=item3a812e1758
… why wouldn’t you just buy a cheap hotshoe to ballhead adapter on ebay for a few bucks? o_O
http://www.ebay.ca/itm/360-Swivel-Mini-Hotshoe-Bracket-Ballhead-Stand-for-DSLR-Camera-Tripod-hv2n-/271323386566?pt=LH_DefaultDomain_2&hash=item3f2c2252c6
yay, I’m not the only one doing this. friends and family all think I’m crazy to have a camera on a camera! so I have to explain to ’em that one is video and one is photo. this is great for doing both BUT you get very loud shutter sounds on the video since it is a hard mount to the camera. not a problem if you need b-roll footage, but don’t make the mistake I did by doing this at a wedding!
thanks for the post!
but I agree with the others: diy on this item may not be the best, since adapters are so cheap. save some time, hassle, and clean-up…
http://www.amazon.com/EzFoto-universal-threaded-adapter-cleaning/dp/B0088VQEV2/ref=sr_1_1?ie=UTF8&qid=1396887823&sr=8-1&keywords=hotshoe+mount
The real problem comes from wanting to mount a second camera AND a Pocket Wizard while shooting. I’ve also found a small Noga/Israeli arm does a great job of getting the camera down closer to the lens and keeping eye lines closer (just flip the camera upside down and flip the footage back in post.) Not quite the same but, I did this video back in the day by Magic Arming a 5D MK II onto the Hasselblad setup. BUT as mentioned before, audio is sorta useless.
https://www.youtube.com/watch?v=aGLb84OFlxM
You miss the point knuckleheads . . . it’s about the MAKING not the buying, finding one somewhere else . . . letting someone else do the work . . . if you do not get this point, you are who takes pictures and does not photograph. Very simple.
just cut the end off of a 1/4-20 bolt, cut some spacer rings out of foam or leather and connect the cameras by their tripod mounts.