


Bokehrama – shallow depth of field with big photos
Mar 10, 2016
Yehoshua Derovan

We love it when our readers get in touch with us to share their stories. This article was contributed to DIYP by a member of our community. If you would like to contribute an article, please contact us here.
Share:
As a self-taught photographer I am continuously seeking creative and technical inspiration, and when I find a technique that involves both technical know-how and demands creative juice I can’t wait to go try it myself.
When I first encountered the Bokehrama technique, sometimes referred to as the Brenizer method, I knew this is one of those instances. What finally got me out to try the technique was the arrival of the new Godox AD600 at the camera store where I work and get to test new gear. For those unfamiliar with the Godox AD600, it is a battery-contained, 600 watt, HSS (high speed sync) and TTL capable strobe with a built-in X-series radio receiver. Perfect for location shooting and ideal for this technique as I will soon explain.
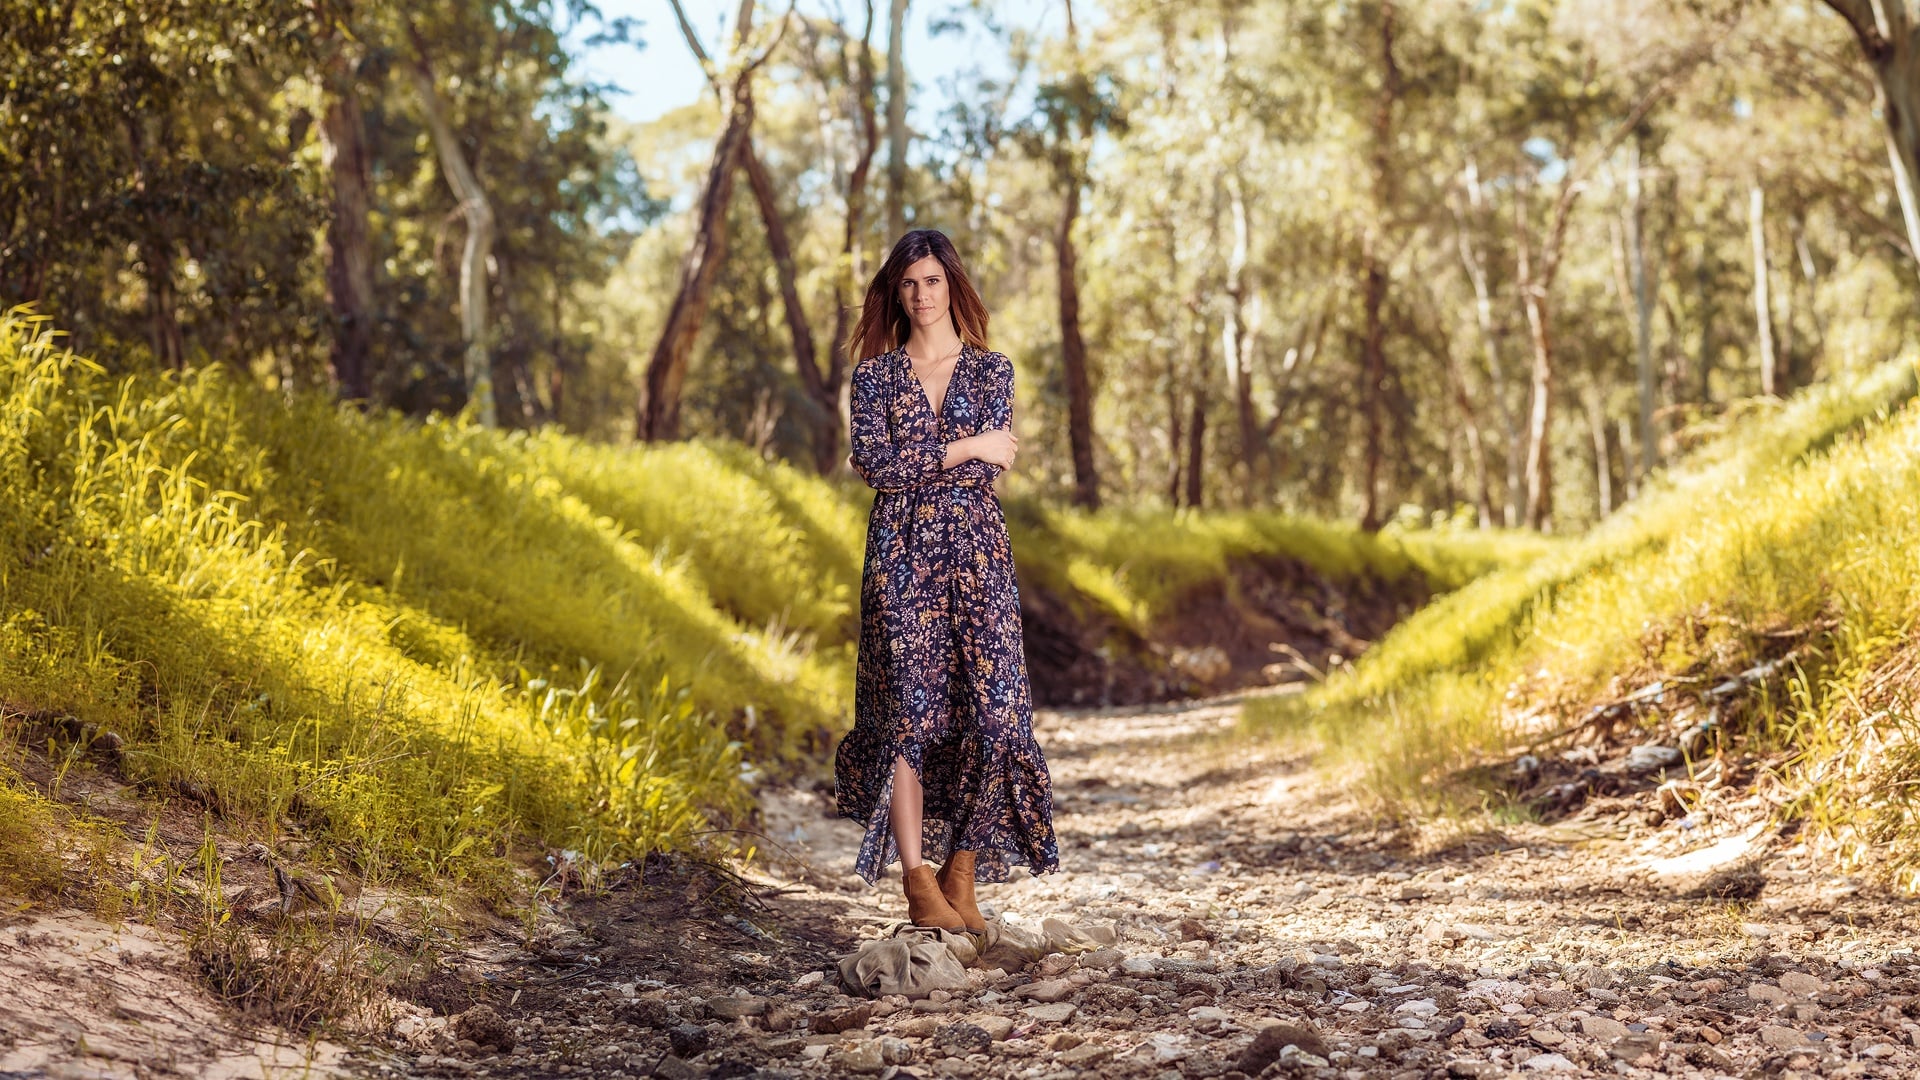
So, what is the Brenizer method (coined after wedding photographer Ryan Brenizer)? Essentially, it is a way of achieving an optically impossible photo. We all know that the two fundamental elements affecting depth of field are aperture and focal length – the wider the former and the longer the latter the more shallow the depth of field will be, and “hello there, bokeh”. The tradeoff to this wonderful bokhe is a photo that incorporates very little of the location and shows narrow field of view. This can be seen as an advantage on an ugly location. But what if the location is indeed grand and beautiful, the light is perfect and a more panoramic field of view is appropriate, and you still want the subject isolating effect of a shallow depth of field? The Brenizer method allows us to achieve a wider field of view and a shallow depth of field, sometimes emulating the look of an unimaginable 14mm f/0.4 lens (as I said, optically “impossible”).
Here is the photo again, click for full size and adore the bokeh

Setup and Settings
How is this unique photo achieved? In short, it is done by shooting multiple shots similar to shooting a panorama, but as mentioned the goal isn’t only more megapixels and a wider field of view. As opposed to a landscape panorama where wide angle lenses are used, using a telephoto lens is what we need here for achieving the bokeh. Anything between 85mm and 200mm should work. I strongly suggest using prime lenses for two reasons: the aperture is wider and you won’t mistakenly change the focal length between shots. The 85mm lenses are perfect then (it’s what I used here and what I saw Ryan Brenizer uses as well).
Next, you want to make sure that all your camera settings are constant, this means shooting in manual mode, and your white balance should be anything but auto (definitely if shooting jpegs).
Before shooting you need to previsualize what you want the borders of your final shot to be. In today’s digital age it might seem funny but making a square shape with your fingers and looking through them before you even pick up your camera can help. Now, keep that previsualization in mind while shooting, ensuring you won’t create any holes and gaps in the shot.
Usually this is done handheld but feel free to use a tripod if you like (a ball head would probably be better, just keep it loose for movement). Maintain your position, kneeling can help, and ask your subject to stay still as well (not as essential as in a long exposure, but preferable). The first shot should be filled by your subject’s whole body (this should also roughly determine your distance from them) and should be repeated until a good expression and pose are achieved. Now you can continue shooting the rest of your previsualized frame.
This manually stitched photo should show the camera movement.

An essential technical aspect of getting this done right is focus. Obviously, we want our subject to be in focus and that focal distance needs to remain constant for the rest of the shots. The regular autofocus programs in your camera will not work well for this since we basically need a combination of autofocus and manual focus – auto for the first shot and manual for the rest. One way of doing this is just switching your lens to manual after the first shot. I think the preferred method is using back button focus. This allows you to just lift your thumb from the back AF button (this varies between models) and continue shooting with only the shutter release button without worrying about the focus changing.
Some recommend shooting the panoramic sequence in rows and some in a spiral starting from the first shot of your subject, it doesn’t really matter as long as you overlap enough to not have gaps and reach those borders you previsualized.
As I mentioned in the introduction, what finally got me out to shoot a Bokehrama was the newly arrived Godox AD600. From the moment I saw this method I knew I want to combine it with one of my photographic passions – off camera flash. I’ve seen it done before with smaller less powerful flashes, but this means the flash has to be up-close to your subject, definitely if a softer light is what you’re after. This means one of two things: you either have an assistant that can get out of there with the light stand after the first shot or you’re going to need to clone it out in post-processing. On the contrary, having a 600 watt HSS capable strobe means I can have the light really far away from my subject allowing me to still get the wide field of view without cloning out the stand and without an assistant. The strobe is even in a 60 inch softbox umbrella giving me beautiful soft light and I’m still getting enough power out of it to overpower the sun utilizing HSS.
Post Processing
For the post processing many photo editing programs can be used here, especially do to the fact that we’re dealing with what is essentially a panorama and there is dedicated software available just for the stitching process itself. I use Adobe Lightroom and Photoshop and now with the latest CC update to Lightroom incorporating “photomerge” you can basically accomplish the whole process in Lightroom only. So I will refer to these programs where I did the post processing for this image.

I strongly recommend to always shoot in RAW, but for the Brenizer method to work seamlessly it is pretty much fundamental. For a few reasons: [a] you can make any exposure, color etc. corrections to the individual files prior to the photomerge, [b] you must utilize the lens correction option, especially the vignette removal which you might even have to adjust manually, and finally [c] you must adjust the white balance to match across all the individual files prior to the photomerge. Ignoring the two last reasons will result you with a very tacky looking stitched image that will be very hard to correct later on.
For this image I shot 23 individual shots. You might not need to with the frame you previsualized and with practice you might get away with less while still ensuring sufficient overlap for the stitching process. In any case what I strongly recommend is to first export all the files as 2-3 megapixels files and apply the photomerge to those first. This shouldn’t be hard on your computer and it will let you know if you’ve succeeded in shooting all the information needed with no gaps. If it worked you can just be happy with this image as a final image and continue from there or you can go for the real thing – merging the full resolution files to one massive image.
You can see the test run with the downsized files above.
There are no visual gaps so I knew I was ready to merge the full resolution images. Note that this can take a while depending on your computer. The resulting image’s numbers are staggering! After cropping in to eliminate most of the jagged edges (and filling just a bit with content aware fill and the clone stamp tool) the resulting image size is 11,474 by 11,945 pixels – 137 megapixels!
I then performed some more exposure and color adjustments in Lightroom focusing on flattening it out and changing the hue of the greens to a more yellow-orange tint. The file is then opened in Photoshop to continue editing. Here too the numbers are overwhelming – upon adding layers in my workflow the PSD saving option was no longer possible and I had to save it as a PSB that at the end was 2.7 GB with a Photoshop temp file that was 36 GB! So, word of advice, brace yourselves and “make nice” to your computer.
Here is a 50% crop of the final image (if you think of it this is what a normal image with an 85mm lens looks like

My final steps were cloning out some unwanted elements that were on the ground, adding some more detail to the sky, color grading, adding an overall soft glow, dodging and burning my subject for some extra “pop”, adding a vignette and a final sharpen.
I hope you enjoyed reading and try the Brenizer method out for yourselves.
About the author
Yehoshua Derovan is a portrait and event photographer and a sales representative at Erlich Photography Center in Tel Aviv, Israel. You can see more of his work on Facebook and Instagram.
We love it when our readers get in touch with us to share their stories. This article was contributed to DIYP by a member of our community. If you would like to contribute an article, please contact us here.
Related Posts
 Depth of Field: the ultimate beginner’s guide to controlling depth of field using lens aperture in nature photography
 A simple technique for faking subtle shallow depth of field in Photoshop
 How to create a realistic shallow depth of field effect in Photoshop
 The secret to those dreamy shallow depth of field shots in Army of the Dead was a 60-year-old Canon lens
Join the Discussion
DIYP Comment Policy
Be nice, be on-topic, no personal information or flames.
16 responses to “Bokehrama – shallow depth of field with big photos”
Brilliant! :D
nice!
rock&roll!
Well done. Another useless post with no new ideas or information, yet another re-hash of things that have been already done and in most instances in a better way as well.
oh, we missed your non-re-hashed, original, done to perfection free tutorials.
I don’t do it as I’m not an expert on the subject – just like the author of this piece. Only I don’t have his delusions of grandeur.
…and here, even 5 years later, this article is still coming high up on google searches – showing the ultimate value of the work.
Yes – it described something “discovered” by someone else….
But is was practical – by someone who had DONE it ane learned how to optimise it for those of us with ordimary computers AND with the results pasted up for all of us to see.
I used this article to revise my work in this to fusing 5 photos – either 5 wide with overlaps of about 25% at each edge for the “panorama” style; or a cenral image and 4 “corner” images for a traditional 4/3 type format picture. Suddenly it worked without taking hours or crashing my computer.
I shoot M4/3 cameras and using the F1.8 42.5mm lens (85mm equivalent) I get great results for me. There is very little distortion with this lens, and if your subject keeps still the overlap is not too difficult to align. The bokeh is fantastic. Yes, I could afford a F0.95 “standard” perspective lens and do without this technique – but that is one more heavy item in my camera bag compared with this exercise.
My tip – using a monopod helps set this up for rapid shooting and reduces misalignment for me. Though I might shoot 9-12 frames I am usually needing only my target number of 5. On a macbbok air I can procees that number in a minute. Modern material monopods that telescope to fit small daysacs are now way cheaper than 5 years ago, coupled with small M4/3 cameras with their lighter weight lenses and OIS systems are a great combination. The number of days I now need a tripod on days out gets less every year!
so – well done Yehoshua Derovane – thanks a lot !
Thank you!!
Thanks for this excellent comment.
Thanks for this excellent, constructive and desirable comment!
You are lucky to have heard about this method from Brenizer himself, we are not as lucky as you since we heard from someone else who “re-hashed” it.
I am sure as a master of photography, you know everything there is about your passion. You have obtained the utmost goal of the art and now you are so bored of your talent that you prefer to use your precious time on websites that offer free tutorials to the people who haven’t obtain your level of greatness.
We are blessed with your guidance in this marvelous comment.
On the other hand, I’m glad that you gave a chance to a beginner to practice his portrait skills and then use it as your avatar. Very humble of you.
Well done yourself at posting another rather useless comment with NO new ideas or information. Wish I had a nickel for every time I’ve heard someone moaning about the content being as you say re-hashed. I might be more sympathetic to your feelings if you had paid for the content but you didn’t. Regardless I personally found the article quite informative, it was new info and it certainly wasn’t a useless post nor a waste of my time.
I call it as I see it.
Great job master Yehoshua Derovan
What a great tutorial! I love the results of this method and have tried to shoot it myself once. Your tips of getting the whole person in the first frame and first exporting 2-3mp images are great. I tried this with a Canon 5DSR and 85mm f/1.2 and the photo merge time alone was over 8 hours on a reasonably speedy PC with 16GB RAM and an SSD scratch disk. I may be able to get an image out of my work yet but have given up a couple times due to the extreme processing power required. Maybe I’ll down sample to tiny files and try again. I don’t need a 4 foot tall gallery print at this point…
Excellent job. Thanks.
Don’t listen to the trolls.
Great post! I’d vaguely heard about this method, but decided to give it a go…
I did a quick test run, and found that with the photo merge I got a fair bit of distortion (even though I ticked the option to correct geometric distortion).
Any suggestions to avoid this? If I had to guess it would be to keep my shooting technique tighter with not as much movement of the camera…
Thanks!