


A simple technique for faking subtle shallow depth of field in Photoshop
Dec 29, 2017
John Aldred
John Aldred is a photographer with over 25 years of experience in the portrait and commercial worlds. He is based in Scotland and has been an early adopter – and occasional beta tester – of almost every digital imaging technology in that time. As well as his creative visual work, John uses 3D printing, electronics and programming to create his own photography and filmmaking tools and consults for a number of brands across the industry.
Share:

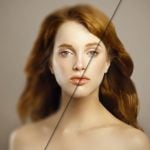
I’m not a massive fan of faking optical characteristics in post. I prefer to shoot it the way I’d like in the first place. But sometimes it’s not always possible. Sometimes you don’t realise until after you’ve got the image up on the computer that something is a little more in focus than you’d have liked.
Shooting in the studio, for example, you’re often around f/8, to allow your subject some freedom of movement. With a solid background it doesn’t matter if it’s not blurred out. But it can often cause shoulders or other body parts to be a little sharper than you’d hoped. In this video, Joe Edelman walks us through a simple technique to help soften those areas in Photoshop and simulate them being out of focus.
It’s quite a simple 5 step technique, that Joe suggests using at the very end of your post processing workflow.
- Copy your finished image to a new layer & set the opacity to 70%.
- Apply Gaussian Blur of between 8-14 pixels. Lower numbers produce more subtle effects.
- With the blurred layer selected, add a layer mask. Paint around the whole subject with a soft black brush at 50% opacity.
- Set the brush opacity to 70%, and paint the areas you wish to have in clearer focus.
- Set the brush opacity to 100%, size it down, and paint the areas of very sharp focus, such as eyes and lips.
If you decide you want to increase or decrease the effect, change the layer opacity mentioned in step one up or down according to your taste. It is a very subtle technique. It’s not like we often see used on location to make f/5.6 kit zooms look like a 135mm f/2.


Personally, for this technique, I’d turn the duplicate layer into a Smart Object. This way, I could apply Gaussian Blur as a Smart Filter and be able to tweak it further once I’d painted the mask. Or, I’d use the Lens Blur filter for a slightly more true-to-life effect.
I’d still try to get the effect in-camera if possible first, though. That being said, it’s still quite a useful basic method to know. Sometimes, you just want to blur a little something out and send the viewer’s attention to somewhere more specific.
Filed Under:
Tagged With:

John Aldred
John Aldred is a photographer with over 25 years of experience in the portrait and commercial worlds. He is based in Scotland and has been an early adopter – and occasional beta tester – of almost every digital imaging technology in that time. As well as his creative visual work, John uses 3D printing, electronics and programming to create his own photography and filmmaking tools and consults for a number of brands across the industry.
Related Posts
 How to create a realistic shallow depth of field effect in Photoshop
 Bokehrama – shallow depth of field with big photos
 Depth of Field: the ultimate beginner’s guide to controlling depth of field using lens aperture in nature photography
 The secret to those dreamy shallow depth of field shots in Army of the Dead was a 60-year-old Canon lens
Join the Discussion
DIYP Comment Policy
Be nice, be on-topic, no personal information or flames.
5 responses to “A simple technique for faking subtle shallow depth of field in Photoshop”
Does anyone remember how to produce “effects” using optics and lighting? I guess I’m just getting old (45 years behind the lens).
You mean faking photoshopping with reality-based techniques? ?
Luke Wilson
Ridiculous!
I really don’t find it worth all the trouble. Hardly any noticeable difference between ‘before’ and ‘after’. Sorry.