


Astronomer uses 2bit Game Boy Camera to capture craters of the Moon
Jul 5, 2017
Dunja Đuđić
Dunja Djudjic is a multi-talented artist based in Novi Sad, Serbia. With 15 years of experience as a photographer, she specializes in capturing the beauty of nature, travel, concerts, and fine art. In addition to her photography, Dunja also expresses her creativity through writing, embroidery, and jewelry making.
Share:

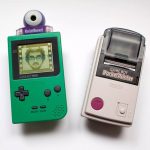
Although I’ve (sadly) never owned a Nintendo Game Boy Camera, I love to see how artists, scientists or nineties kids play with it in the modern age. An astronomer Alexander Pietrow used this 1998 gadget for astrophotography, and ended up with 2bit images of the Moon and Jupiter. He shares the process and the photos with DIYP, so take a look how the Moon craters look when taken with a 2bit, 128×112px Game Boy Camera. And if you use a telescope, you could take them yourself, too.
We’ve featured some of the Game Boy Camera experiments before. Theo Acworth demonstrated its capabilities, and Roland Meertens turned its pixelated portraits into realistic photos using neural networks. Being an astronomer, Alexander wanted to try it out for astrophotography. He was surprised that no one did it before, so he to definitely give it a go.
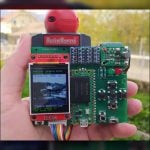
He used the 1838 6” Fraunhofer telescope, and attached the Game Boy Camera using a Gosky Universal Cell Phone Adapter. He shares on his blog it was relatively easy to align the camera with the telescope, but a much bigger challenge was to wait for a clear night and take the shots.

For starters, he tested the build on the church tower nearby. He took one photo with the GB camera, and another with the modern camera:


When the Dutch sky finally treated him with the night without clouds, he went to the observatory and took some shots. He took the first two photos through the viewfinder, while the third one is the Stellarium image of that night for comparison.

He took the second series through the main telescope. Even with the insanely poor quality of the GB camera – you can see the Moon craters, which is pretty impressive.

After the successful Moon shots, Alexander pointed his telescope at Jupiter, and he managed to capture three of its moons. In the photo below, you can see their position, and he used Jupiter’s Moons calculator by SKY & Telescope.


If you’d like to try this out yourself, you should know how to transfer the photos from the Game Boy Camera to the computer. Alexander suggests this method, and it’s the one he used. And for installing the GB USB smart card 64m on Windows 7, check out the video above. And lastly, if you’d like to learn more about the process and see some more photos, check out Alexander’s blog post about astrophotography with Game Boy Camera.
[all photos by Alexander Pietrow and used with permission]

Dunja Đuđić
Dunja Djudjic is a multi-talented artist based in Novi Sad, Serbia. With 15 years of experience as a photographer, she specializes in capturing the beauty of nature, travel, concerts, and fine art. In addition to her photography, Dunja also expresses her creativity through writing, embroidery, and jewelry making.


Join the Discussion
DIYP Comment Policy
Be nice, be on-topic, no personal information or flames.