


Light-paint the rainbow with these awesome DIY light tubes
Jul 5, 2017
John Aldred
John Aldred is a photographer with over 25 years of experience in the portrait and commercial worlds. He is based in Scotland and has been an early adopter – and occasional beta tester – of almost every digital imaging technology in that time. As well as his creative visual work, John uses 3D printing, electronics and programming to create his own photography and filmmaking tools and consults for a number of brands across the industry.
Share:

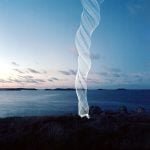
This is just too awesome. These rainbow coloured light tubes are the creation of light painter and photographer Zach Smidt. We’ve featured Zach’s work before, and for good reason. He’s constantly pushing himself and his work. To create something a little different and special. And his new rainbow light painting tube images sure fall under that “special” category.
DIYP got in touch with Zach to find out a little more about how they were made. Zach also shared some more images with us created with these light tubes.

For these images, Zach used a Canon 5D Mark IV and Sigma 35mm f/1.4 Art lens. The aperture varied, depending on the required depth of field, with shutter speeds ranging from about a second and a half to three seconds. Mounted on a tripod, Yongnuo RF-603 triggers were used to remotely fire the camera.

As far as the technique for light painting itself goes, Zach credits friend and fellow light painter, Eric Paré. His method involves using fluorescent tube guards lined with various gels and other materials. We’ve also featured Eric’s work here on DIYP before, too, as well as a recent video on how he puts his tubes together.
Zach’s method differs slightly from Eric’s original technique, by combining two tubes, and some rather fetching holographic rainbow fabric.

Unlike gels, this material is quite soft and flimsy. It needs something to provide it with some strength, and this is where the second tube comes into play. Normally, for gels, you simply roll it up and slide it into the tube. With this material, the trick is to wrap it around a smaller outer diameter tube. In this case, Zach used a T8 tube protector, and used tape to hold the material in place.

With the material wrapped around it, this was then placed inside a larger diameter T12 tube proector. This provides a means to hold the tube without the material becoming twisted and distorted in the middle of your exposure. It keeps it straight along the length of the tube for a more uniform rainbow result. It also helps to protect it from any dirt if you need to lay it on the ground. Plastic’s a lot easier to wipe off.

Then, it’s just a case of sticking your flashlight in the end as normal, and away you go. The final results are very cool indeed.


Thank you, Zach, for taking the time to talk with us and share some of your methods and work. You can see more of Zach’s work on his Instagram and website. And be sure to check out his YouTube channel for some behind the scenes action.
So, now we can build our own. Of course, just because one builds the tube and heads out to give this a try doesn’t mean our work will be as good as Zach’s. You’ll still want to put in a lot of practise!
I always find it fascinating when a photographer takes the methods and techniques of another photographer, but takes them in a new or interesting direction. It’s the whole definition of inspiration, really.

John Aldred
John Aldred is a photographer with over 25 years of experience in the portrait and commercial worlds. He is based in Scotland and has been an early adopter – and occasional beta tester – of almost every digital imaging technology in that time. As well as his creative visual work, John uses 3D printing, electronics and programming to create his own photography and filmmaking tools and consults for a number of brands across the industry.
Related Posts
 This 4K video shows rainbow paint spinning off a drill at 2,500 frames per second
 How to take awesome paint splash photos with a speaker, a garbage bag and some noise
 Photographer Creates Supernatural Light Tubes With A DIY LED Hoop
 Delivering Awesome Content On Time – How Preston Kanak Delivered an Awesome D810 Demo
Join the Discussion
DIYP Comment Policy
Be nice, be on-topic, no personal information or flames.
3 responses to “Light-paint the rainbow with these awesome DIY light tubes”
I love this so much. Great work!
Thank you so much Dunja! ????
Yes!!! I have my smart hoop which has 180 led lights and 40 different patterns and hundreds of colour combos. Can we can we! ?