


How to add light rays through the clouds in Photoshop
Apr 8, 2016
Gannon Burgett
Gannon Burgett is a communications professional with over a decade of experience in content strategy, editing, marketing, multimedia content creation. He’s photographed and written content seen across hundreds of millions of pageviews. In addition to his communications work for various entities and publications, Gannon also runs his multimedia marketing agency, Ekleptik Media, where he brings his expertise as a full-stack creator to help develop and execute data-driven content strategies. His writing, photos, and videos have appeared in USA Today, Car and Driver, Road & Track, Autoweek, Popular Mechanics, TechCrunch, Gizmodo, Digital Trends, DPReview, PetaPixel, Imaging Resource, Lifewire, Yahoo News, Detroit Free Press, Lansing State Journal, and more.
Share:

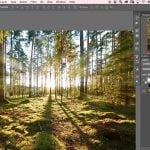
Cloudy days are great for shooting wide open shots with a naturally soft light. But, sometimes the scene can appear a bit dull due to the lack of contrast.
One way of spicing up an image is to include light rays coming down from the clouds. In an ideal world, these would appear in-camera, but the reality is we don’t get to choose when they do and don’t appear.
For those times when they don’t, thankfully it’s possible to add the effect in post production. To show us how to do that, Aaron Nace of Phlearn has created an in-depth tutorial.
Throughout the eleven minute tutorial, Nace shows the best practices for adding realistic-looking light rays that appear to be coming through the clouds.
One of the most vital components is to choose the proper location as the center area for your light rays. Specifically, he says to use where you believe the sun to be as the center. This will create a more natural aesthetic when you use the brush and radial blur filter to further finish the process.
Once you get the hang of it, the process is fairly simple. In fact, you could further speed up the process by creating a custom brush, which you could tweak with each new image for a more natural aesthetic. An alternative option would be to pick up our Light Ray texture pack.

Gannon Burgett
Gannon Burgett is a communications professional with over a decade of experience in content strategy, editing, marketing, multimedia content creation. He’s photographed and written content seen across hundreds of millions of pageviews. In addition to his communications work for various entities and publications, Gannon also runs his multimedia marketing agency, Ekleptik Media, where he brings his expertise as a full-stack creator to help develop and execute data-driven content strategies. His writing, photos, and videos have appeared in USA Today, Car and Driver, Road & Track, Autoweek, Popular Mechanics, TechCrunch, Gizmodo, Digital Trends, DPReview, PetaPixel, Imaging Resource, Lifewire, Yahoo News, Detroit Free Press, Lansing State Journal, and more.


Join the Discussion
DIYP Comment Policy
Be nice, be on-topic, no personal information or flames.