


















How to Fix Color Banding in Your Images
Jan 4, 2026
Darlene Lleno
Darlene Lleno brings a unique perspective to DIY Photography as someone who grew up surrounded by camera gear but chose words over lenses. With five years of writing experience, she specializes in photography content that’s both technically informed and genuinely passionate. Growing up with a photographer twin brother meant camera talk was everyday conversation in her household. While he mastered capturing moments, Darlene discovered she preferred being the subject and the storyteller behind the scenes. As a travel enthusiast and mother of two, she understands the importance of preserving life’s precious moments. When not exploring new destinations or writing for DIY Photography, you’ll find her reading or tending to her garden. Her approach to photography writing is refreshingly authentic, she may not be behind the camera, but she knows exactly what it takes to help others capture the shots that matter most.
Share:

You captured that perfect sunset gradient. But when you opened the file, ugly stripes appeared everywhere. Learning how to fix color banding saves images you thought were ruined.
Color banding shows up more often than you think. Those visible steps ruin smooth transitions in skies and studio backdrops. The good news is you can fix it.
What Causes Color Banding
You need to know why banding happens before you fix it. Several things create this problem in your photos.
Bit Depth Issues
Your camera might be shooting 8-bit files instead of higher depths. An 8-bit image has only 256 levels per color channel. That’s not enough for smooth gradients across large areas.
Most cameras shoot 12-bit or 14-bit RAW format. This gives you thousands more color levels. But JPEG files lock you into 8-bit.
Heavy Editing
Big adjustments make banding worse or create new problems. When you push exposure or saturation too far, you stretch those color values thin.
Shadow and highlight recovery cause major issues. Pulling up dark shadows requires creating tones that didn’t exist originally. The software has to guess. Sometimes those guesses create visible steps.
File Compression
JPEG compression tosses out color data to make files smaller. Each time you save a JPEG, you lose more information. This stacks up over multiple saves.
Some RAW formats use compression too. While less destructive than JPEG, they still contribute to banding in extreme cases.
Display Problems
Sometimes your file is fine. A bad monitor or one with limited color depth shows false banding. Budget displays often show only 6-bit color. You’ll see steps where your file has smooth transitions.
This false banding tricks you into over-editing. You try to fix something that wasn’t broken. Then you create real problems.
How to Fix Color Banding in Lightroom
Adobe Lightroom has tools built specifically for fixing color banding. Here’s how to use them without hurting image quality.
Add Grain
Adding grain sounds backwards, but it works great. The grain breaks up visible steps by adding random texture.
Go to the Effects panel and find the Grain slider. Start with 15-25 for amount. Use 25-35 for size and keep roughness at 50. You want subtle texture, not an obvious film look.
This works because our eyes forgive random patterns. Banding creates repeating patterns that grab attention. Grain randomizes everything and makes it disappear.

Use Local Adjustments
Graduated and radial filters help smooth problem areas. If banding appears mostly in skies, graduated filters work perfectly.
Select the Graduated Filter tool and drag across the banded area. Make tiny adjustments to exposure, highlights, or shadows. Small changes redistribute tones more evenly.
For circular banding areas, use radial filters. Create several overlapping filters with barely visible adjustments. The goal is changes so small you barely notice individually.
Adjust Tone Curves
The Tone Curve gives precise control over transitions. You can redistribute values more evenly across problem spots.
Switch to the Tone Curve panel. Select the color channel where banding looks worst. Make gentle S-curves that spread compressed ranges. Place multiple points and make micro-adjustments.
Use a light touch here. Heavy curve adjustments create new problems. You’re redistributing existing information, not creating drama.
Export in 16-Bit
Always export as 16-bit TIFF or PSD when moving to Photoshop. This keeps maximum color data and gives you room to work.
Choose ProPhoto RGB or Adobe RGB when exporting. These wider spaces maintain more information than sRGB throughout editing.
How to Fix Color Banding in Photoshop
Photoshop offers advanced tools for stubborn banding. These give you pixel-level control over problem areas.
Apply Noise Filter
Like Lightroom’s grain, Photoshop’s Add Noise filter masks color banding well. But you get more control over application.
Create a new layer above your banded area. Go to Filter > Noise > Add Noise. Use 3-8% amount, select Gaussian, and check Monochromatic. This adds texture without affecting color.
Change the blend mode to Overlay or Soft Light. Reduce opacity to 20-40%. You can fine-tune exactly where noise appears. Use layer masks to target only problem spots.
Strategic Blur
A tiny blur smooths hard transitions between banding steps. But you must avoid softening your whole image.
Duplicate your background layer. Apply gentle Gaussian Blur at 0.5-1.5 pixels maximum. Reduce layer opacity to 30-50%. This softens just enough without making things mushy.
Use a layer mask to blur only banded areas. Keep sharp details like portraits or foreground elements protected.
Gradient Maps
Gradient maps rebuild smooth transitions in severely banded areas. This works best for skies and simple backgrounds.
Create a Gradient Map adjustment layer. Build a gradient matching your area’s color transition. Use multiple color stops for smooth progression. Reduce opacity and adjust blend modes until it blends naturally.
You’re recreating the transition that should have been there. Match colors precisely and blend naturally so it doesn’t look fake.
Median Filter
The Median filter averages adjacent pixels. It’s uncommon but works great for banding.
Duplicate your layer. Go to Filter > Noise > Median. Use 2-5 pixels for radius. This averages out stepped transitions. Reduce opacity and mask to target only problems.
Median preserves edges better than Gaussian Blur. Perfect for fixing sky banding while keeping foreground sharpness.
Preventing Color Banding
Prevention beats correction every time. These strategies help you avoid banding from the start.
Shoot RAW Format
RAW files give you maximum bit depth and color information. Most cameras capture 12-bit or 14-bit RAW. That’s 4,096 to 16,384 levels per channel compared to JPEG’s 256.
This extra data is insurance against banding. Even with aggressive edits, you have more to work with. More color levels mean smoother gradients.
Nail Your Exposure
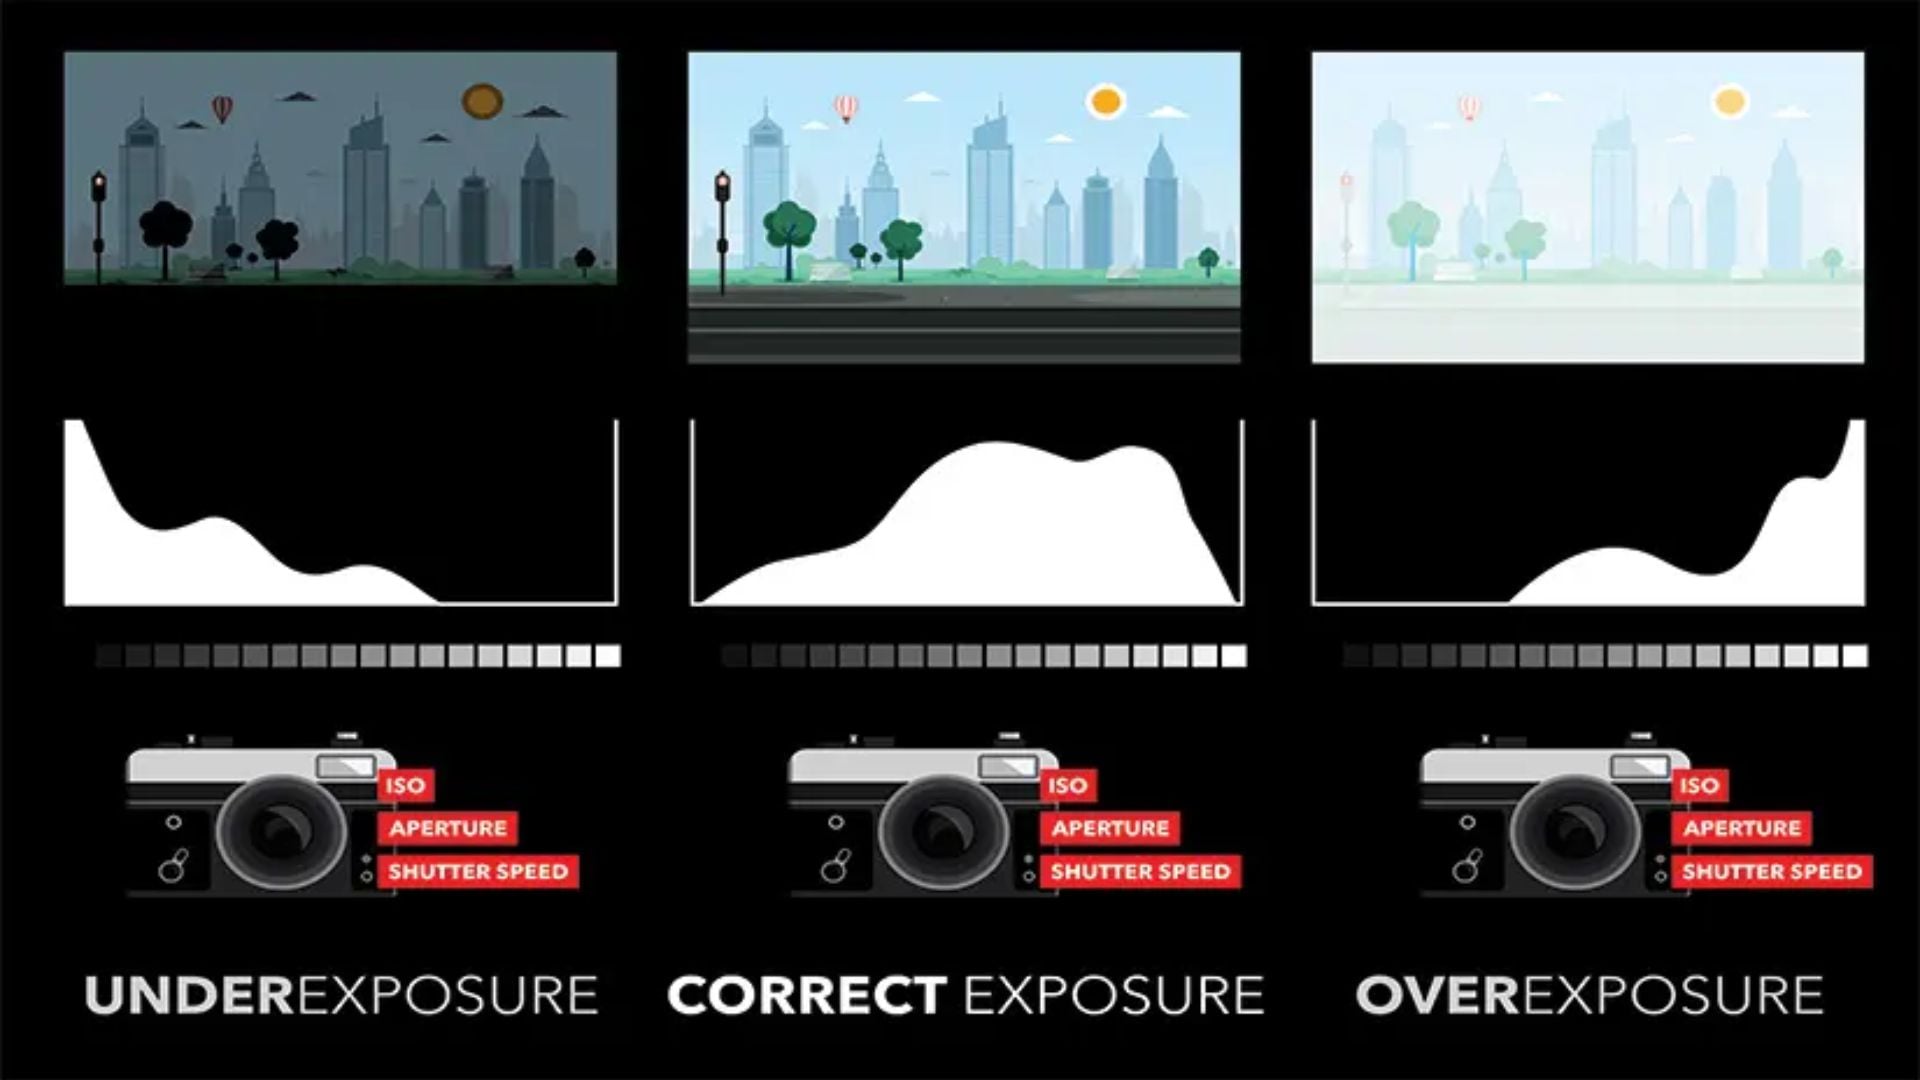
Correct exposure in-camera means less corrective editing later. The more you push shadows or pull highlights, the more likely you’ll see banding.
Use your histogram to capture full tonal range without clipping. Slightly overexpose for shadow detail when you know you’ll lift shadows. This “expose to the right” technique maximizes highlight data.
Use Physical Filters
For landscape photography, graduated ND filters balance sky and foreground exposure. This reduces heavy shadow and highlight adjustments that cause banding.
Physical filters control contrast at capture. They produce cleaner results than software adjustments applied to high-contrast RAW files.
Minimize Repeated Saves
Each JPEG save introduces compression artifacts. These pile up with repeated saves and create banding.
Work with RAW or TIFF throughout editing. Only convert to JPEG for final output. Save multiple versions instead of overwriting the same file.
Get a Better Monitor
Poor displays show false banding that doesn’t exist. This leads to unnecessary corrections. Invest in quality monitors with true 8-bit or 10-bit color depth.
Regular calibration helps your monitor show accurate colors and tones. What you see matches what’s actually in your file. According to Digital Photography School, proper calibration is essential for color work.
Edit Non-Destructively
Use adjustment layers in Photoshop or develop settings in Lightroom. Non-destructive editing lets you revise without repeatedly compressing image data.
This keeps maximum quality and flexibility. You can step back to previous states without generation loss.
Advanced Techniques to Fix Color Banding
For tough cases that resist basic fixes, try these advanced methods.
Dithering
Dithering adds controlled noise patterns to smooth color transitions. Similar to grain but uses specific patterns optimized for smoothness.
Enable dithering when saving for web or print. For more control, manually add noise using pattern overlay. Create a 50% gray layer, add pattern noise, blend with soft light at low opacity.
Channel-Specific Fixes
Sometimes banding appears mostly in one color channel. Red or blue channels often show banding in sky gradients.
Switch to Channels view in Photoshop. Examine each channel separately. Apply corrections like curves or blur only to the problem channel. This surgical approach fixes banding without affecting clean channels.
Frequency Separation
Frequency separation splits your image into texture and color parts. You can smooth color gradients without affecting detail.
Create high and low frequency layers. Use Gaussian Blur on the low frequency layer to smooth banding. The high frequency layer keeps all detail. When combined, you get smooth gradients with sharp details.
Smart Sharpening
After fixing banding, strategic sharpening restores detail without bringing back banding. Use Smart Sharpen with small radius at 0.5-1.0 pixels.
Target sharpening to high-contrast edges using blend modes or masks. This adds sharpness to important details while keeping gradients smooth.

Common Mistakes When Fixing Banding
Even experienced photographers make these errors. Avoiding them improves your results.
Too Much Noise
Adding excessive grain makes images look old or cheap. You want just enough randomization to break up patterns. Not a vintage film aesthetic.
Here are the key points to watch:
- Keep noise subtle at all viewing sizes
- Check at 100% zoom and normal viewing distance
- Step back frequently to check overall impact
- Test on different screens if possible
Excessive Blur
Heavy blur kills banding but destroys detail too. Your images look soft and muddy instead of natural.
Use minimum blur necessary. Confine it to problem areas only. Combine subtle blur with grain for better results. Layer masks are essential here.
Wrong Color Space
Working in sRGB during editing limits available colors. This can create banding where none existed before.
Always edit in wide color spaces. Convert to sRGB only for final web delivery. Extra color information prevents new banding during adjustments.
Skipping Test Prints
Screen appearance differs from prints. What looks fine on screen might show terrible banding when printed.
Print small test sections before large prints. Adjust corrections based on actual print results. Different printers and papers emphasize or hide banding differently.
Fixing Specific Types of Banding
Different situations need different approaches. Here’s how to handle common scenarios.
Sky Gradients
Sky banding appears in sunset and sunrise photos. The smooth color transition from bright to dark shows visible steps.
Start with subtle grain in Lightroom. Add a graduated filter across the sky with tiny exposure adjustments. If needed, use Photoshop’s Median filter at 2-3 pixels on the sky area only.
Studio Backgrounds
Smooth backdrop lighting can reveal banding in post-processing. This happens often with seamless paper or fabric backgrounds.
Use radial filters in Lightroom to create subtle vignettes. Apply noise specifically to the background area in Photoshop. Keep subject sharpness by masking the corrections carefully.
Portrait Skin
Skin tones sometimes band after heavy retouching. This looks unnatural and draws attention.
Use frequency separation to separate texture from color. Smooth the color layer gently without touching texture. Add minimal noise only to problem areas. Keep natural skin texture intact.
Workflow Tips for Banding-Free Images
Building prevention into your workflow saves time. Here’s how to structure your process.
Pre-Production Planning
Think about banding before you shoot. Large areas of smooth gradients need special attention.
Check your camera settings for RAW capture. Plan your lighting to minimize extreme contrast. Consider using physical filters for outdoor work.
During Editing
Make small adjustments instead of big ones. Multiple subtle changes work better than one dramatic slider move.
Follow this editing order for best results:
- Start with global adjustments first
- Use local corrections sparingly
- Add grain before heavy toning
- Save frequently in high bit depth
- Check for banding at 100% zoom regularly
Final Output
Choose the right format for your final use. Web delivery needs different treatment than print.
For web output, apply gentle grain before resizing. Enable dithering during save. For print, work with the lab to test samples. Different printers handle gradients differently.
Tools and Resources
Good tools make fixing color banding easier. Here are some helpful resources.
Software Options
Lightroom and Photoshop are standard for a reason. They have proven tools for fixing banding. But other options exist too.
Editing software like Capture One handles gradients well. ON1 Photo RAW includes grain tools. Affinity Photo offers cheaper alternatives with similar capabilities.

Monitor Calibration
Accurate color starts with a calibrated monitor. Don’t trust factory settings.
Hardware calibrators from Datacolor or X-Rite produce accurate results. Calibrate monthly for consistent color. According to Cambridge in Colour, calibration is essential for serious work.
Learning Resources
Understanding color theory helps prevent banding. Knowing how digital images work makes you better at fixing problems.
Study bit depth and color spaces. Learn about compression and file formats. Practice with test images before working on important shots.
Mastering How to Fix Color Banding in Your Images
You now have complete tools to fix color banding. From Lightroom’s grain to Photoshop’s frequency separation, these techniques handle mild to severe cases.
Remember prevention beats correction. Shoot RAW, expose carefully, edit conservatively. When banding appears, start simple with grain before moving to complex techniques.
Your images deserve smooth, professional gradients. With practice, you’ll spot banding instantly. You’ll know exactly which technique eliminates it while keeping quality. Understanding causes and applying the right fix matters most.
See more from DIYPhotography.net on Google
Add DIYPhotography.net as a trusted source. This makes
our stories more likely to appear in your Google Search results.
 Add as a preferred source on Google

Darlene Lleno
Darlene Lleno brings a unique perspective to DIY Photography as someone who grew up surrounded by camera gear but chose words over lenses. With five years of writing experience, she specializes in photography content that’s both technically informed and genuinely passionate. Growing up with a photographer twin brother meant camera talk was everyday conversation in her household. While he mastered capturing moments, Darlene discovered she preferred being the subject and the storyteller behind the scenes. As a travel enthusiast and mother of two, she understands the importance of preserving life’s precious moments. When not exploring new destinations or writing for DIY Photography, you’ll find her reading or tending to her garden. Her approach to photography writing is refreshingly authentic, she may not be behind the camera, but she knows exactly what it takes to help others capture the shots that matter most.



Join the Discussion
DIYP Comment Policy
Be nice, be on-topic, no personal information or flames.