


The “Edelclone” is a 4-axis DIY camera slider that used to be a 3D printer and you can make one, too
Aug 19, 2022
John Aldred
John Aldred is a photographer with over 25 years of experience in the portrait and commercial worlds. He is based in Scotland and has been an early adopter – and occasional beta tester – of almost every digital imaging technology in that time. As well as his creative visual work, John uses 3D printing, electronics and programming to create his own photography and filmmaking tools and consults for a number of brands across the industry.
Share:

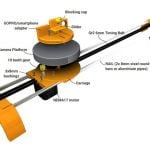
Some of you might remember DSLR DIY CNC from last year’s post about those neat 3D printed custom lens caps. This have been pretty quiet from the since, but now they’re back and sticking to the “CNC” part of their name with a new motorised 4-axis camera slider. Four axes because one runs along the slider, two are the pan and tilt with the fourth being focus control, so you can track subjects during your move.
While there isn’t yet a complete YouTube video to go along with the build, dslrdiy (as he’s known on Instructables) has posted a teaser. He’s also posted written instructions, along with downloads for all of the code, Marlin configuration files, STL files, and instructions on how to build and customise it to your liking on Instructables.
Dslrdiy cannibalised parts from old 3D printers in order to bring his slider to life. It reuses the stepper motors, controller board, 2020 aluminium extrusion, steel rods and various other things typically found on many FDM 3D printers. If you don’t have an old 3D printer lying around that you can cannibalise, you can of course just go and buy the components. There are a few other things you’ll need to buy anyway and he has posted a list.
Slider parts:
- 3 or 4 Stepper motors the bigger the stronger.
- Controller board of the 3d printer
- 2020 Aluminum Extrusions
- Right Angle Plate
- 8mm Shaft Bearings
- 8mm Shaft Supports
- GT2 20 tooth pulleys and GT2 60 tooth pulleys
- V-slot M8x10 screw set
- 8mm Steel rod
- 16 – M3 screws
- Camera L bracket
- 2 Camera long quick release plate
Remote Controller Parts:
- ESP32 Microcontroller
- 0.96″ OLED Display
- Mini Joystick Module
- Logic Voltage adapter Board
- Arduino Buzzer Module
- 2-M3 Screws
Tools:
- Metal Saw
- Drill with 5mm or 13/64″ bit
- Set of Allen Keys
- 1/4 Tap screw set (optional)
- Tap Wrench (optional)
The total cost will depend on what you might have lying around already that you can reuse. It could be anywhere form a few bucks to a couple of hundred depending on how much you need and how fancy you want to get with it. Dslrdiy used an Arduino Mega with a Ramps board as his controller, but if you don’t already have a board you can reuse, check out the SKR boards from BigTreeTech – it’ll probably work out cheaper than the Arduino/Ramps combo and they’re 32-Bit, which should result in smoother motion at higher speeds.
The controller board runs Marlin, which is the default go-to firmware for most 3D printers, although as it’s not being used for a 3D printer, it requires some configuration tweaks. Configuration files have been provided for the Arduino/Ramps combo, but the final section of those configuration files shows the things you’d need to change for other boards – and he lists some specific things on the Instructables page for the SKR Mini E3 V2.0 (although, personally, I’d avoid boards that won’t let you swap out the stepper drivers).
Because it uses an ESP32, which features built-in Bluetooth, the slider can also take advantage of Bluetooth control from your smartphone. He hasn’t designed a custom app for it, but he uses the Serial Bluetooth Terminal app to connect to his “Edelclone” (yup, that’s what he called it). As well as Bluetooth control, it also has controls and an OLED display built in, too.
The resulting footage in the demo video at the top is pretty awesome. Repeatable computer controlled moves mean you can make exactly the same shot over and over and over again, allowing for all kinds of cool composites and other creative effects in post. I’m looking forward to seeing the final video when it’s ready, but for now, head on over to Instructables to read the written version.

John Aldred
John Aldred is a photographer with over 25 years of experience in the portrait and commercial worlds. He is based in Scotland and has been an early adopter – and occasional beta tester – of almost every digital imaging technology in that time. As well as his creative visual work, John uses 3D printing, electronics and programming to create his own photography and filmmaking tools and consults for a number of brands across the industry.

Join the Discussion
DIYP Comment Policy
Be nice, be on-topic, no personal information or flames.