


The 5 Minutes, 5 Dollars Monitor Hood
Dec 20, 2015
Udi Tirosh
Udi Tirosh is an entrepreneur, photography inventor, journalist, educator, and writer based in Israel. With over 25 years of experience in the photo-video industry, Udi has built and sold several photography-related brands. Udi has a double degree in mass media communications and computer science.
Share:

When you edit, and especially when you colorize, you want to do it in a relatively dim environment. And if you cannot achieve that, you at least don’t want any direct light falling on your monitor. That can really screw up the color your eyes perceive. If you are using a calibration tool like Datacolor’s Spyder (reviewed here) it will notify you when there is too much light hitting your monitor.
But even if you don’t have a tool for that, it is always better to work with a hooded monitor. Hoods for 21 inch screens run for about $30–$35, which is fairly reasonable, but I could not get one locally and did not want to wait. So here is how I made my $5 hood in 5 minutes flat.
Materials & Tools
- Black corrugated board – This one is $12 on amazon, but your local art store should have one for $2-3.
- Sticky-Back Velcro – both the Velcro and the board should last for 2-3 hoods so spoil your friends
- Tape (optional)
- Sharp Knife or Scissors
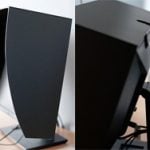
Step 1 – measure

You need to take two sizes, the width and the height of the monitor, marked here A and B.
Step 2 – mark and cut


You want to draw a trapezoid shape on the corrugated board. The width of the top part should match the width of the monitor. The Width of the bottom part should match the width of the monitor + twice its height. The height of the trapezoid is up to you, the higher it will be, the deeper your shade will be.
Once cut, bend the board around the middle rectangle
If you don’t have enough material, break the trapezoid into one rectangle and two triangles and tape them using the tape.
Step 3 – Add Velcro

Now tape the Velcro on the long side of the trapezoid. For each part you would want to apply at least three small strips; one at each corner and one in the middle. If you monitor is exceptionally long or high, use four pieces. When you cut and tape the Velcro, do not separate the hook and loop sides.
Now pill off the back of the Velcro pieces you placed on the board, and place the board on the monitor. The other side of the Velcro strip will stick the sides of the monitor.
Step 4 – Enjoy
This entire build took me around 25 minutes, including the ride to the art store. It is not optimal, but definitely not too shabby either.


Udi Tirosh
Udi Tirosh is an entrepreneur, photography inventor, journalist, educator, and writer based in Israel. With over 25 years of experience in the photo-video industry, Udi has built and sold several photography-related brands. Udi has a double degree in mass media communications and computer science.


Join the Discussion
DIYP Comment Policy
Be nice, be on-topic, no personal information or flames.
3 responses to “The 5 Minutes, 5 Dollars Monitor Hood”
Make it even better (no glare) and more durable by lining the inside with self-adhesive black felt. Also available at your DIY/Art store for about $8.00 per roll.
Nice post
It seems like the A’s and B’s are swapped between your two pictures?